


Wyatt Tuzo
-
Posts
709 -
Joined
-
Last visited
-
Days Won
6
Content Type
Forums
Gallery
Store
Posts posted by Wyatt Tuzo
-
-
Here is what worked for me filming in Northern Iceland a year or so back:
Firstly, NO COTTON (this means no jeans, no flannels, etc). This was impressed on me quite urgently by the locals. So much so, that I had to go out and replace half of what I had packed.
Feet:
Silk or poly liners, followed by wool socks (or electric socks *which I'd only turn on to their lowest setting half-way through the day, as not to get so warm that I would sweat), followed by suede sneakers, followed by insulated Neo's overshoes with gaiters (then often followed by crampons on account of the ice). I liked this configuration as I could go down to the sneakers if commuting or going indoors for a bit, without concern of overheating.
Legs:
100% wool thermal bottoms (bought locally...not cheap, but worth every penny), followed by poly blend heave yoga pants/sweats, followed by a fully waterproof shell. Note that Goretex isn't fully waterproof and won't cut it in these conditions, IME.
Torso:
100% wool thermal top, followed by fleece, followed by electric vest, followed by heavy down-filled parka
Neck/Head:
Balaclava or neck gaiter, winter hat of your choosing, occasionally ski goggles for when the wind would pick up (or just to knock down the reflection off the snow/ice).
Again. No cotton. If it gets wet, it stays wet, then it gets cold, then you get cold (very cold) and you have big problems. Water is the enemy. Wool and synthetic materials are your friends. I never had a single issue with gear
-
I don't have time for a long response at the moment, but don't forget about one of my favorite features of the SX-ST, the 12/24dB over unity switch. For scenes like you mention, I would frequently switch over to 24 and use this to push the quieter passages to the mix (gain at the fader) while allowing all the headroom needed for the louder passages in the ISO. I miss this feature an awful lot after moving to a control surface.
When I encounter this now, I mult the input to two separate channels and give each their own gain ranges... This gives me a similar effect, but across two faders. I track each of these two ISO's, so in a way, it can be even more flexible. As I'm using Axient, I don't have to worry about gain at the Tx stage
And RE your outputs... The Sonosax has an awful lot of internal headroom. If you're bumping up against (a lack of) output limiters, try to adjust gain staging to your busses. You can also dial the output bus masters down a bit and apply the appropriate amount of makeup gain at your recorder.
Hope this all makes sense. I will forever miss my Sonosax, but adapt or die, as they say
-
Agree with Patrick above ^^^
What kind of work are you doing? I generally cable to VTR via Canare A2V2. Sure there are other ways, but this is pretty foolproof and allows for sending playback return to Comteks (or even just for my own QC monitoring of playback.
-
6 hours ago, Martin Lonek said:
Hi Wyatt, I definitely agree fixing noise issues straight on set is still crucial. But it is also very helpful to try some of these plugins, to get an idea which noises are unbearable / still needed to fix and which don´t. I would use cleaned audio only for monitoring and mixdown purposes. I would never affect original iso tracks,for example, with artificially cleaned signal. I would be grateful to hear what added latency are you experiencing in real life using A 10 RACK and your axient ADX5D via dante. I will have a chance to first test it soon.
Oh, for that, sure! Sometimes, If I'm questioning an annoyance that I really can't do anything about, I'll open an instance of Rx to see ho well I could manage it, were I stuck with it in post. I do not, however treat anything for delivery (I'll make a note in my sound report, and maybe flag it in an email).
I do realize though, that there are many here doing different kinds of work than myself.
As far as latency with Axient/A10 racks/dante: I don't have any numbers for you. Honestly, I rarely worry about these things with the work I do. I remember many years back when there was a lot of talk about system latency of the Lectro and Zax gear... while certainly aware of these processing delays, I never truly felt an impact in practical use.
To your question on DAW integration on set:
There was one time, just back from the pandemic, where I was shooting a scene of someone addressing a large crowd from a concert stage... Because of social distancing considerations, we had to tile the crowd many times over. Because of this, our lead actor wasn't getting the energy he wanted from what was supposed to be a very large group. The best we could do to help, was to record several passes of crowd murmur and cheering, layer those with some canned crowd sound, and play them back through the FOH system while we shot his side of the coverage (and overs). I did this by hooking up my laptop, running Pro Tools, into my dante network- grabbing crowd reactions during all of the separate audience tiling passes (while simultaneously tracking into my main recorder for delivery). This made for a REALLY seamless way to grab performances on the fly for playback. It was really wonderful to have the tools to make a last minute pivot like this. It made us look like magicians 😄
-
On “movie sets”, our primary goal is, generally, to minimize the issues so that these tools aren’t needed.
Maybe I’m in the minority, but I feel that our tracks are scrubbed a bit too eagerly (and aggressively) these days.
I hear what you’re saying, but in my opinion, the logic is backwards. Fix it IRL > fix it with plugins (whether on location or in post)
-
1 hour ago, Philip Perkins said:
I'd be interested to know if any sound folks here working in drama or docs are using Axient (or other Shure) these days? Where I live it is all Lectro, Zax and a few Wisy, with the solo-shooters using low-end Senn G4 or the Blutooth stuff. I like Shure, but what with diffs in mic connectors etc it's hard to change horses.
I would guess that there are maybe 10 or so (myself included) narrative mixers here in NYC who are using Axient.
I had personally finished my transition to the platform a few months before the Nexus was announced. Fully expecting I would experience some buyers remorse, a few colleagues and I took SD demo stock out to run tests against my setup. Both systems sounded great, but I personally have to give the edge to Shure in terms of range and remote control. Obviously, external conditions are always a factor, so I wouldn't feel comfortable making any hard declarations. Suffice it to say, I left feeling assured that I had made a good choice for my own needs.
The thing that I find enticing about the SD platform is the potential for further development. We've seen this just recently with the extension of the system down into the VHF range. I believe they'll continue to refine their system leading to improved performance and an increase in features. My Shure hardware, on the other hand, is probably locked into it's current feature-set. I'm okay with that (because it's a rich and high performing feature-set), but maybe there will come a time down the road when I look into the SD offerings again... I dunno
-
12 hours ago, Derek H said:
Olle, you’re correct I see what Wyatt was talking about in the 2nd article from the protools expert site. My comment was in reference to just the original article being discussed here which glosses over production a bit if you ask me.
Sorry for the confusion, Derek. I was referring to the second posted article (the one from protoolsexpert). I feel the author did a really good job pointing to all the contributing facets of the problem. Maybe the strongest (or at least most through) I've seen on the topic.
An small excerpt, acknowledging our side:
Pre-existing Knowledge - Those Involved In The Production All Know What Is Being Said
Another big issue at play as to whether a particular line is intelligible or not, is that everyone involved in the production knows what is being said, they have lived with it through pre-production, script editing, shooting, and post-production. This means they probably know the script as well as the actors, if not better!
What this familiarity with the script means is that they can hear the words even when they are not clearly intelligible. For example, this can happen when the drama is being shot, the director knows what is being said, and even if the sound team asks for a retake it is likely to be received with a hard stare and "I can hear it what's your problem"! When we get to the dub when the director comes to sign off on a scene, again they know what is being said and so may well be asking for the FXs and/or music to be lifted to increase the sense of drama in the scene to a much higher level than they would if they were new to the production and hearing it for the first time.
Changes In Production Techniques - More Multi-camera, Less Use Of Boom Mics
Shooting a scene using more than one camera means that your use of a boom mic is compromised at best, as at least one of the cameras tends to be a wild-shot, meaning the boom mic cannot get in close enough to pick up a clean sound. Consequently location sound teams end up relying on the use of personal radio mics. As we learned in our article Speech Intelligibility - The Facts That Affect How We Hear Dialog the spectrum of speech recorded on the chest of a person normally lacks frequencies in the important range of 2-4 kHz, where the constants are, which results in reduced speech intelligibility.
In fact in this article, we also learnt that just over the head, where the boom mic would normally be, is a great position for getting the best speech intelligibility. All of this means that the growth of multi-camera shoots results in a double-whammy, we lose the use of a boom mic and replace it with personal radio mics often in the chest area, which don’t pick up the consonants as well as the boom mic and as we learnt, speech intelligibility is all about the constants.
-
9 hours ago, Derek H said:
No disrespect to the subjects in the article but I think the majority of the issue starts on set.
The actors whisper and the directors think you’re joking if you suggest they speak up. Debilitating useage of multiple cameras on set. Poorly managed LED lighting setups that make boom coverage almost impossible. Sets that sound like crap. The false confidence of ‘everyone’s wired’.
If you ask me.. the problem gets a big head start in production.
I actually felt this article, while true that it was written by someone with more experience in post, was quite thorough. The author spends a good deal of time highlighting the very issues listed above.
He specifically discusses the boom mic’s ability to more faithfully capture frequencies in the range critical to intelligibility, and how it’s use has been compromised by the proliferation of body mics, multi-cam shoots, and lighting choices.
Also of note, the phenomenon of directors not heeding our advice, borne of their familiarity with the script. This is a point that I’ve personally had to make numerous times on set. -
8 hours ago, Fred Salles said:
Thanks, I really like the idea that the short SMA to BNC cable is also used for bag work for the bowtie. But with the female/female BNC socket you have a total of 4 connections par cable along the way. That is a lot if you need to troubleshoot RF issues. Although the Neutrik socket is very unlikely to have issue appart from dirt and oxidation.
I will probably try that setup, thanks.
Afterthought remark: Neutrik does not do any 50ohm socket. Do you use the 75ohm ones?
Amphenol makes 50-ohm panel mount sockets, if it helps. These are what I've built into my patch bays.:
https://www.amphenolrf.com/031-3220.html
or:
https://www.amphenolrf.com/000-47025.html
-
Just, just did this.
I agree that you’re going to want the base station in the hero car.
In my case, we ended up switching to a tow rig on the day. I rode on the back of that, took PB into my recorder, and transmitted via UH/411 to my base station in the car. I was prepared to do the same from a command van, but again… last minute change, as they wanted a frontal 2-shot.
I’m rambling a bit here, but bear in mind that if the performer is singing along to a known song, you can also have a speaker playing at a reasonable level in the vehicle. They are going to have to cut around the song anyway, and this will just worldize the track a bit.
For car to car, I generally try to get my Tx high in the hero vehicle, and rig my antennas to the top of the follow vehicle. With an ultimate arm, you may not have that luxury. Are you sure they dont plan to shoot conventional coverage as well? -
Thanks Patrick. I remember when you and I first opened one of these up to assess a plan of attack for this.
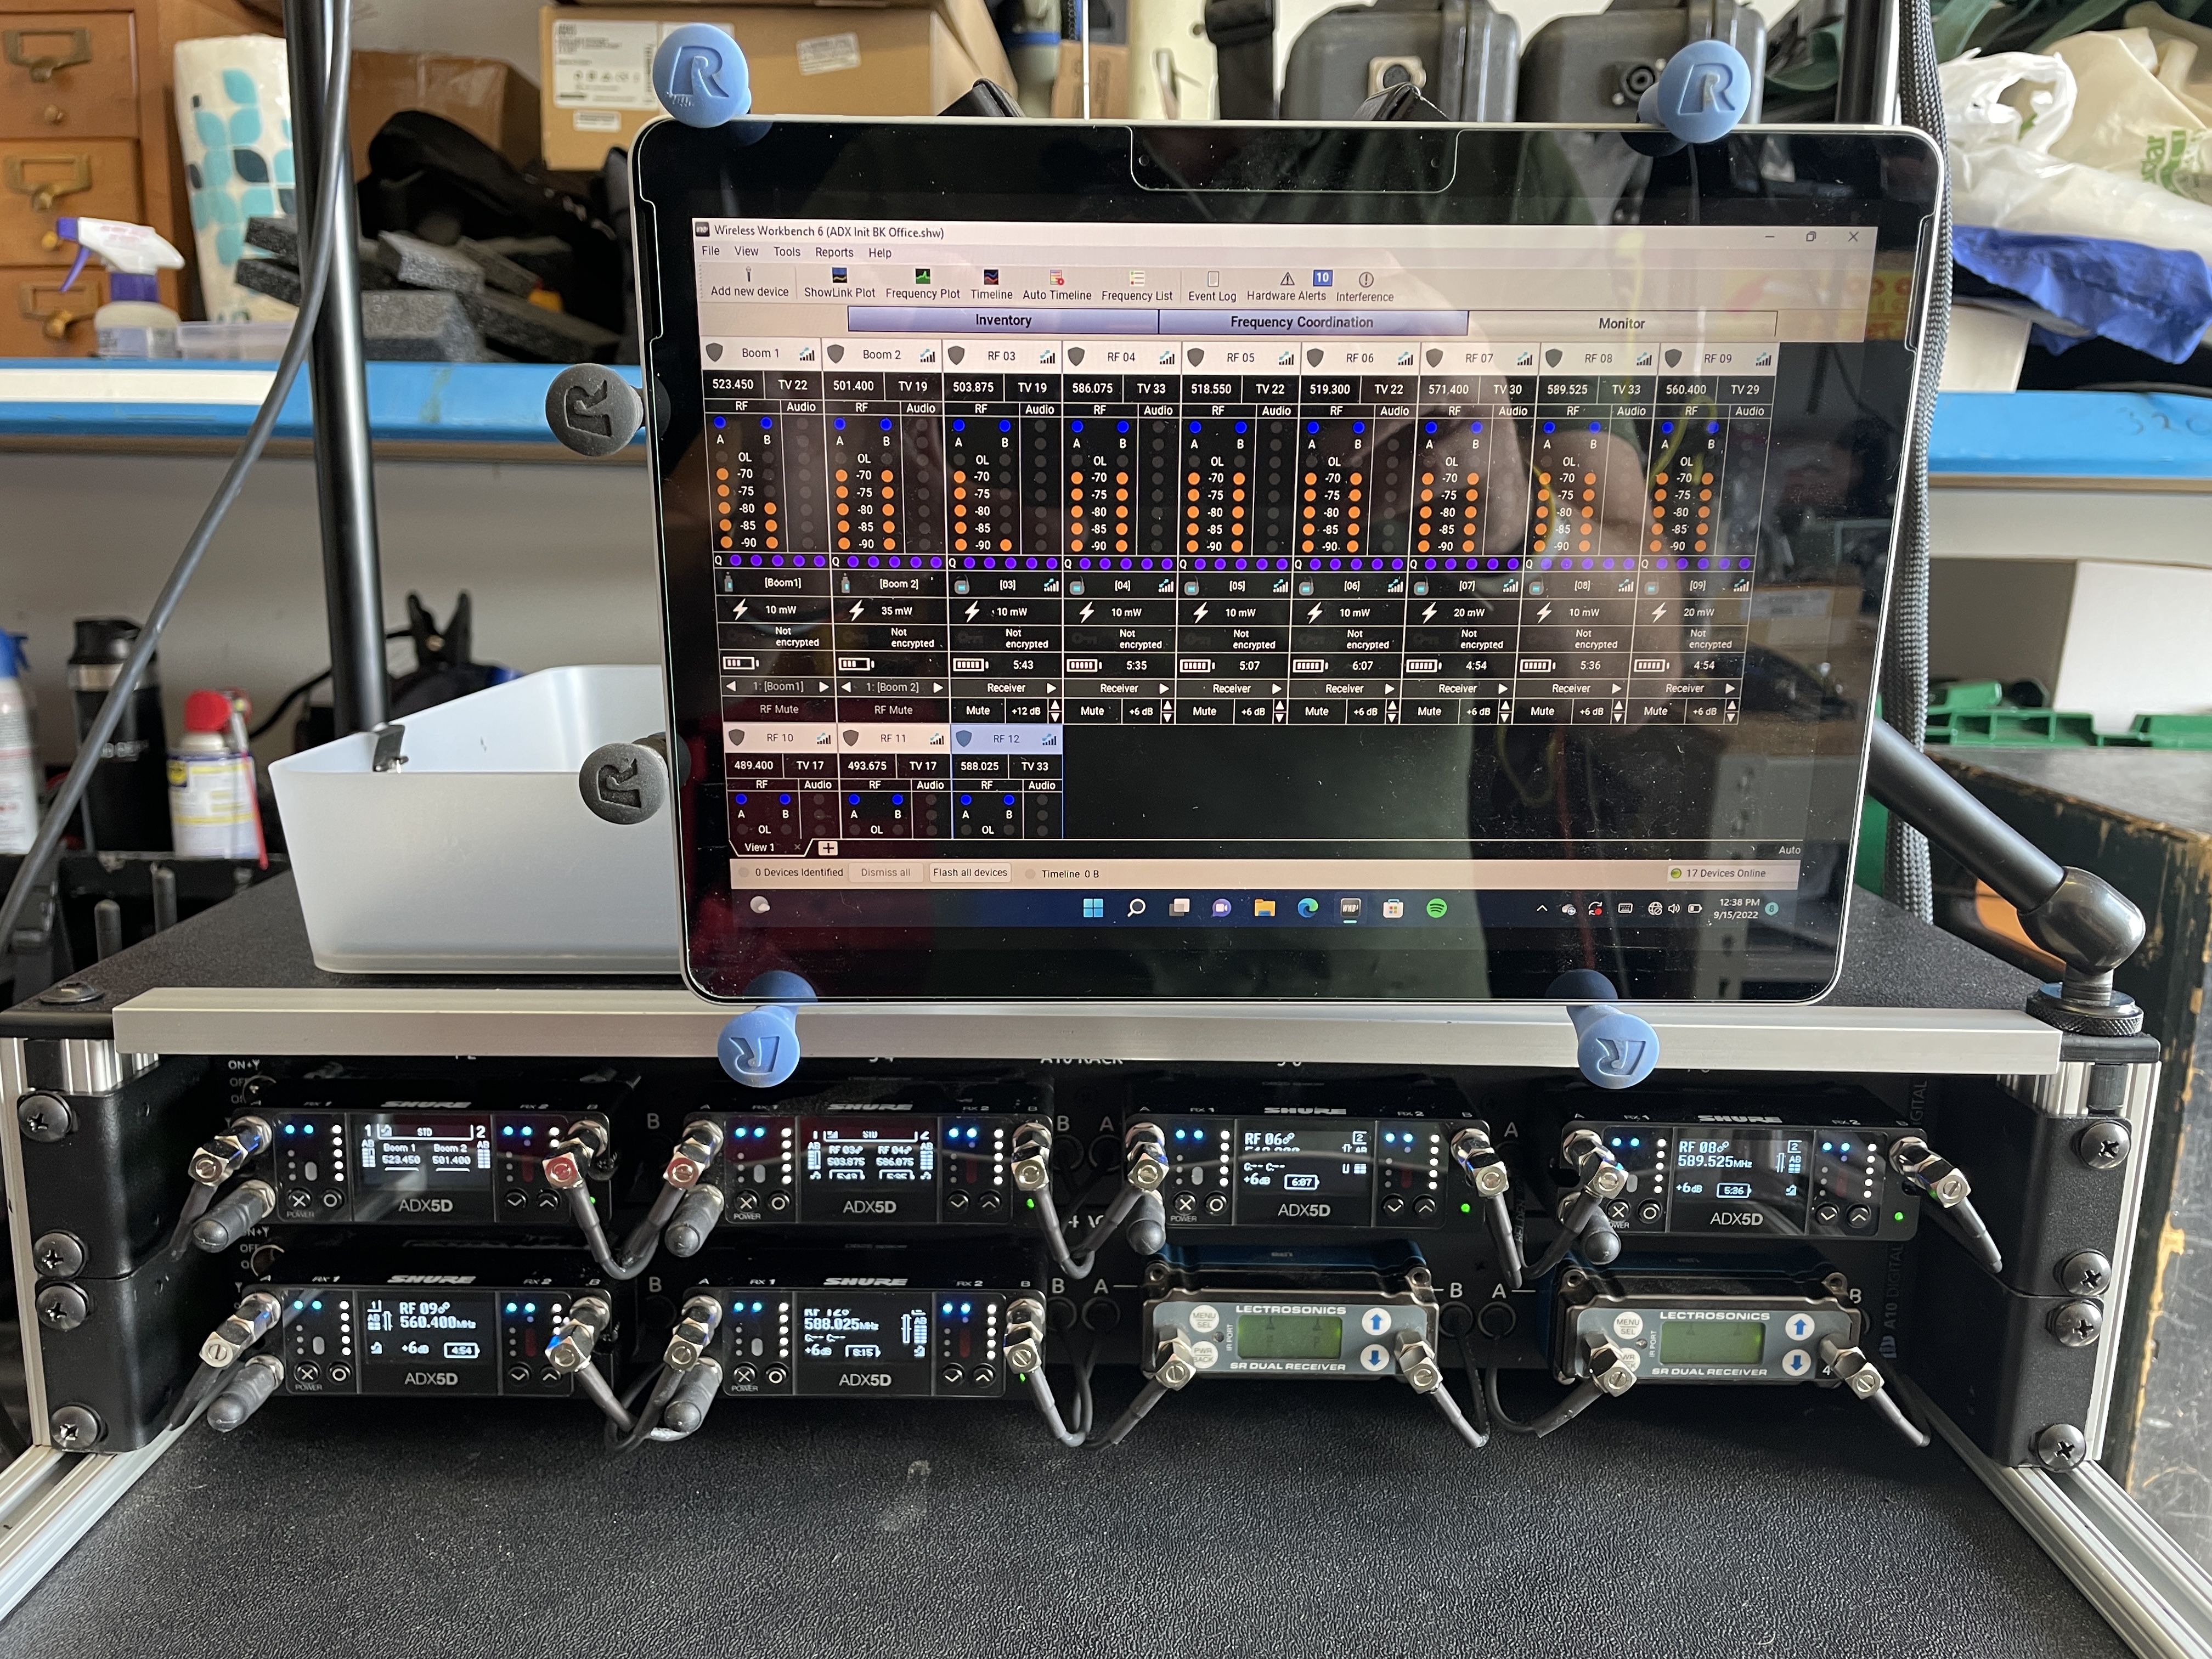
While you’re right on the drawback of not quite having the control in one convenient place, my tablet will generally be positioned in front of the Rx rack, giving me even more complete control and feedback. That said, there are more potential points of failure.
In the pros column, I get: modularity, a more shallow and lighter rack, and greater channel density/rack
Cons: more potential points of failure, and less integrated networking capabilities.
An example on the last point… in order to use showlink to control all of this, I have a wifi access point and separate PoE injector built into my cart. One nice aspect of this, is that either myself or my Utility can have access to settings through WWB and/or Channels on our individual devices. A downside, is that I have to keep a 610 in range of my cart or I lose showlink connection to the Rx. There is a slim possibility that this will drive me to get an additional 610 to position close to set for Tx control in the future. This will iron itself out with time.
-
Long delay here, but I finally got some downtime and was able to integrate everything. All is working well, and as hoped.
Racks are communicating over Dante, with Showlink intact.

-
16 hours ago, Doc Justice said:
I think you’ll find a lot of the answers to your questions in this live stream I did with Allen Williams.
Preorders begin on Tuesday.
Thank you. I think I got the answer I was looking for around the 20min mark (if anyone else is wondering)
-
Just curious, is there anywhere we can see an image or video of this, in an ear, from the side?
It feels like the earpiece may stand a bit proud for my needs, but I’m only guessing -
18 hours ago, Martin Lonek said:
You're very welcome, Martin!
One thing I've been hoping to follow up on... after the conversation with Vin above, I decided to try snipping the SMA's off of my second mod and the traces flew right off. This is really a job for a focused hot-air rework station. The ground pads are extremely weak on this board. Fair warning.
In other news, I was thinking of machining notch for the db25 risers for the 1st position receivers, but decided to 3d print some instead. I'd be happy to share the file, if anyone needs, but know that I am no expert in 3d rendering
-
I had a very, very similar need on a show last year. Fortunately, I didn't have the added headache of the Roger shortcomings.
One day, we'll trade war stories.
-
On 1/24/2022 at 1:13 AM, Vinod Subramanian said:
wonderful...
Apropos getting those SMA connectors off - imho the best way is to use a clipper and cut off the legs soldered to the board. and then desoldering those pieces of metal off the board one by one becomes very easy.
cheers,
-vin
Good angle, Vin. Maybe I'll give that a shot with my next one.
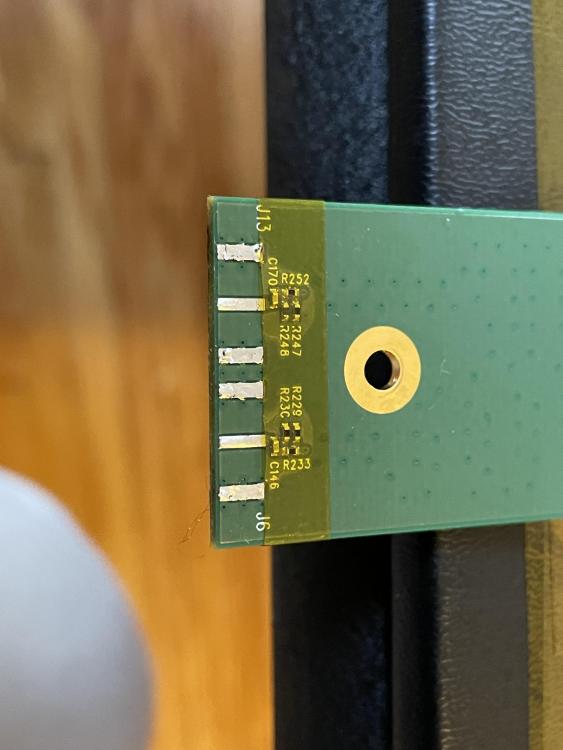
One thing that I didn't mention in my original post that is worth noting, is that the SMA connectors are soldered to both the top and bottom of the PCB, for a total of 5 connection points. This would leave hot air desoldering, your method, or a product called chip-quick (which reduces the melting point of solder in order to give you more work time) as options. The hot air is tricky without a microscope on account of the circuit near the SMA's, leaving the last two as the most practical to execute at home
-
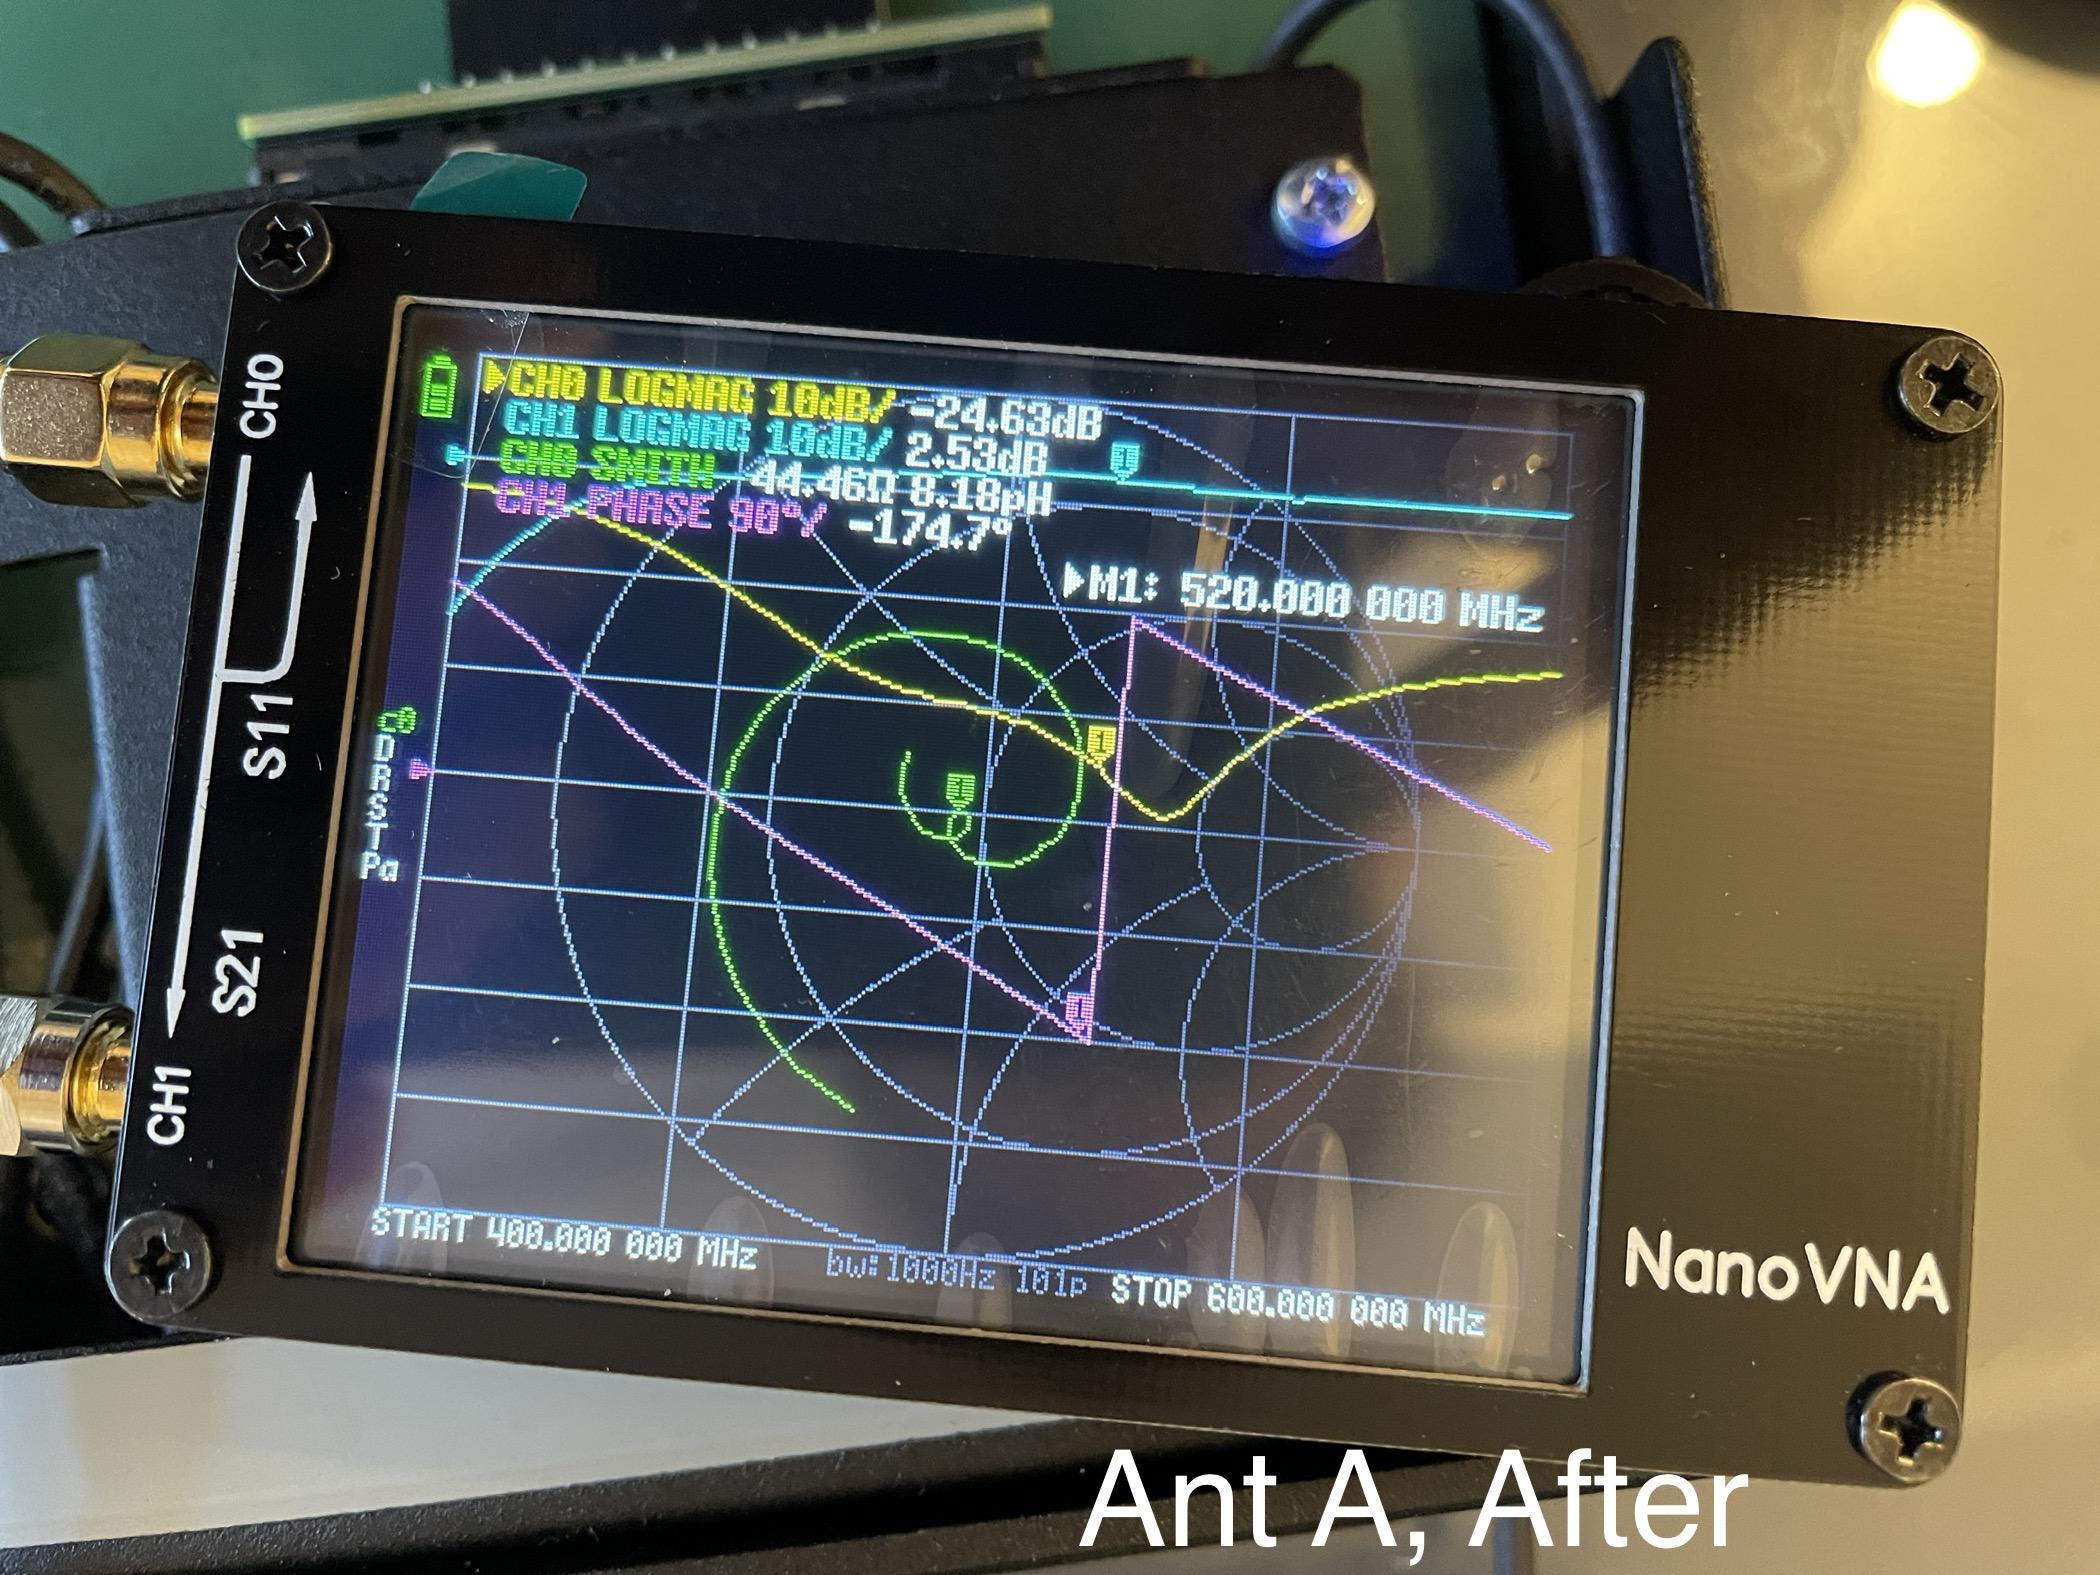
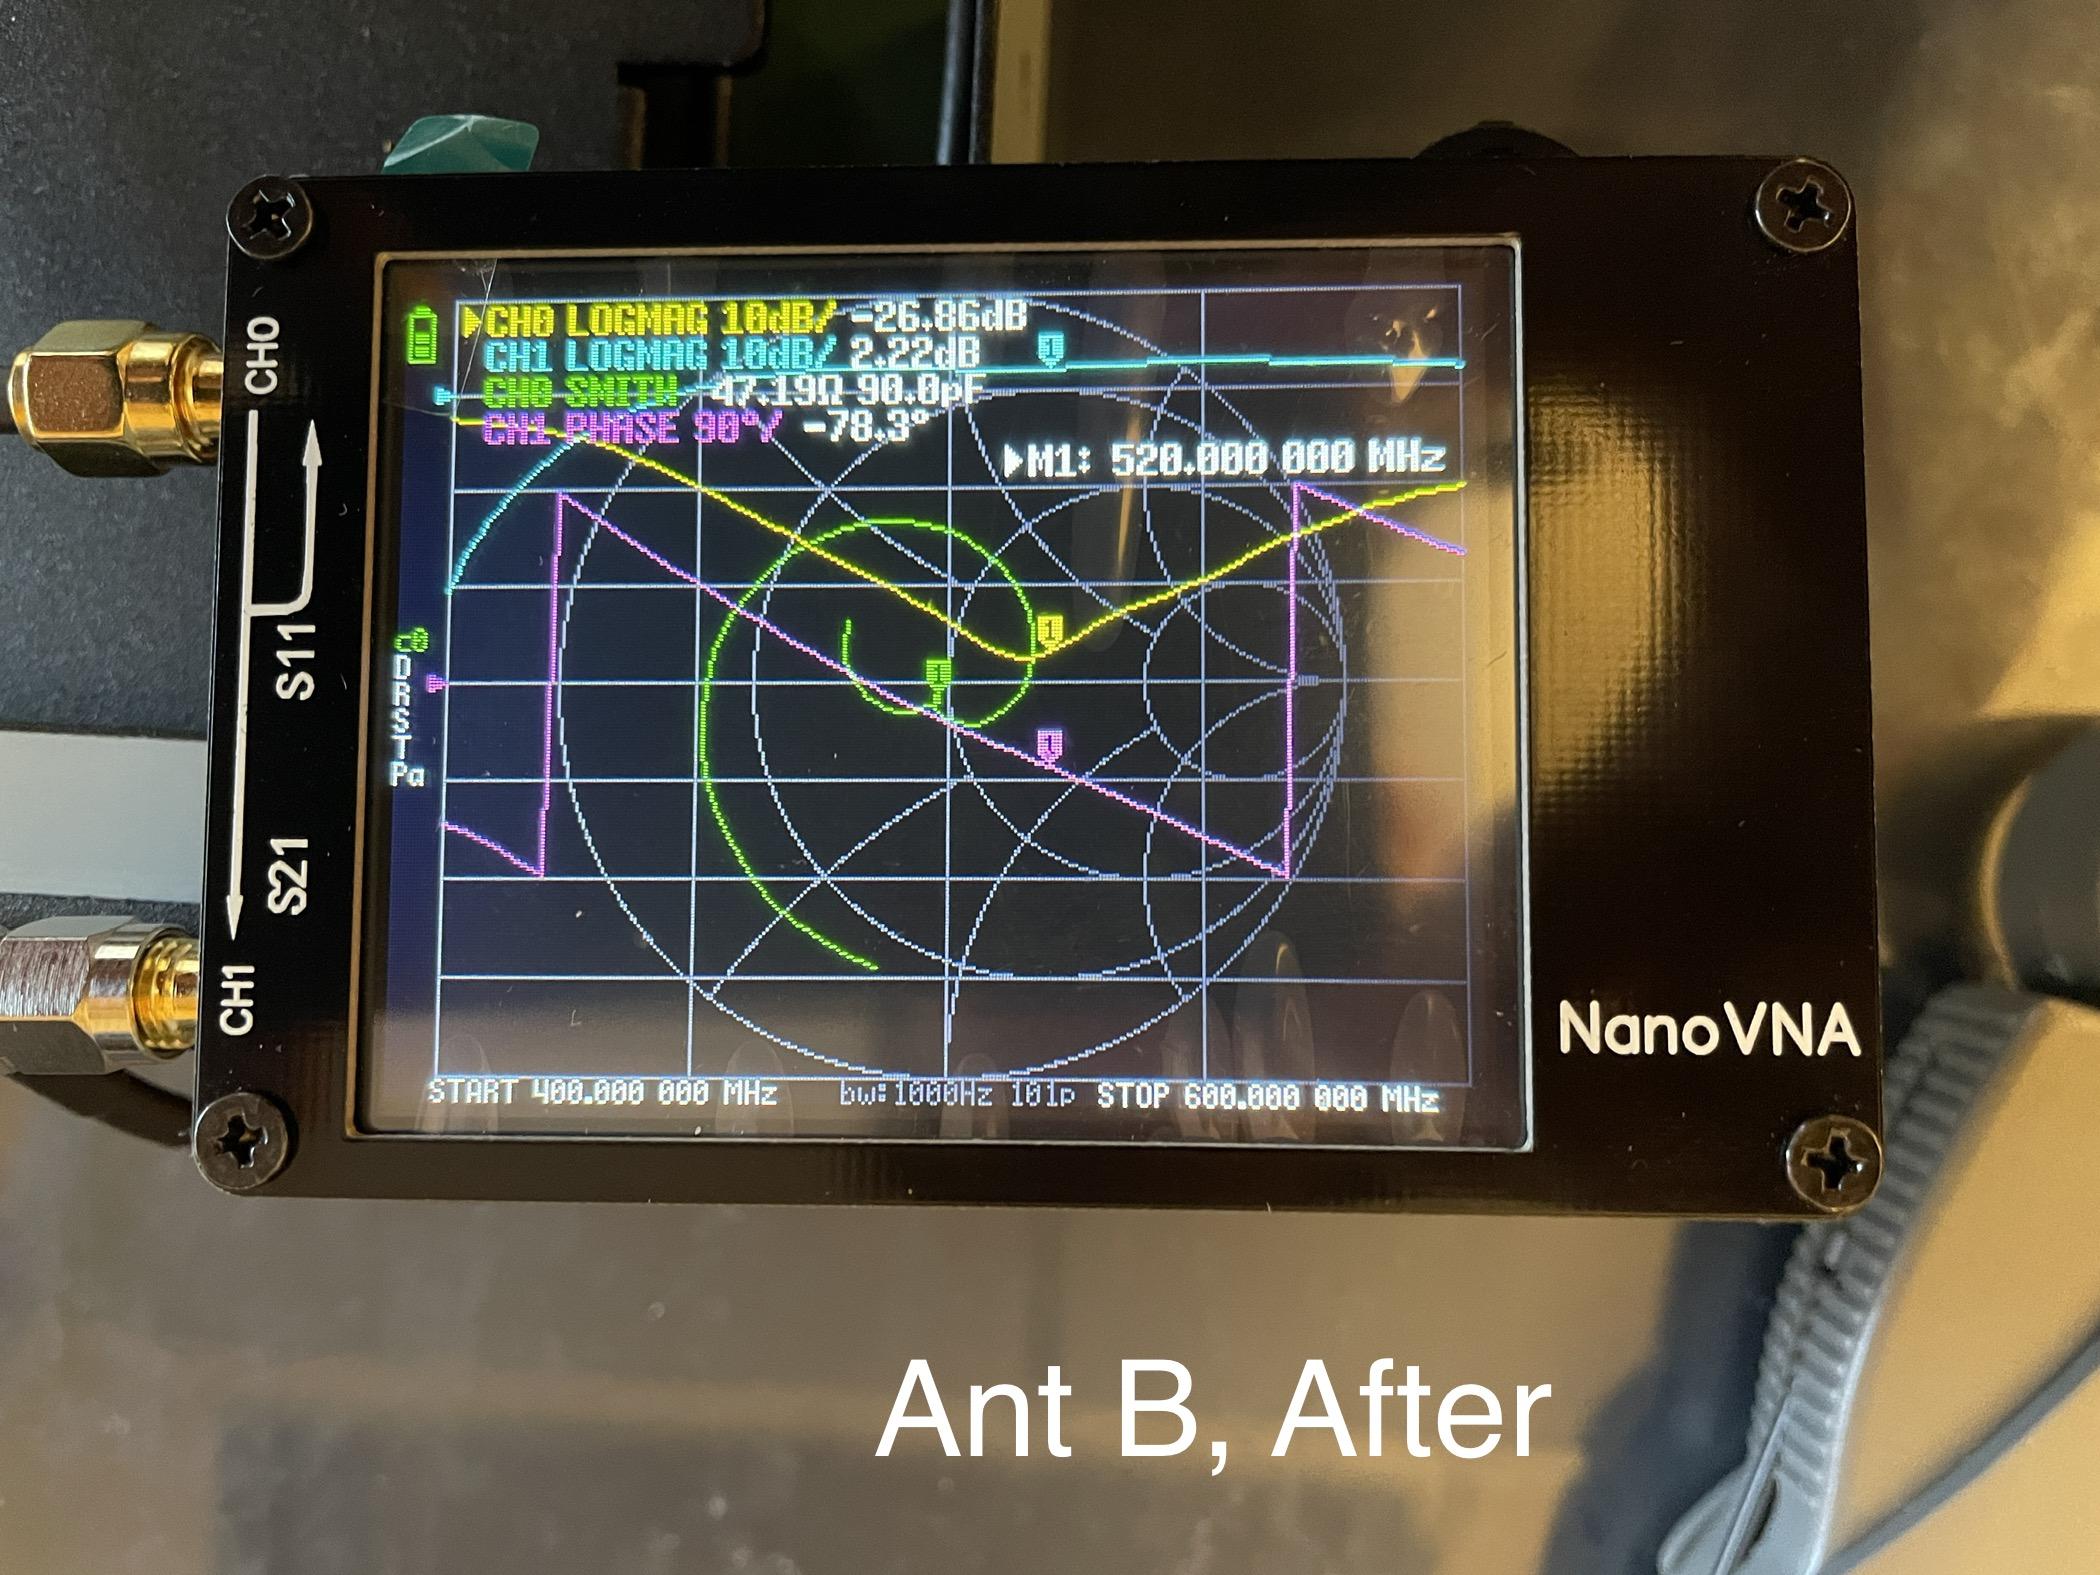
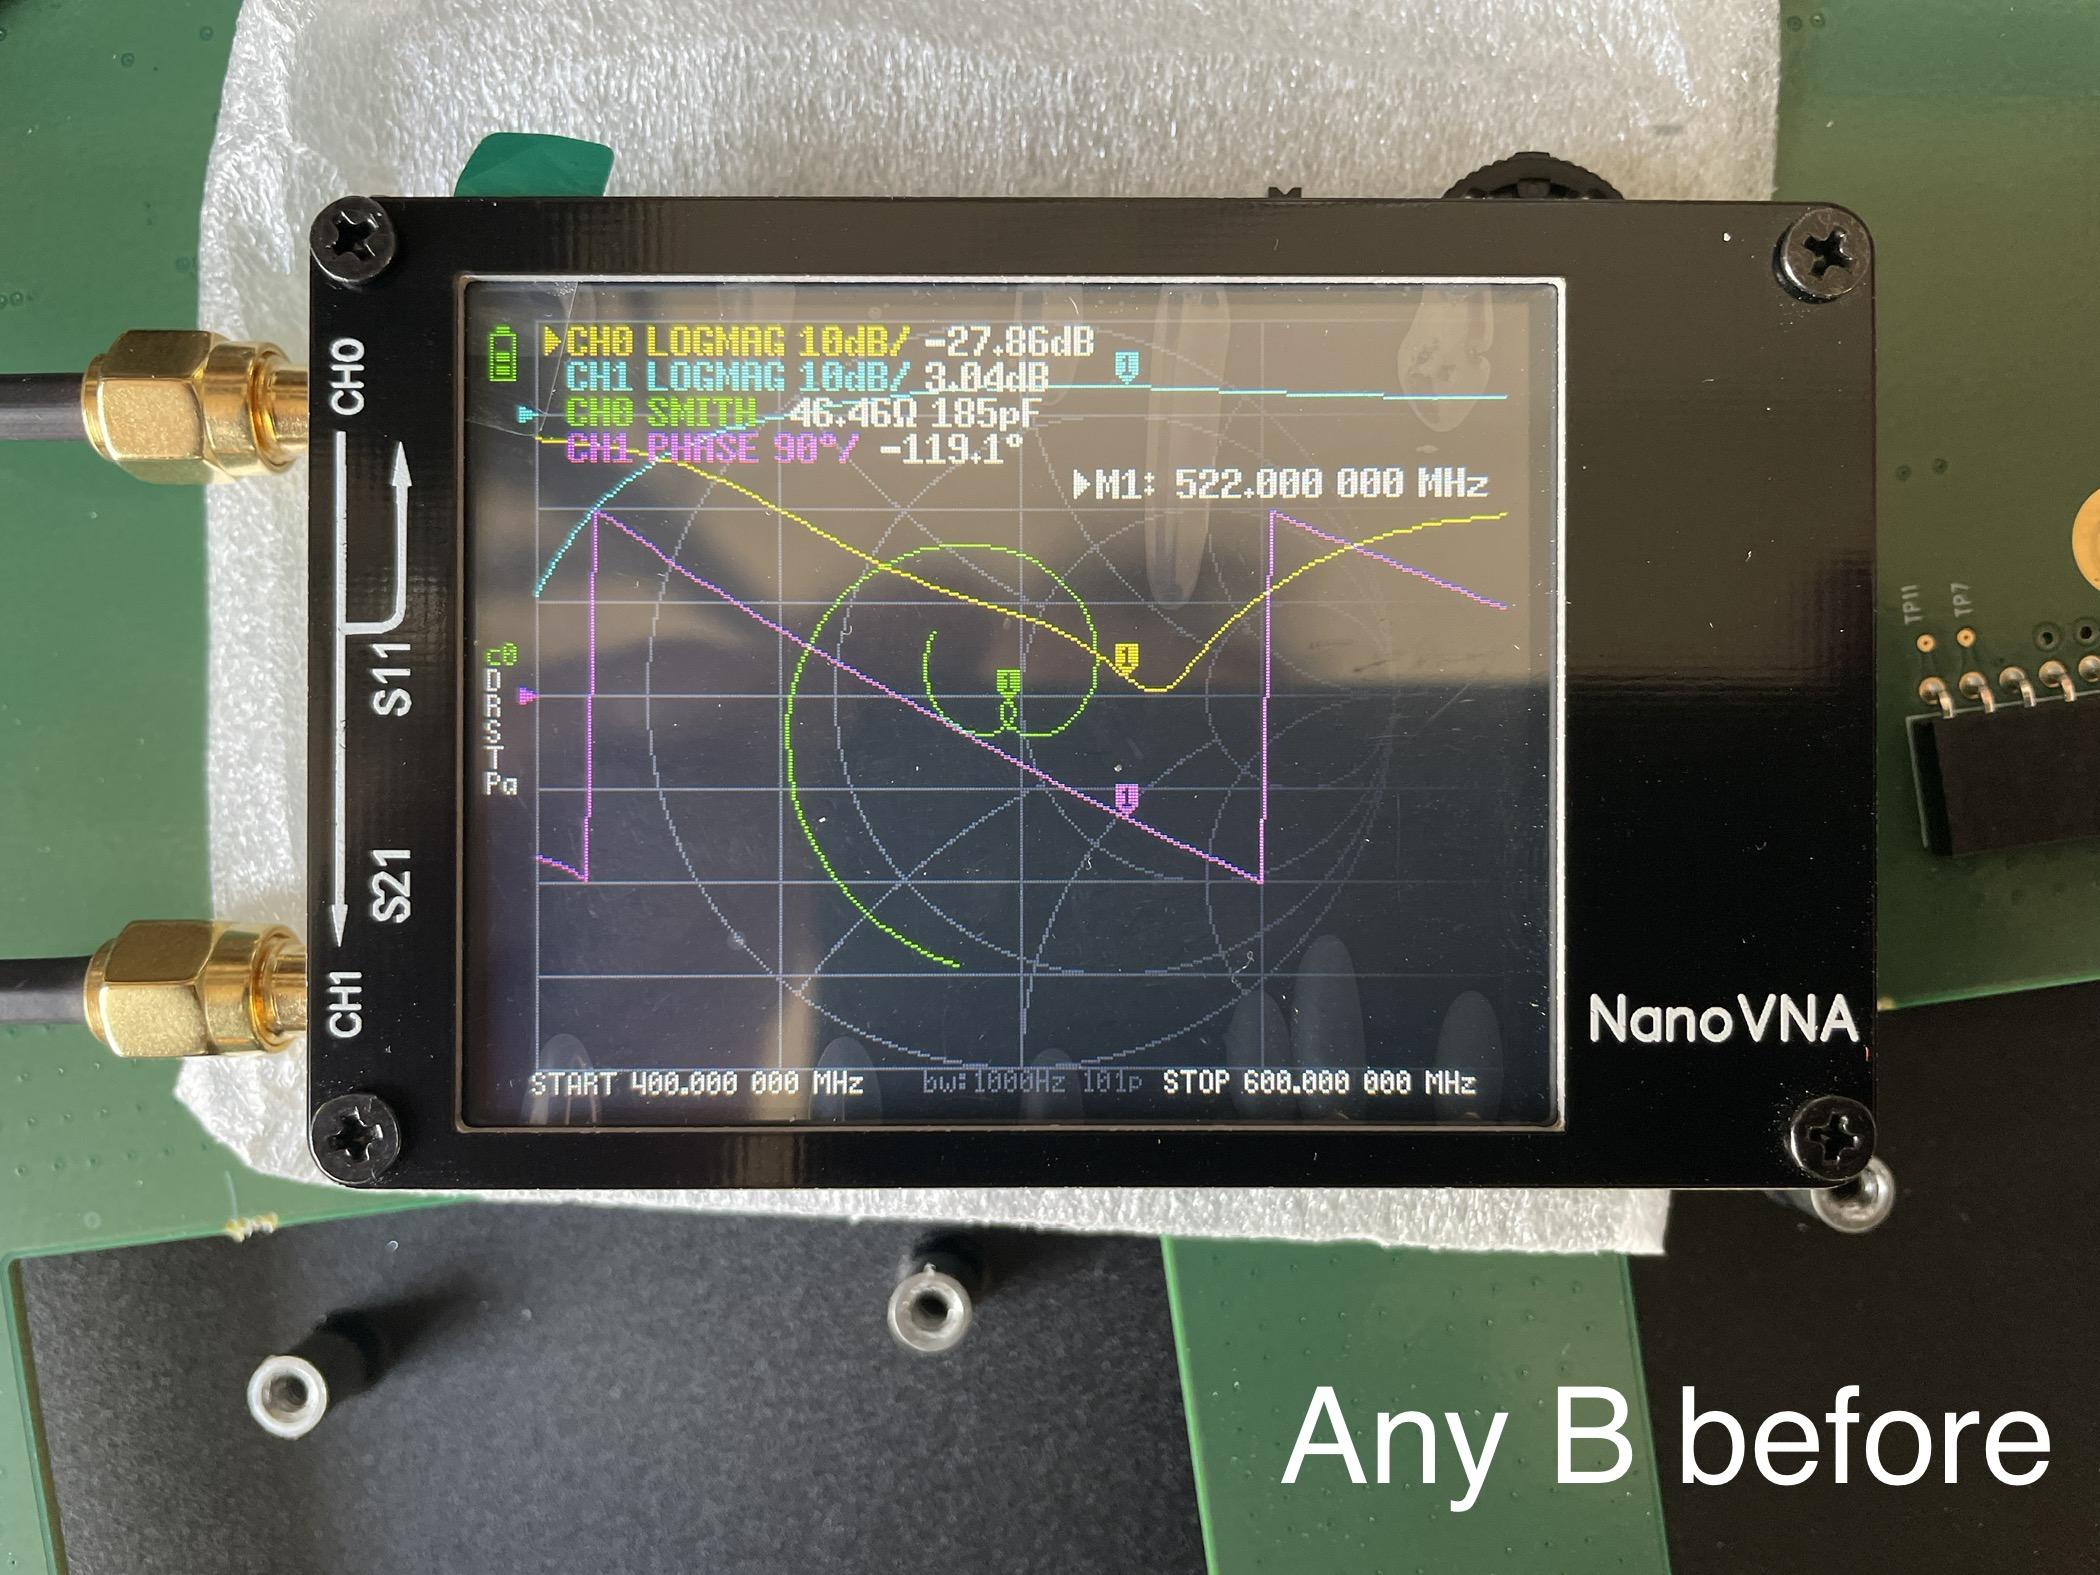
Step 6: Finishing/testing
Time to measure again! Two things to note: I realize that the curser here is at 520 Mhz, and not 522 as above, but this is good enough to give me a picture and tell me that everything is working as expected. Also, I think the the greater difference in Ant. B from the before may point to something being off in my before measurement . I feel like it's more likely that the two antennas legs were not measuring off by a full dB from the factory, and that the after is probably more indicative of what to expect from the unit. So, I'm happy with this:


Note the Excess cable that I left inside the unit. I did this for a few reasons: it allowed me to work more comfortably, I didn't have to be quite as precious with my cable measurements, the slack takes any potential strain off the connection to the PCB, and if I ever have a problematic connection, I have extra cable that I can just pull through and re-terminate:
Viola!:

I haven't had a chance to pass audio yet, as I left all of my transmitters at my office, but a receiver tone-up is working as it should on all DANTE outputs.
I think this means I can move forward with finalizing my transition now (once ADX5D units become available again). My plan is to go through this process for a second A10, giving me 16 channels of Axient in 2u!
One more thing to mention: I'm going to have to mill a notch out of the DB25 riser for A10 position 1 in order to accommodate the power switch. Fortunately, the receiver will sit just above the switch bezel (as I'd like to keep the bezel to prevent accidental bumping)
Whew!
-
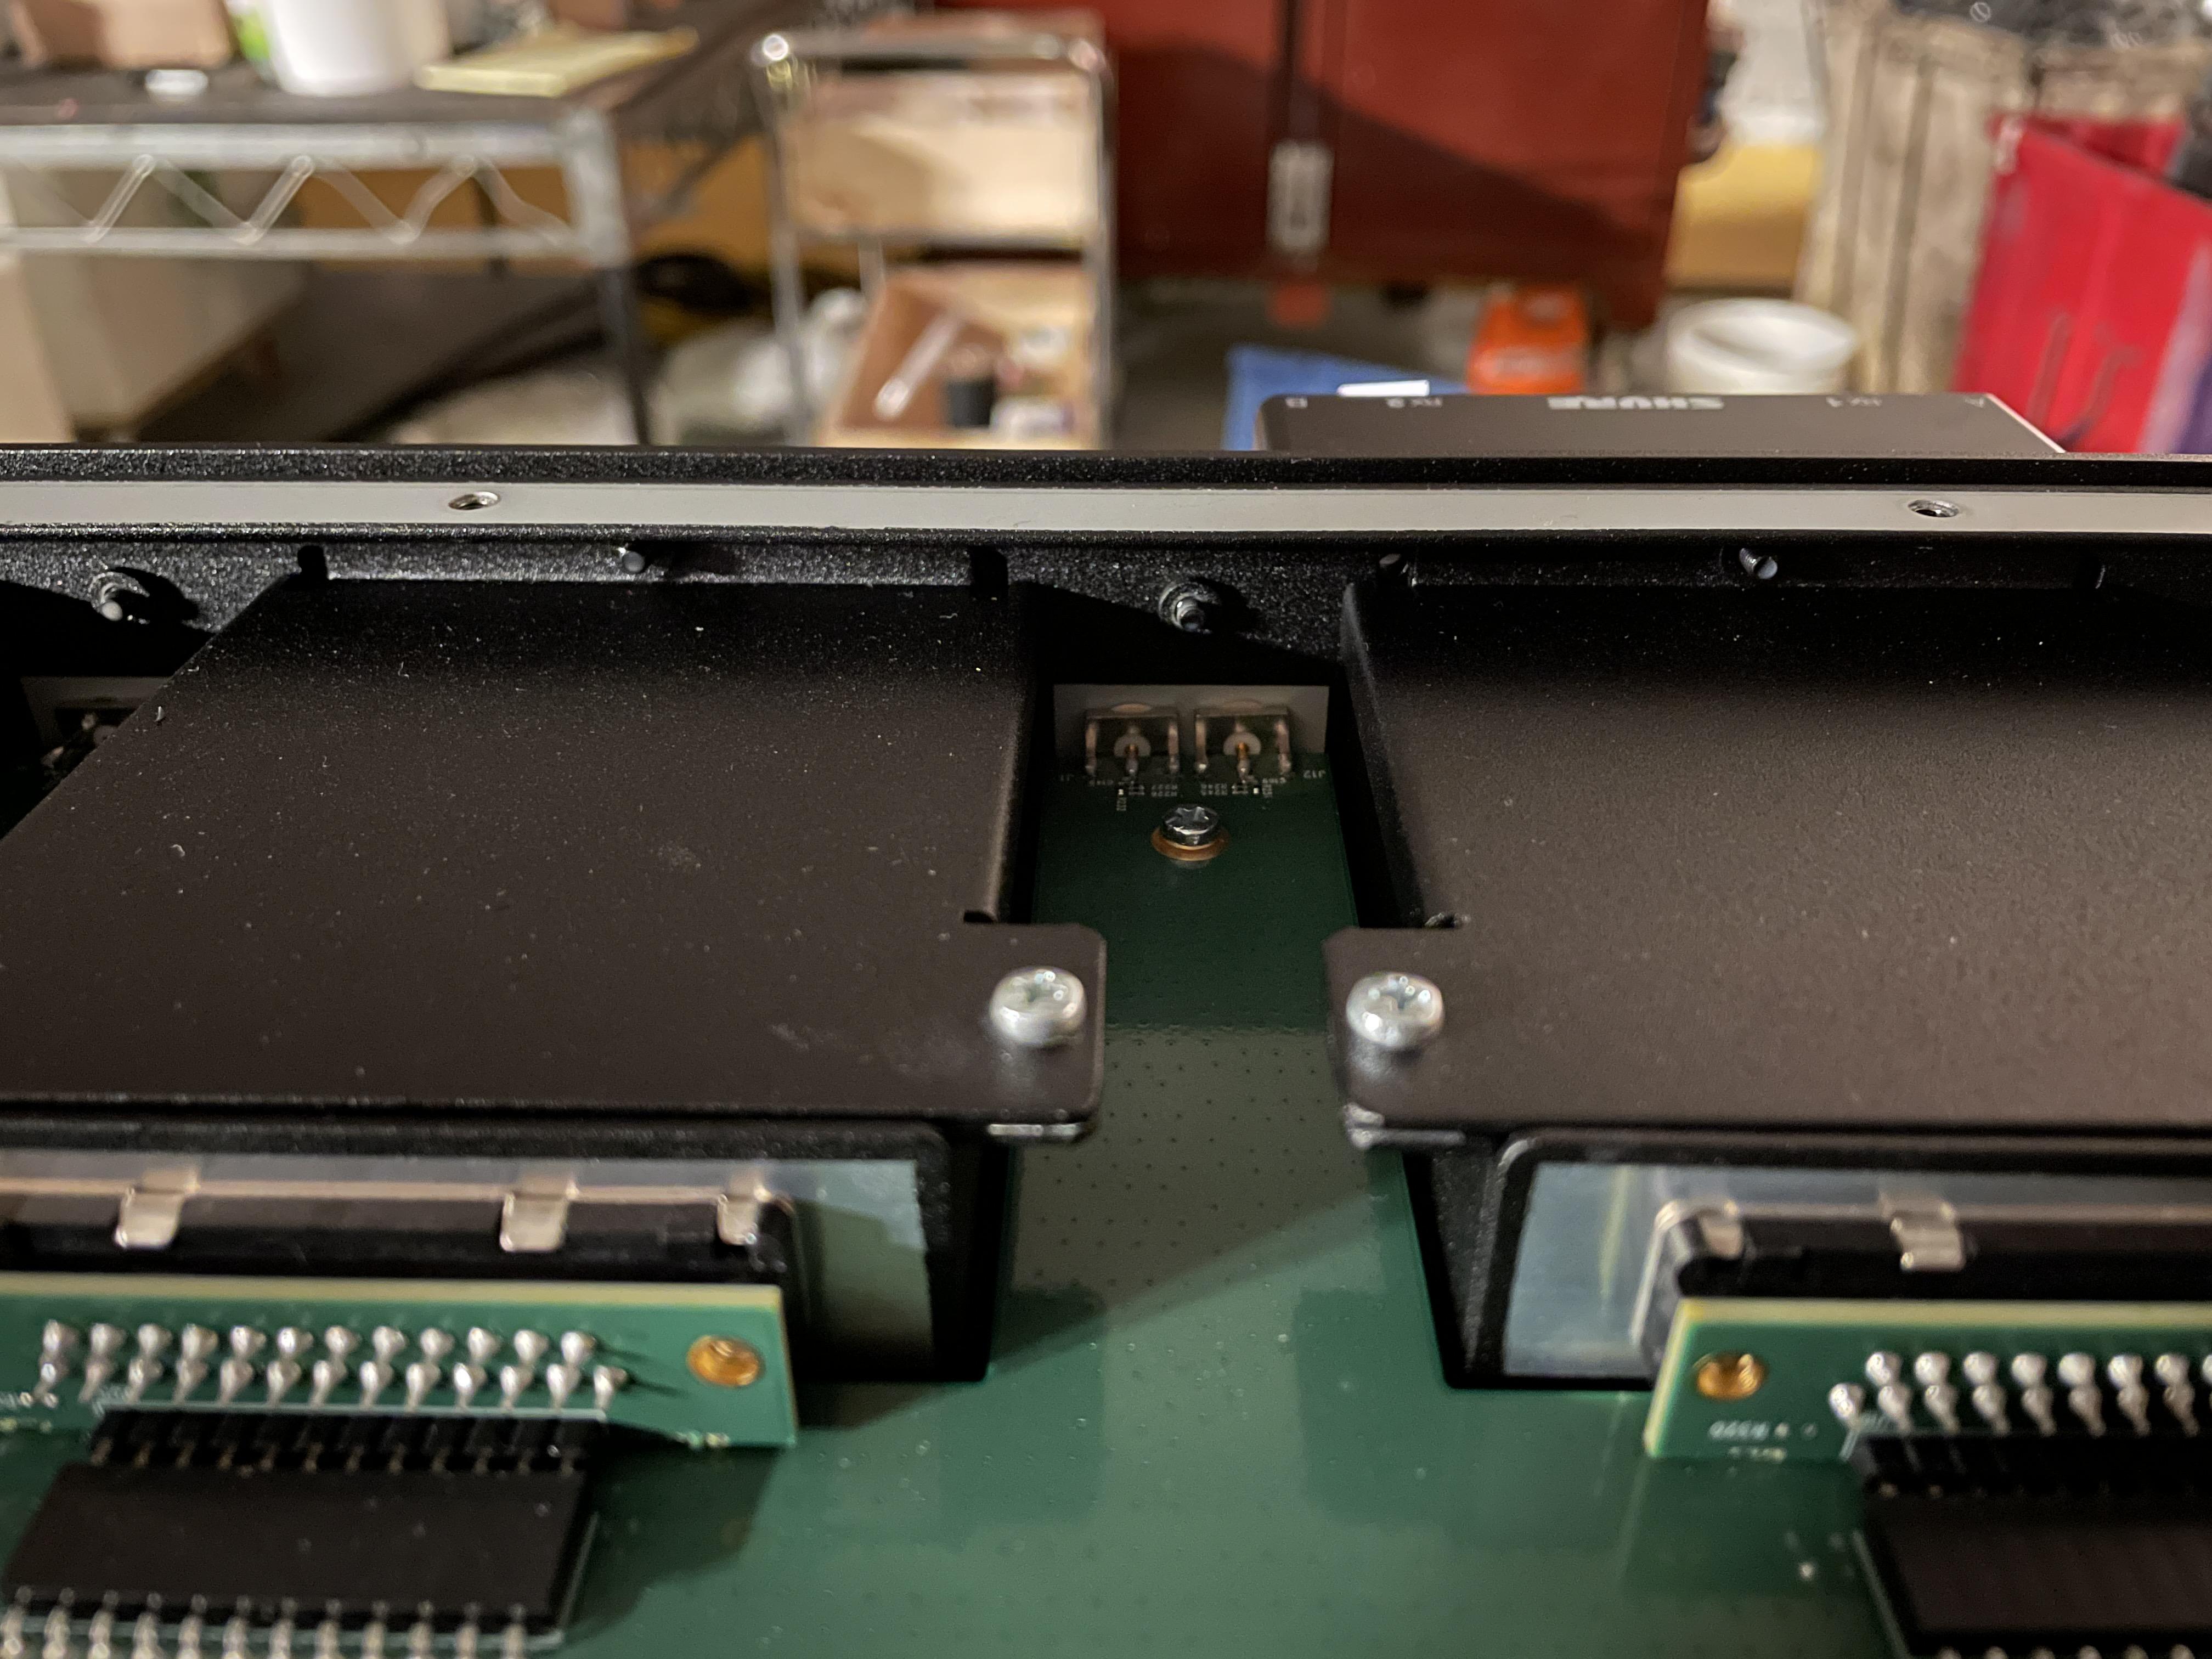
Step 5: Making all connections
I decided to cover the neighboring circuit with Kapton for some added insulation prior to adding my RF leads:
After meticulously making my RF leads (using plenty of heat shrink for further insulation), I decided to add more Kapton tape, both over the connections, and down the PCB arms a bit, to act as a strain relief:
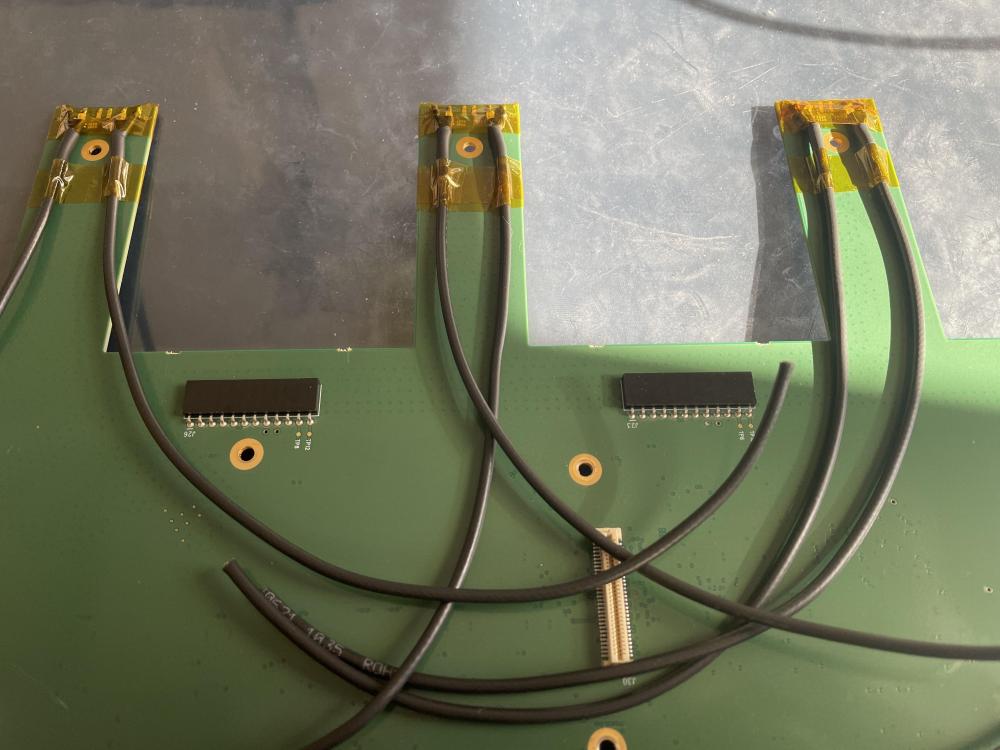
Next, I re-installed the receiver slots so I could secure the faceplate to the front of the chassis (the receiver slots attach via screws under the faceplate, as well as inside the unit). Note: I used blue thread lock on EVERYTHING while reassembling. This is going to bounce around on a cart, on a truck, hopefully for a few years to come. I didn't want anything shaking loose:

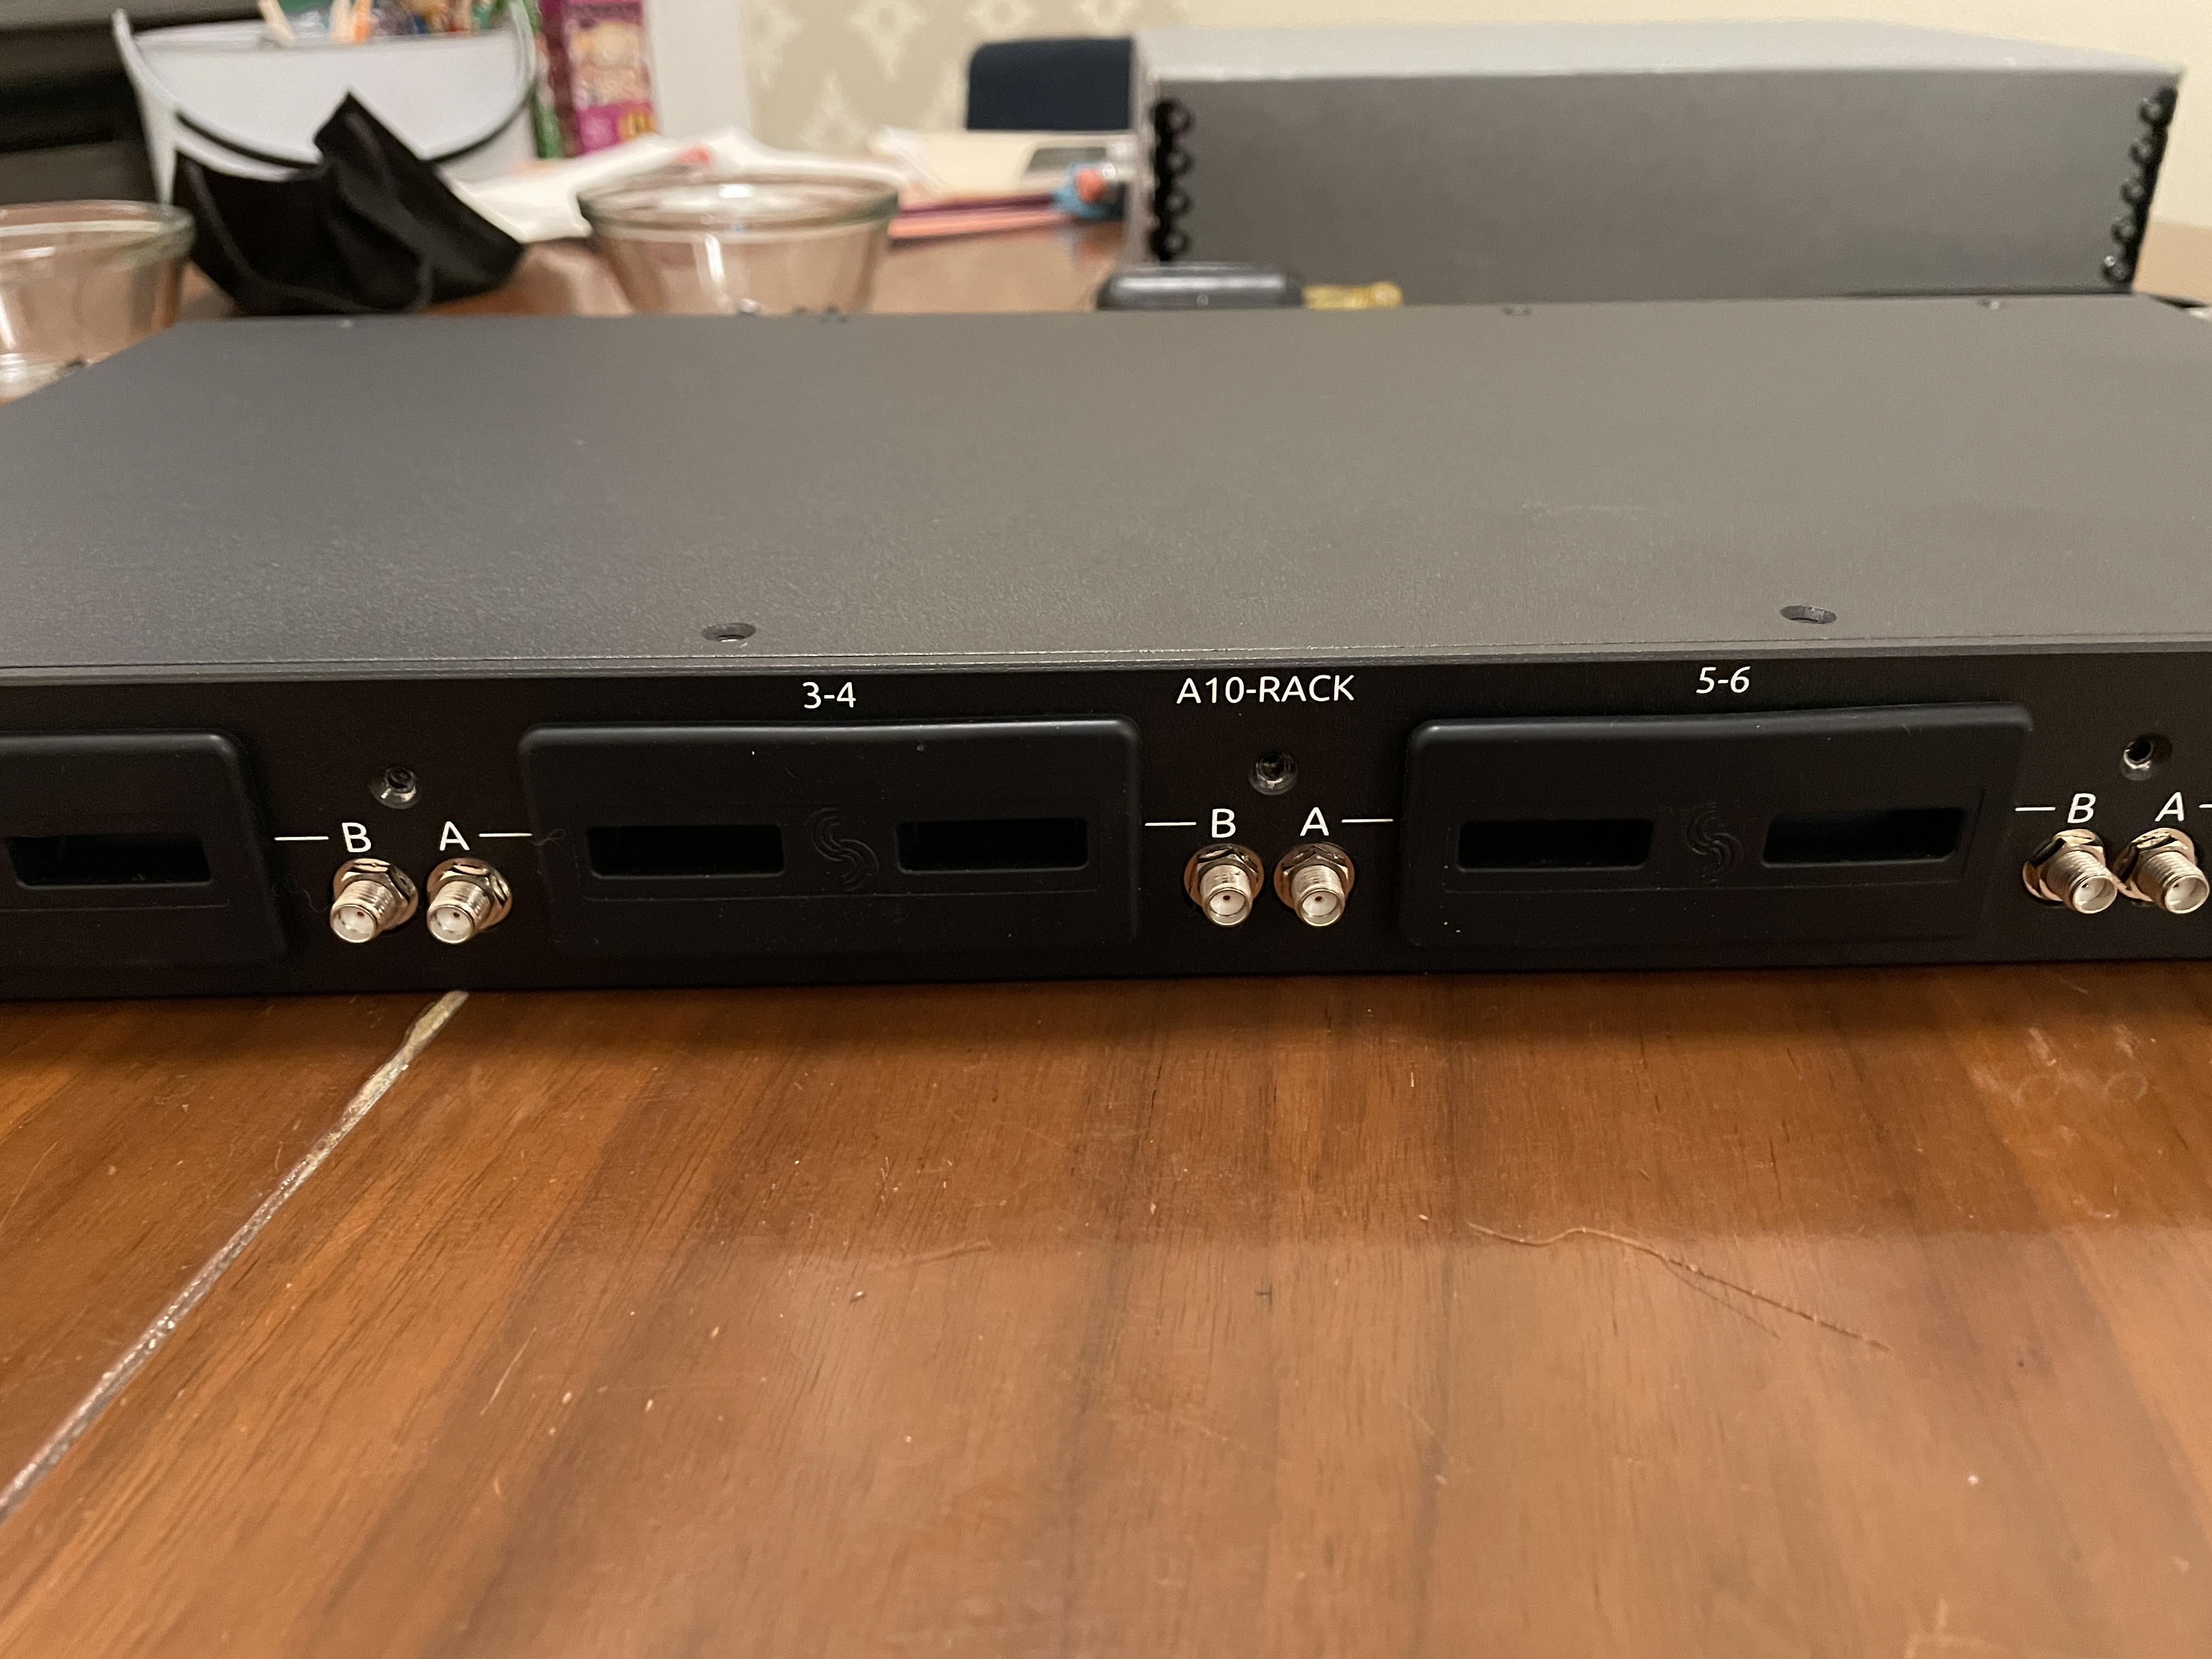
Next, I fed the other end of the RF leads through the grommets, and terminated with RA SMA connectors:

-
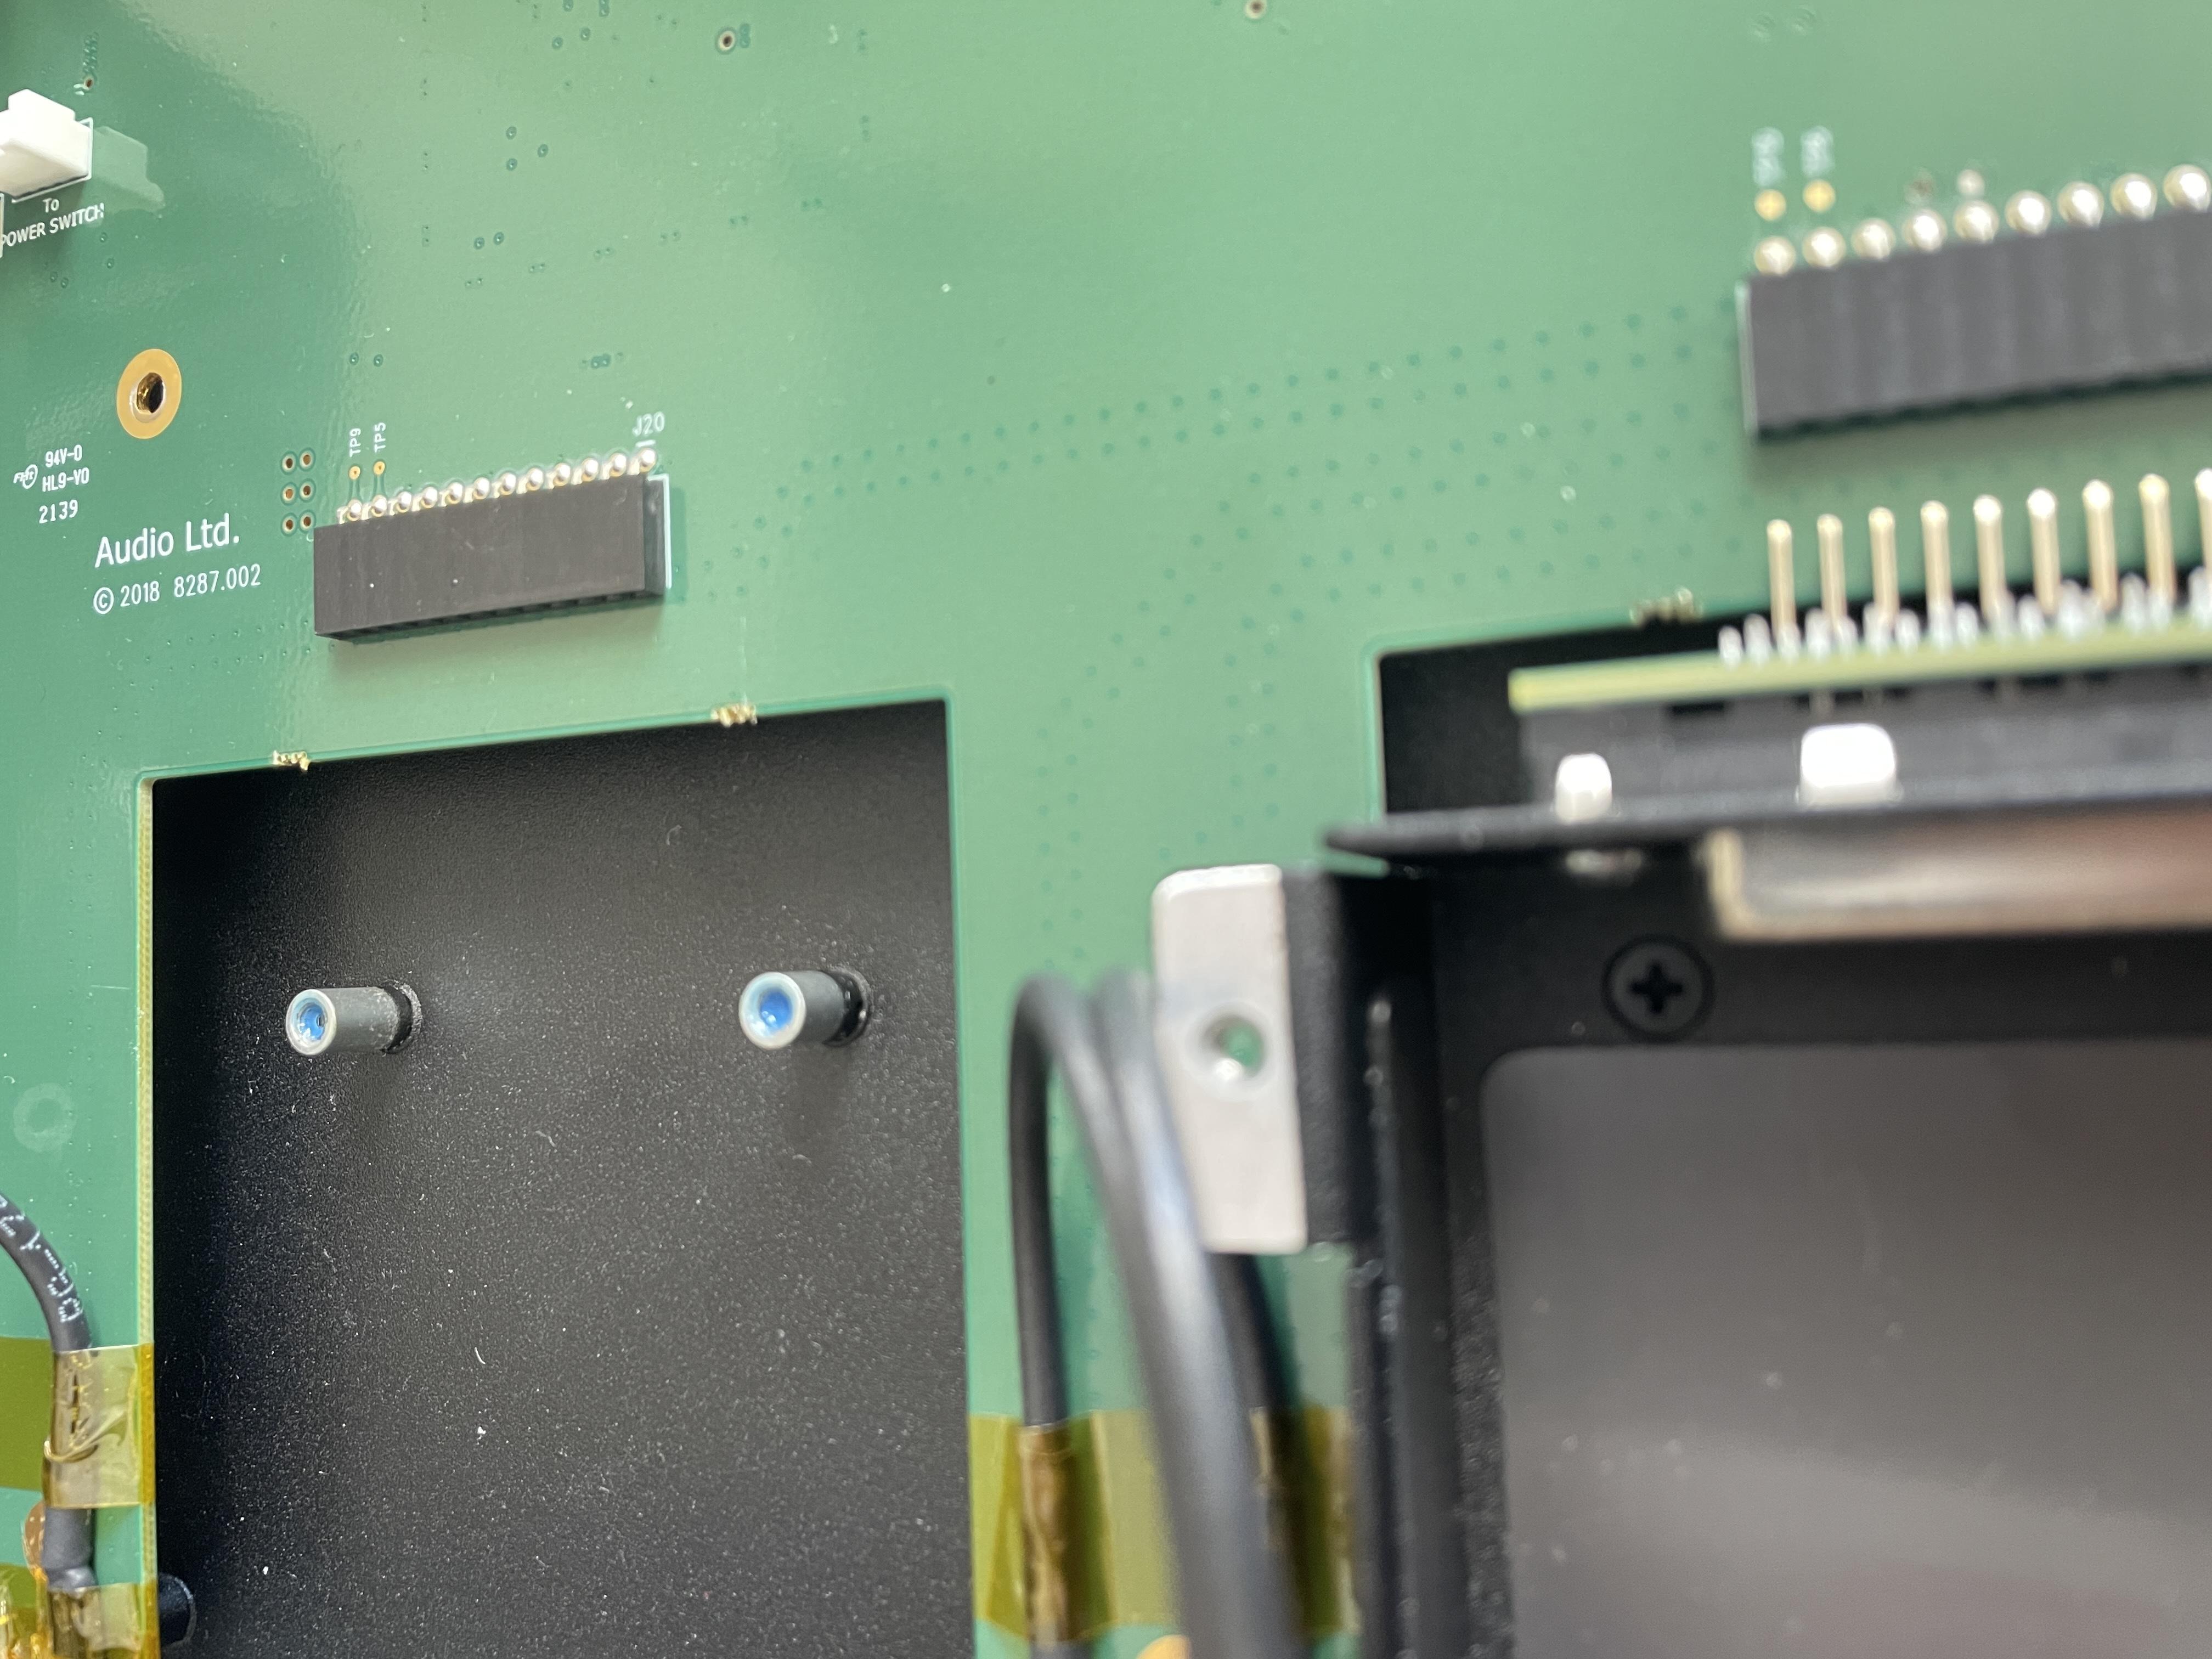
Step 4: Preparing the PCB and faceplate:
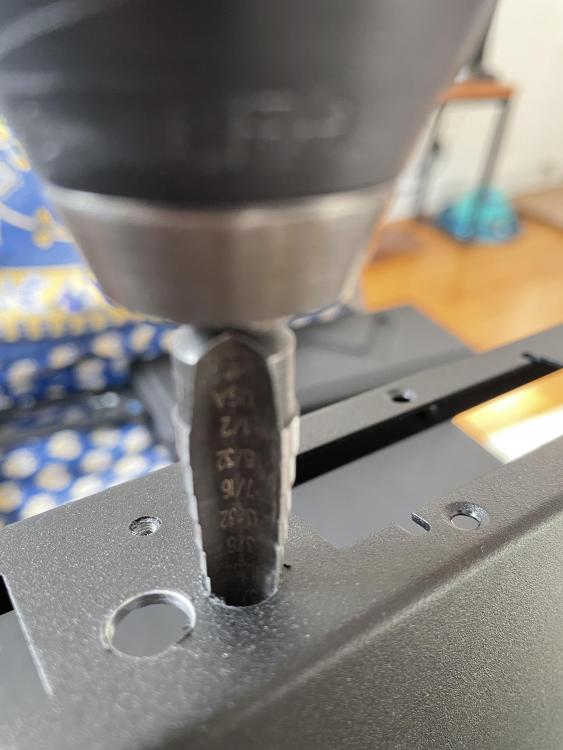
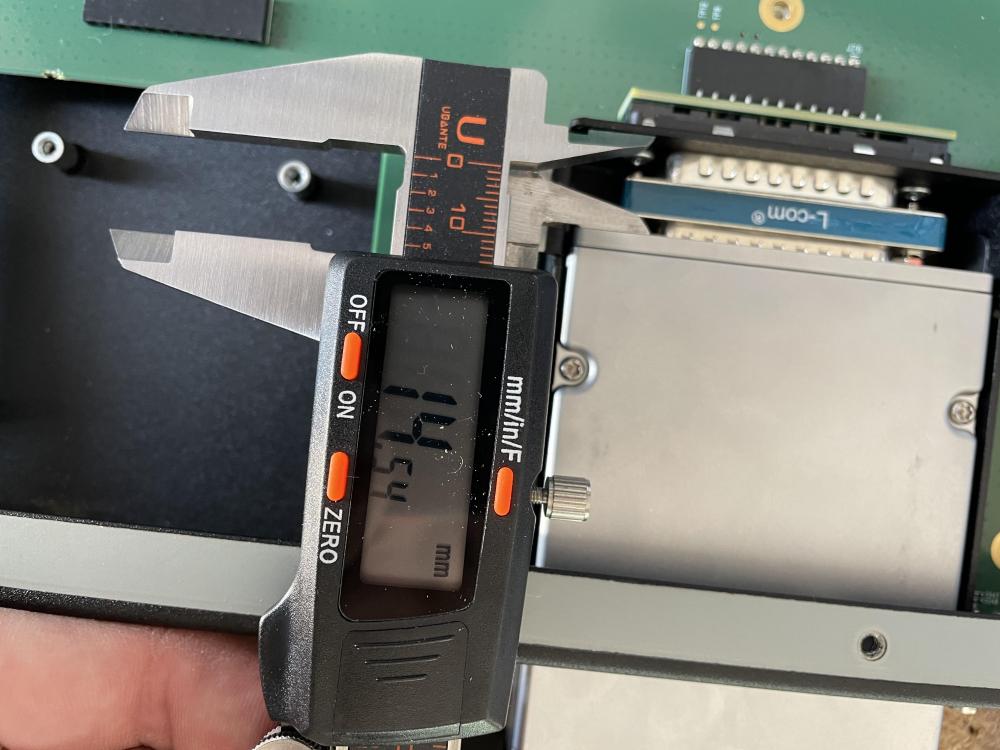
As the grommets don't sit completely flush with the faceplate, and this will need to mount directly against the chassis front, I'm unfortunately going to have to drill out the chassis to accommodate the outer diameter of the grommets:
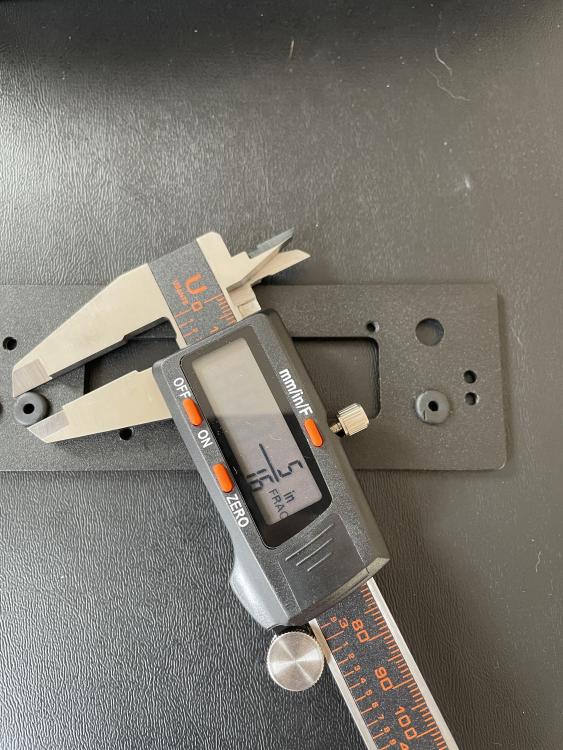
The grommets measure 5/16... I'm going to drill the chassis holes to 11/32. I take extra care de-burring these holes after, and blowing out any potential stray metal filings... that would be the last thing I'd want bouncing around in here once I'm finished:
I don't have photos of the next step (removing the SMA connectors) because I decided to take the board to a specialist for that. I was too nervous given the proximity of the aforementioned circuit... Money well spent. Here is a pic of me cleaning the residual flux off the PCB afterward:
Note that even the pro's pulled off a few solder pads in the process. Fortunately, they were just ground pads and I had enough to spare:
-
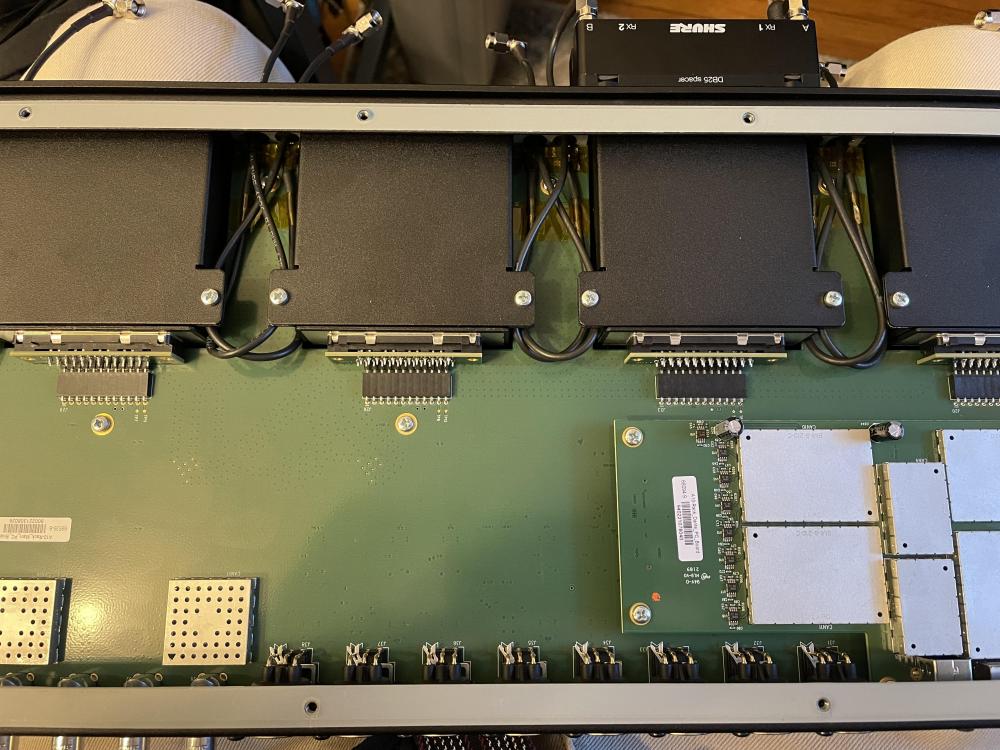
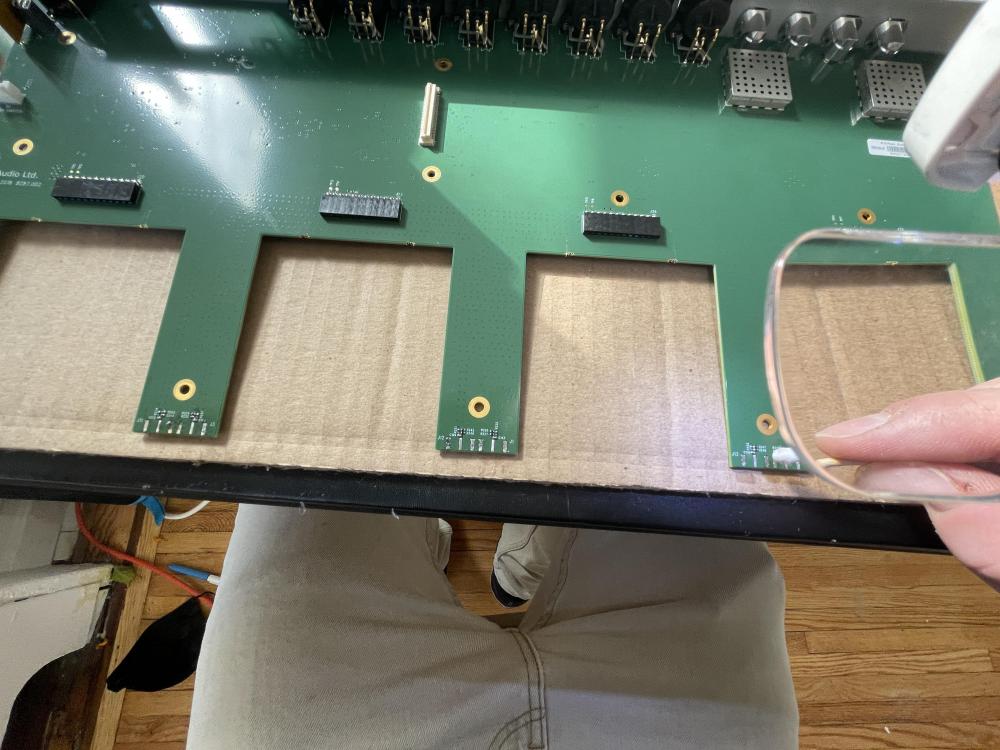
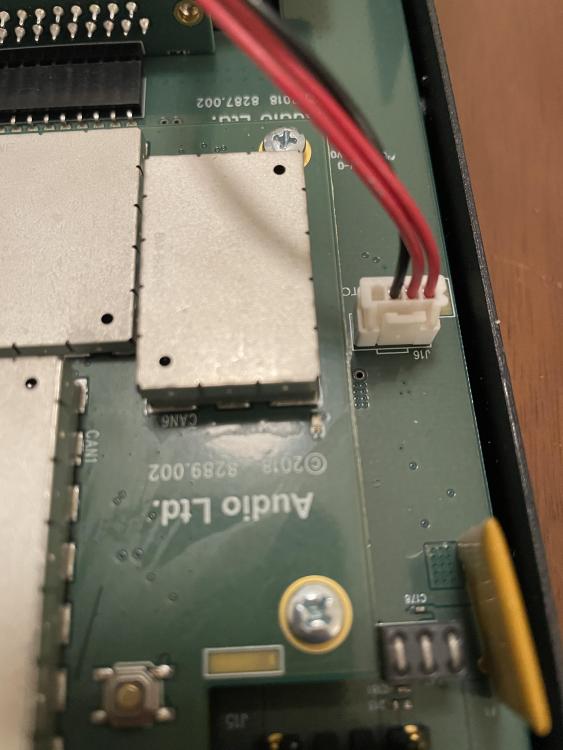
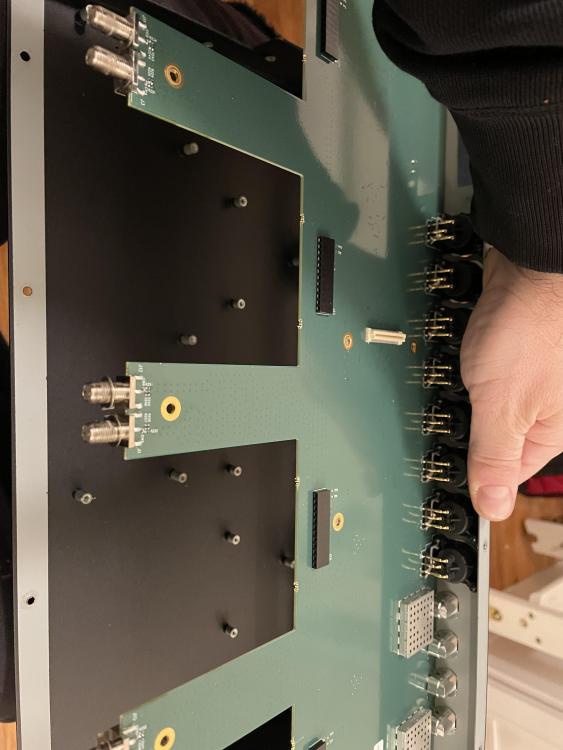
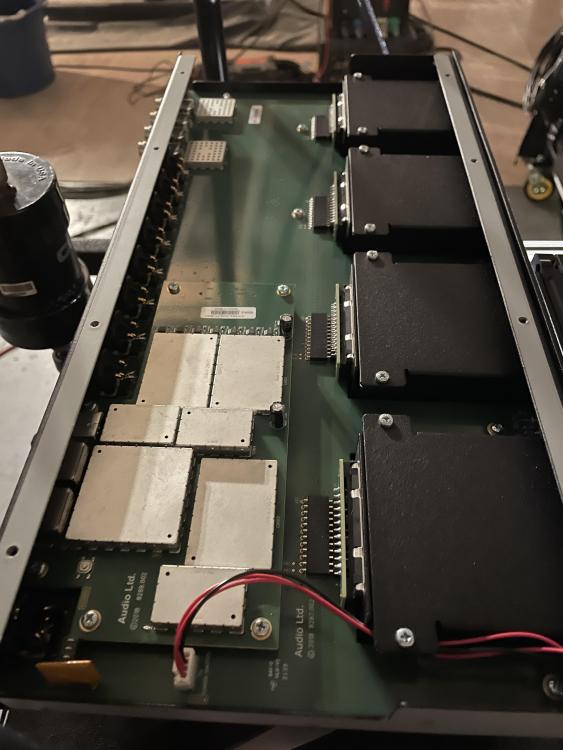
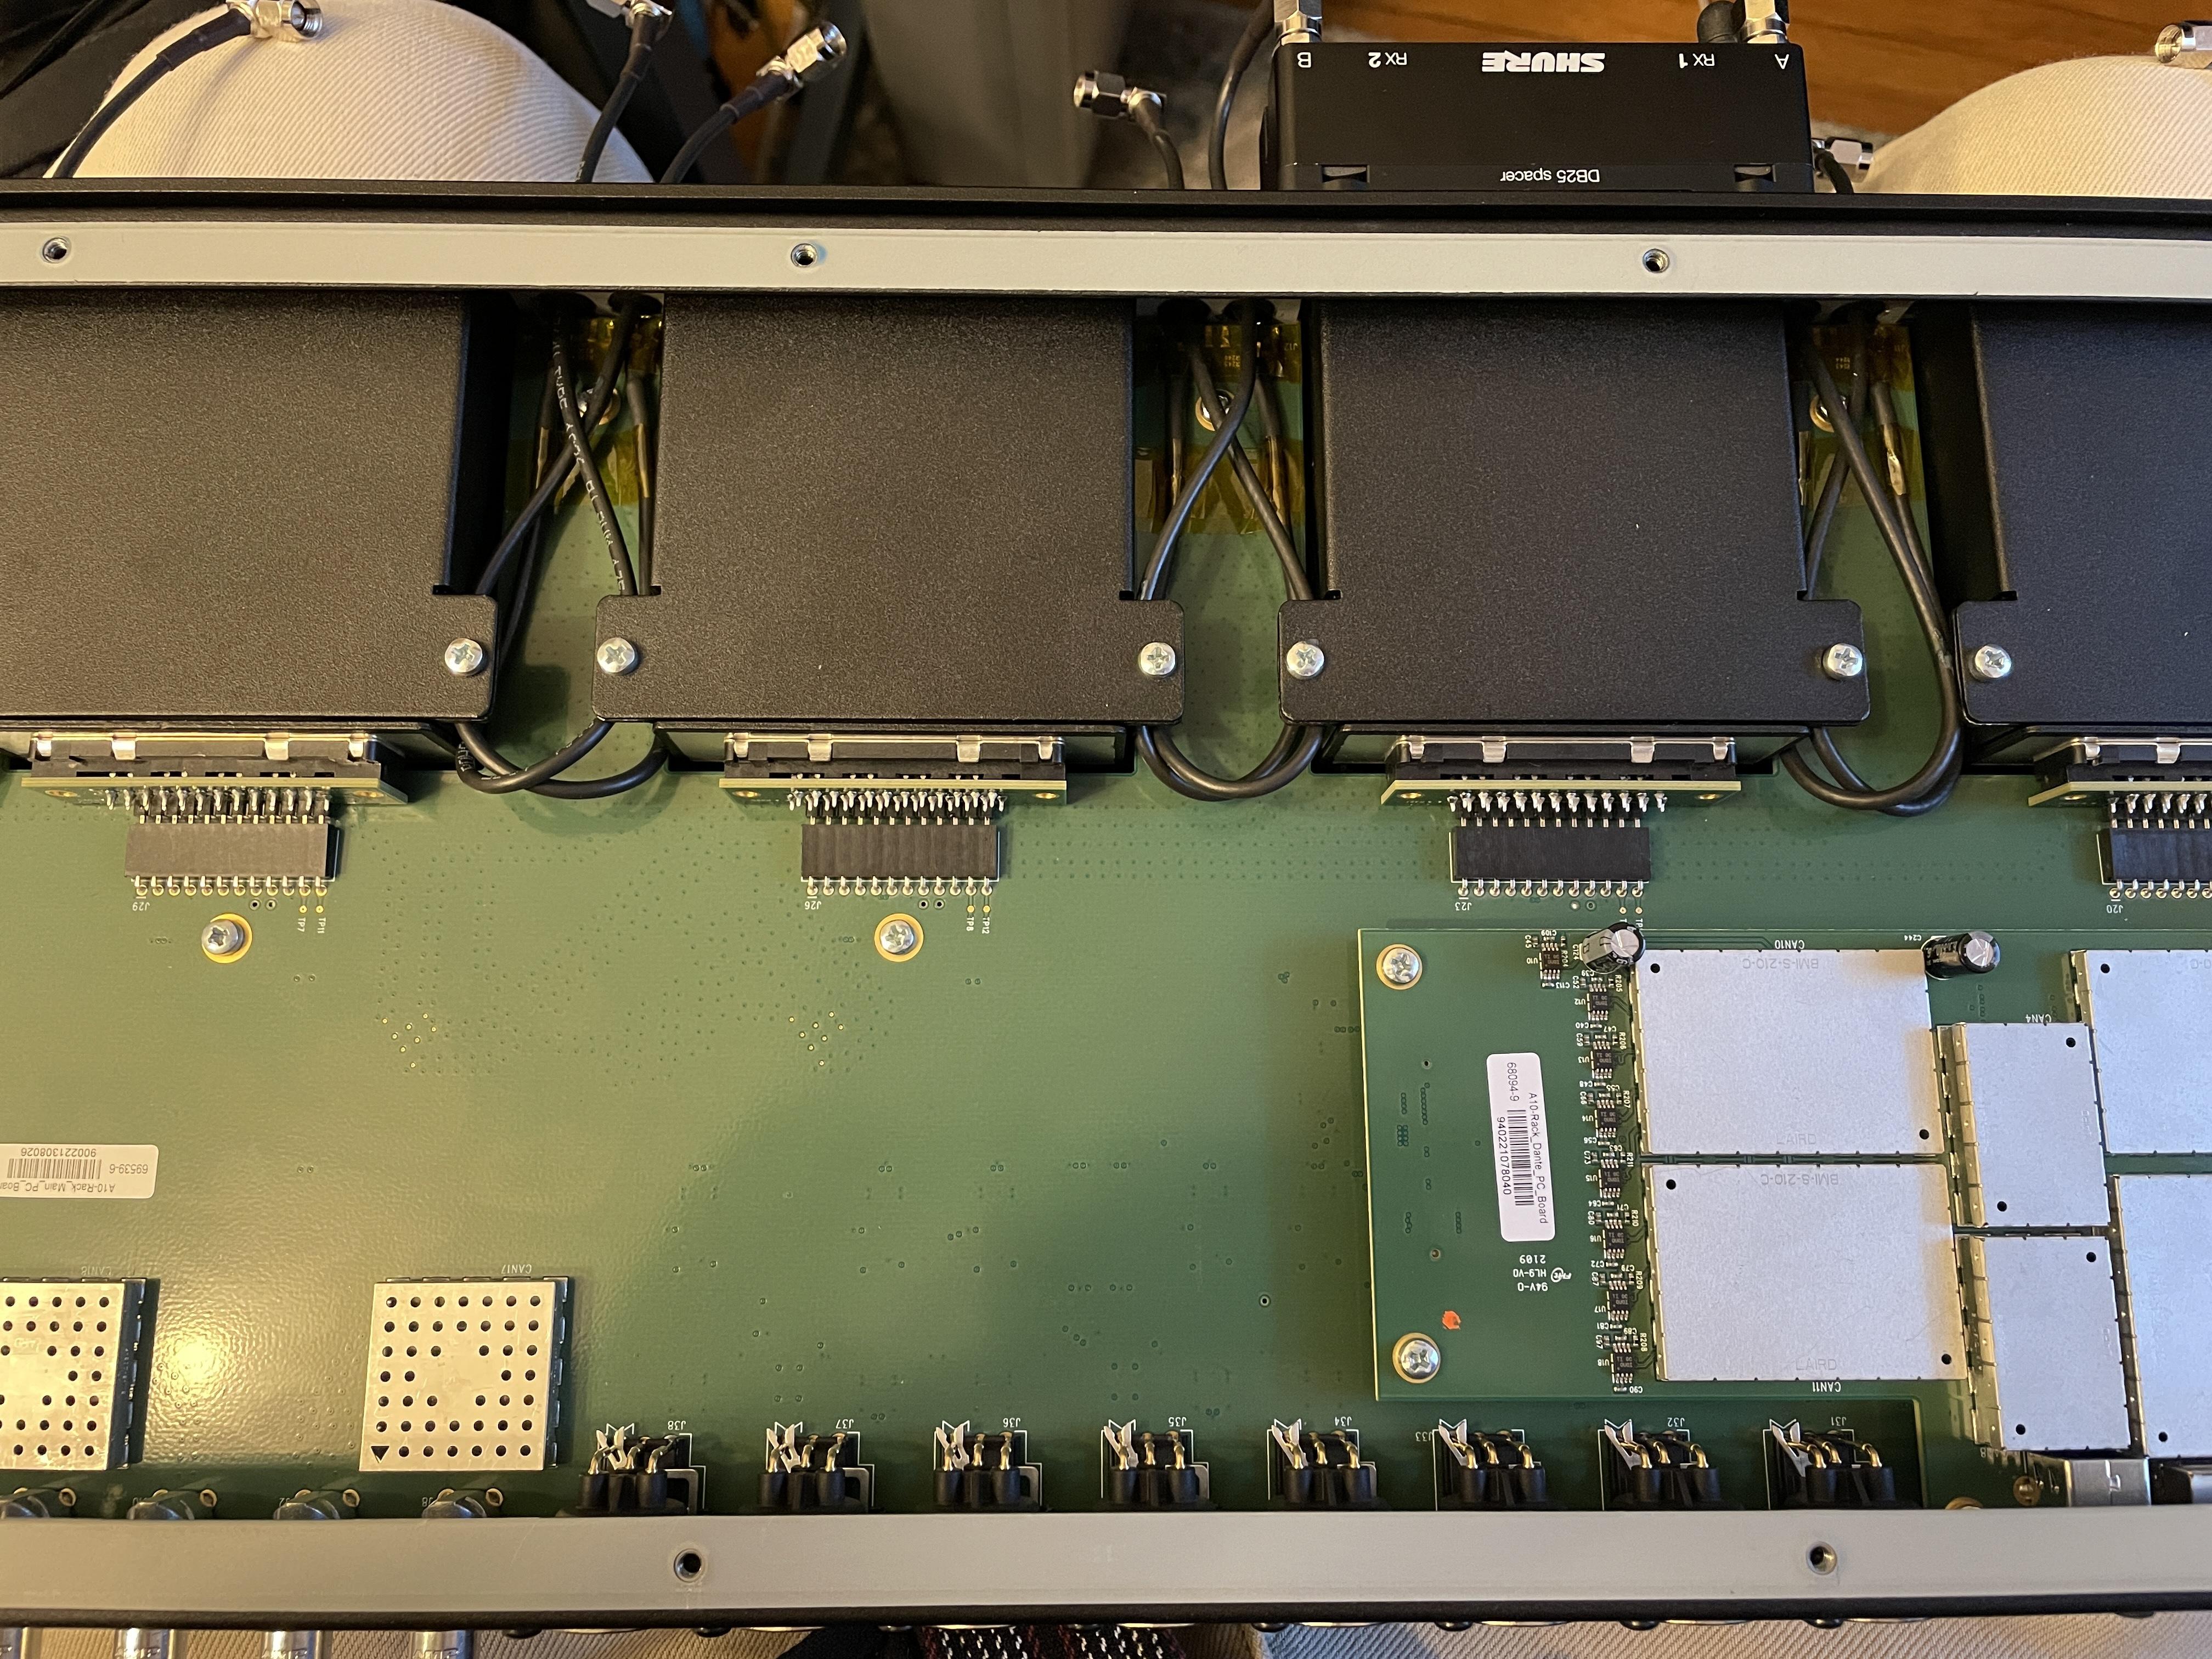
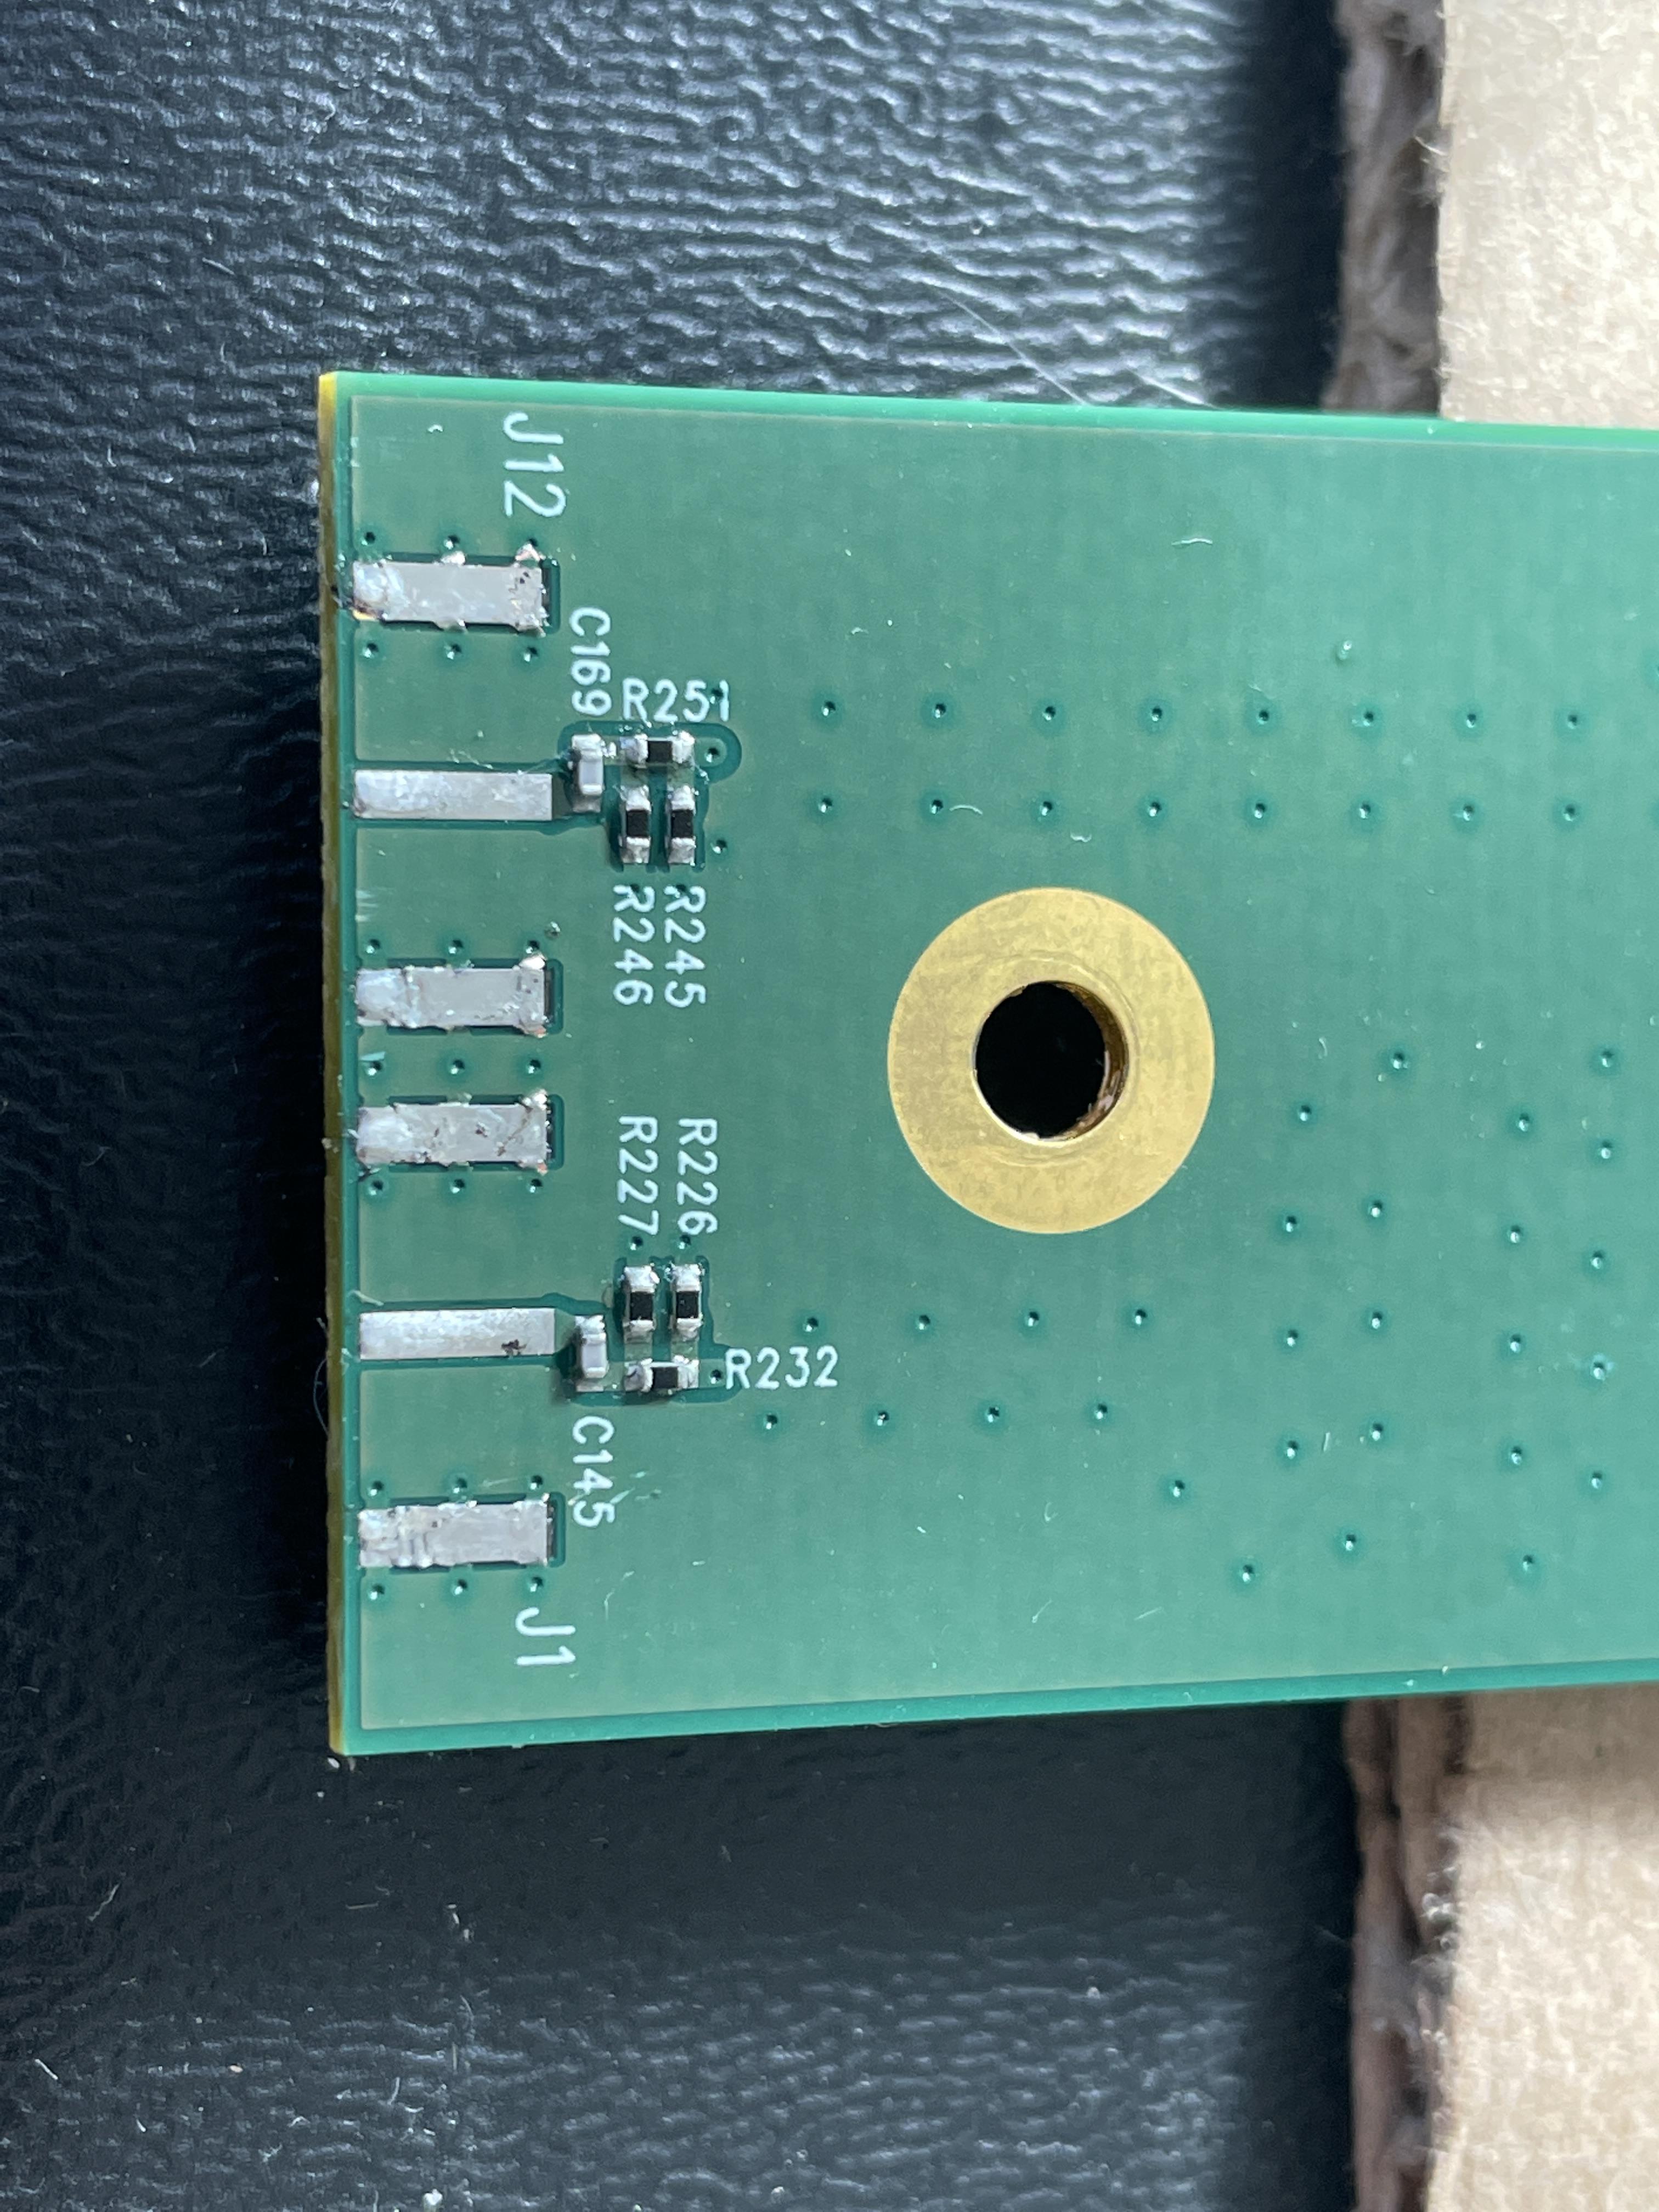
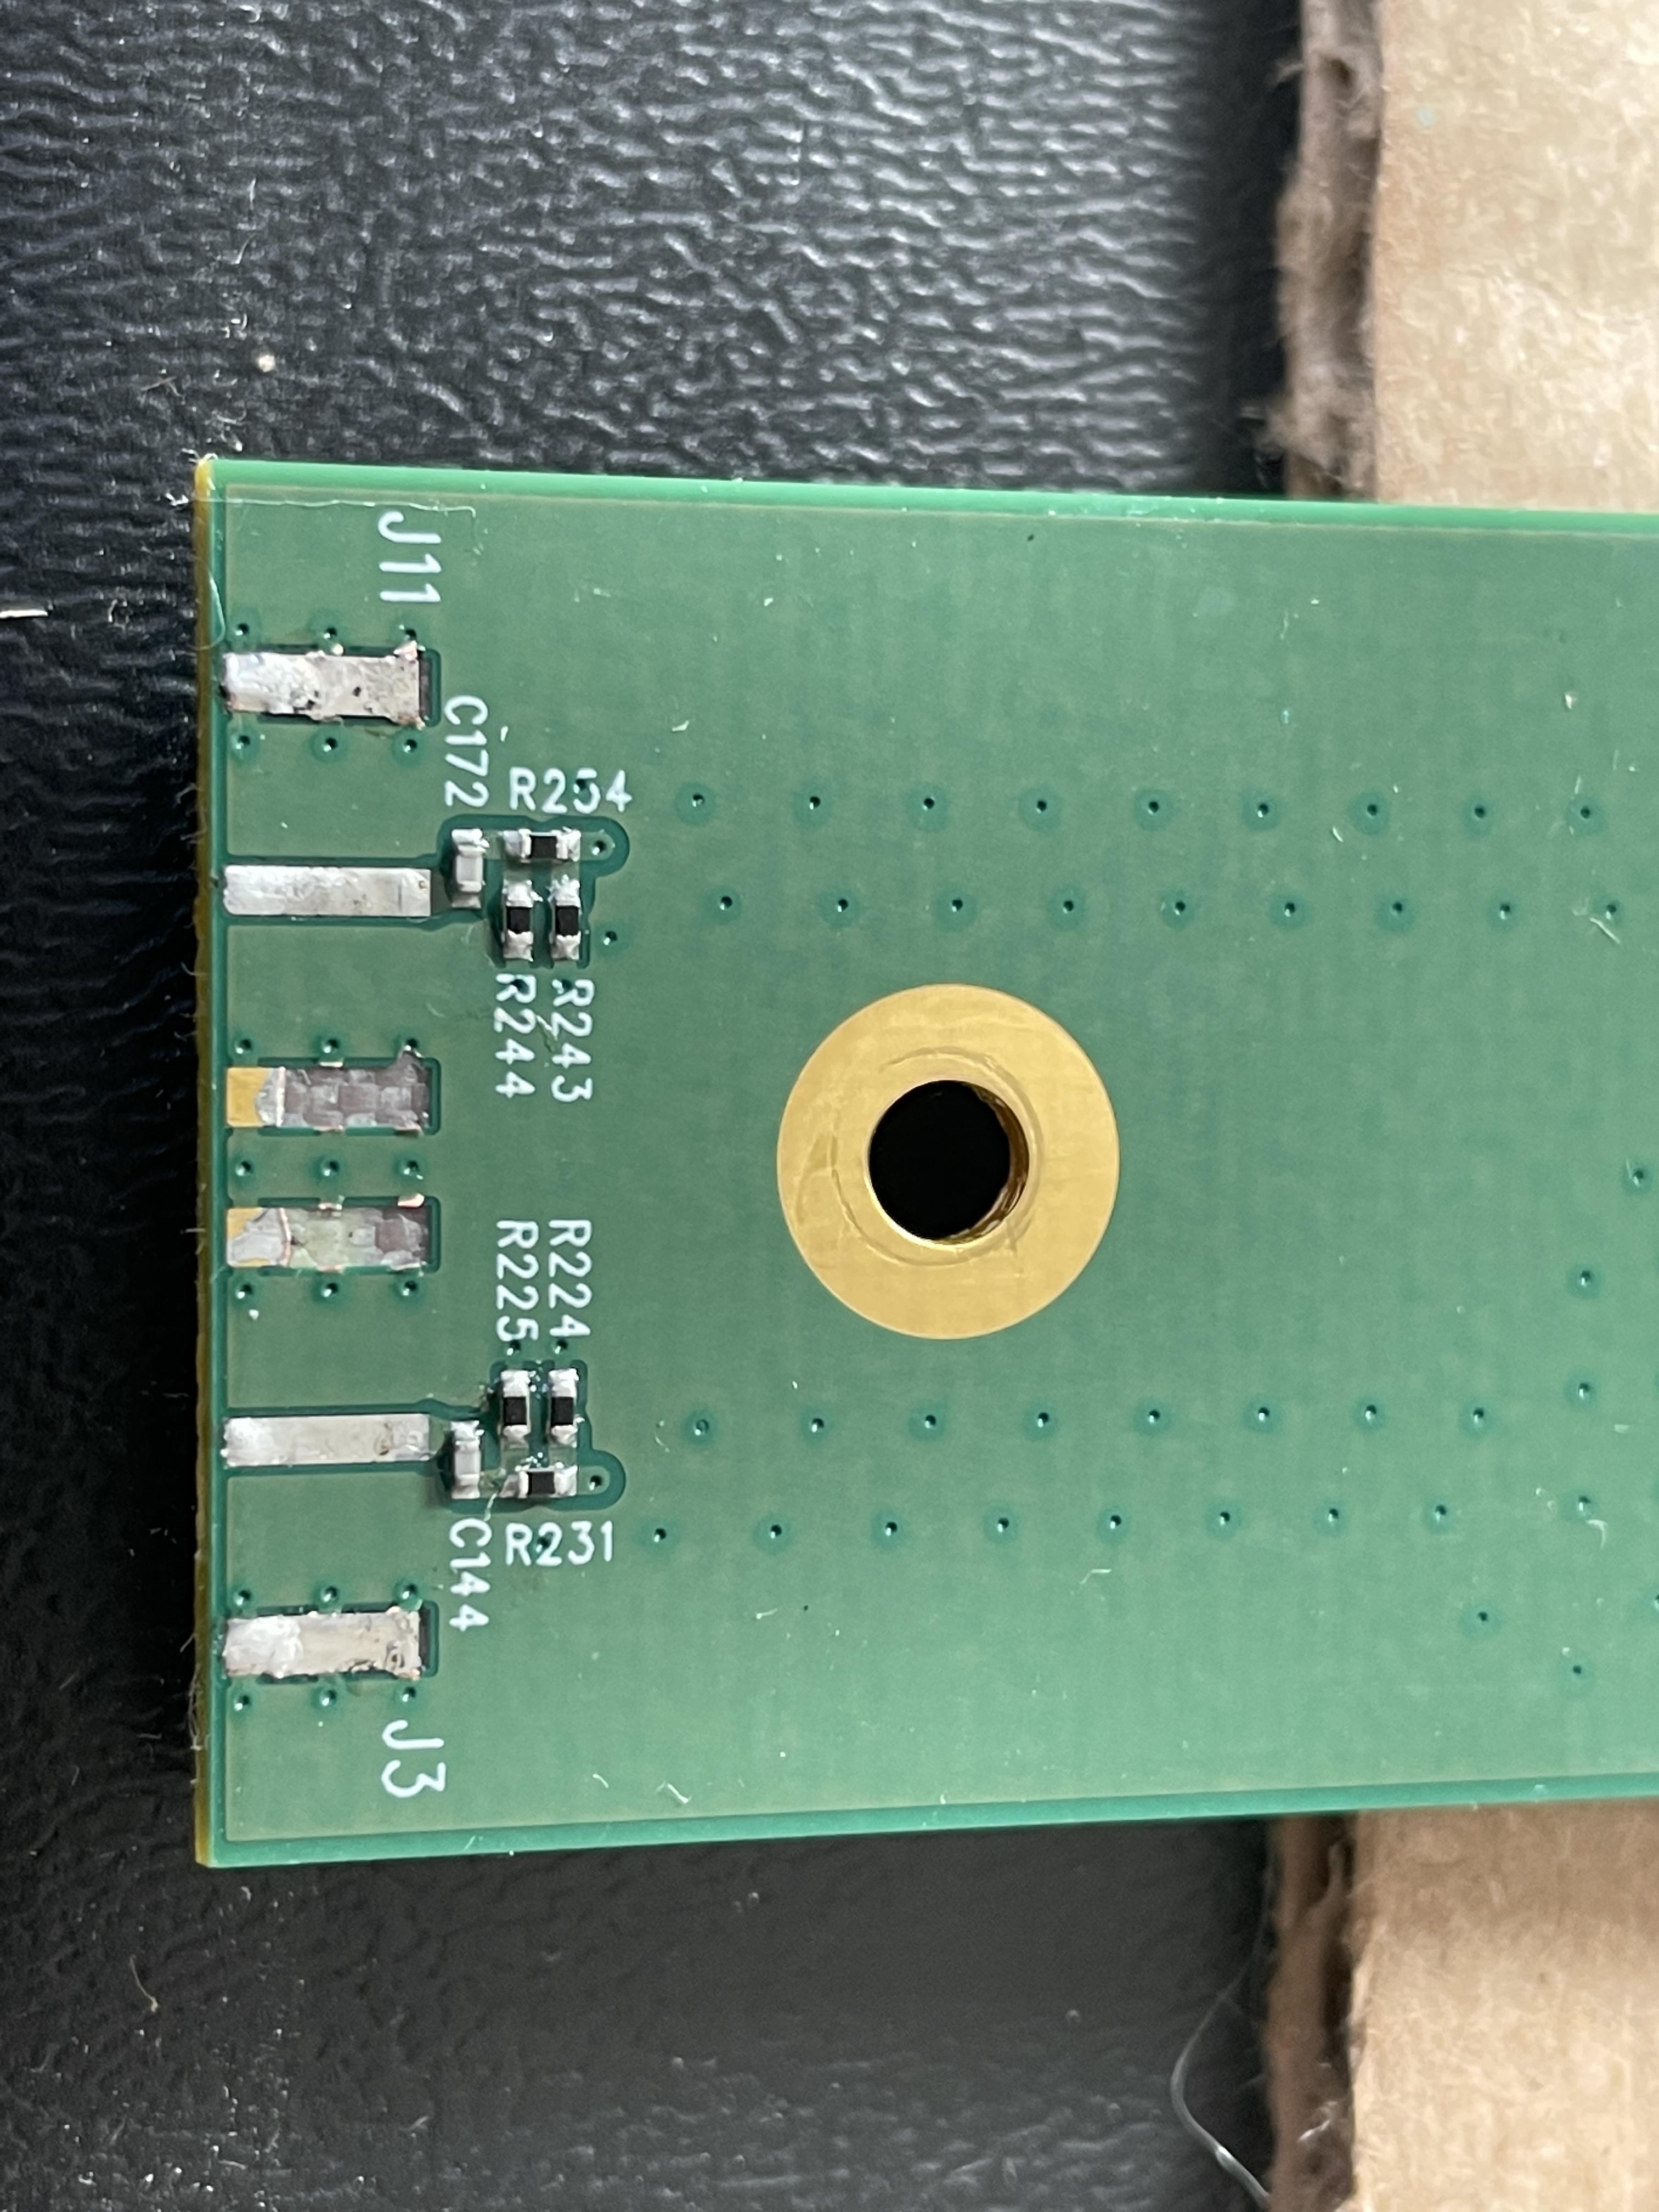
Step 3: Pull everything out
Carefully remove the DANTE board, then remove main PCB screws and DANTE card stand-offs:
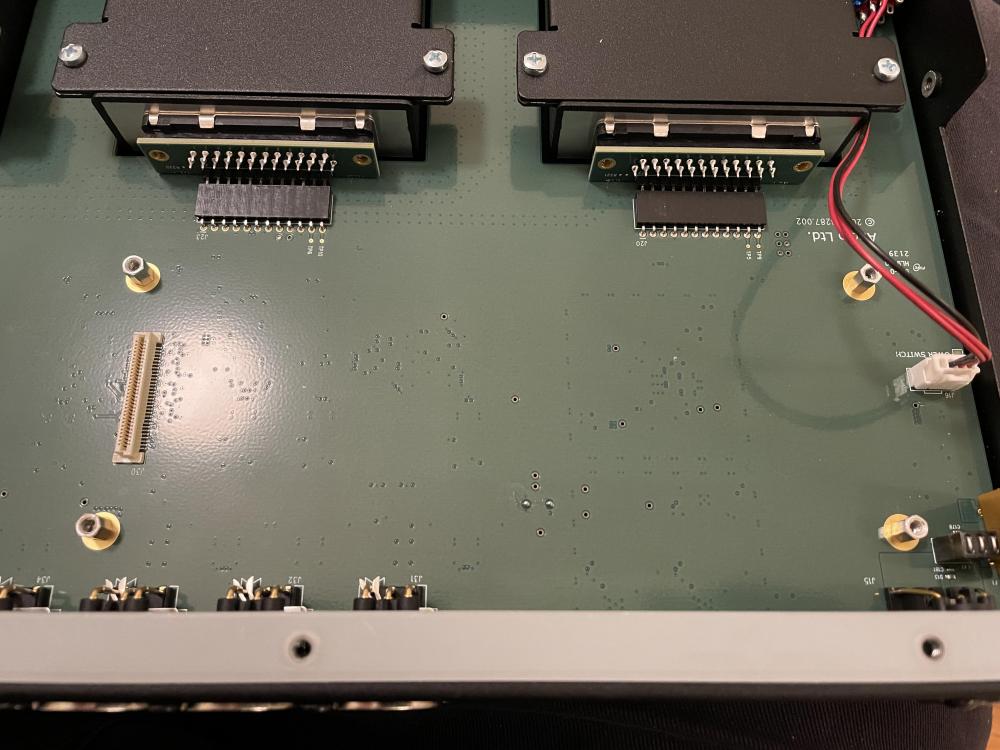
Remove receiver slots by gently pulling PCB away, then removing all screws:
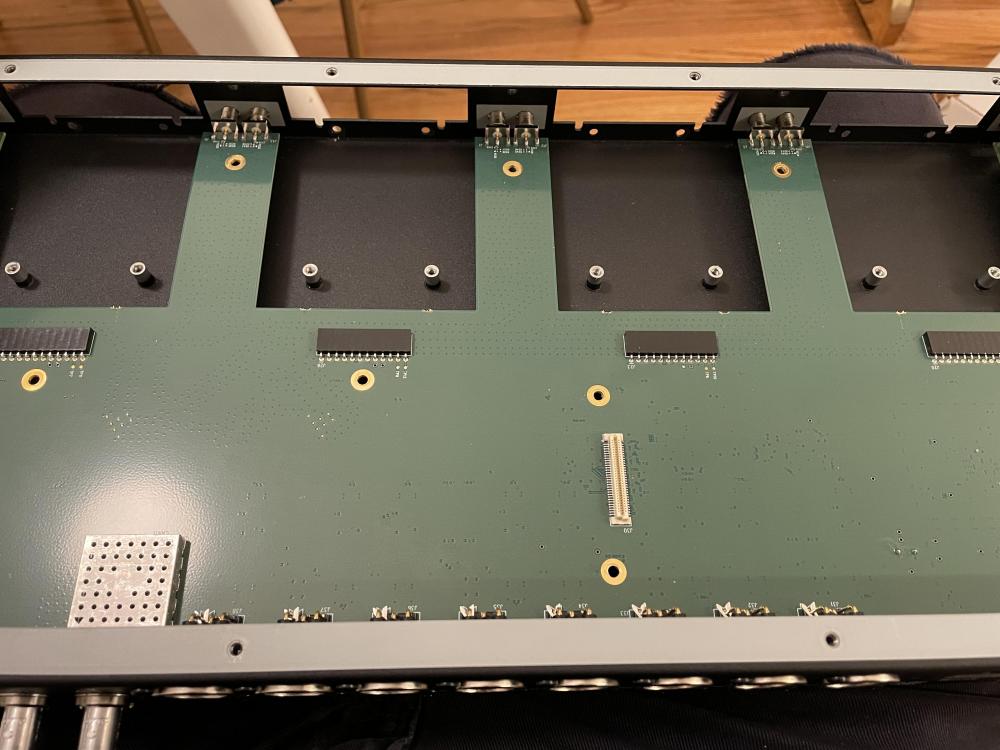
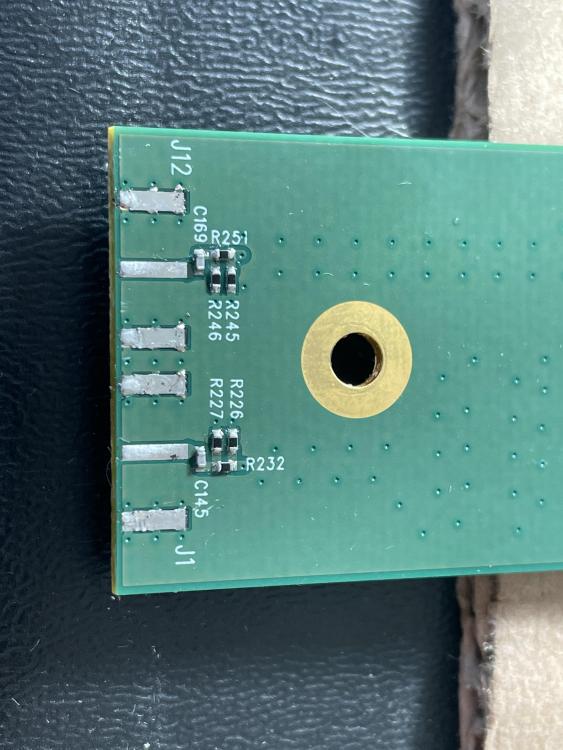
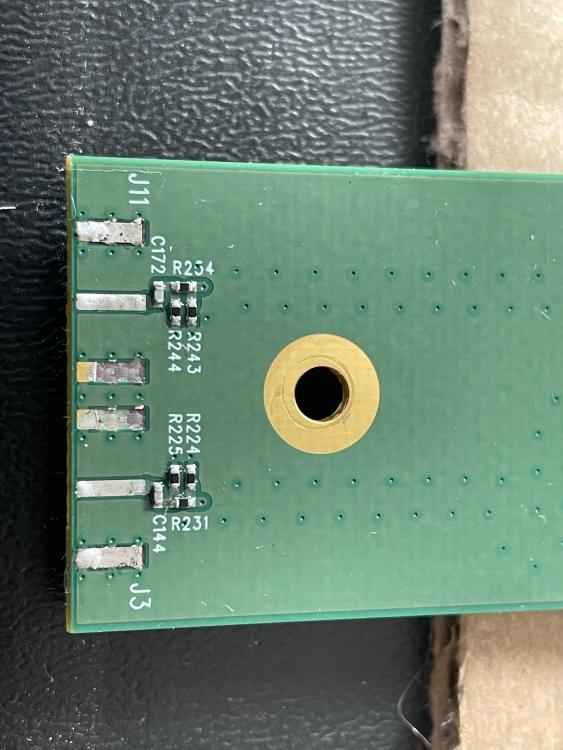
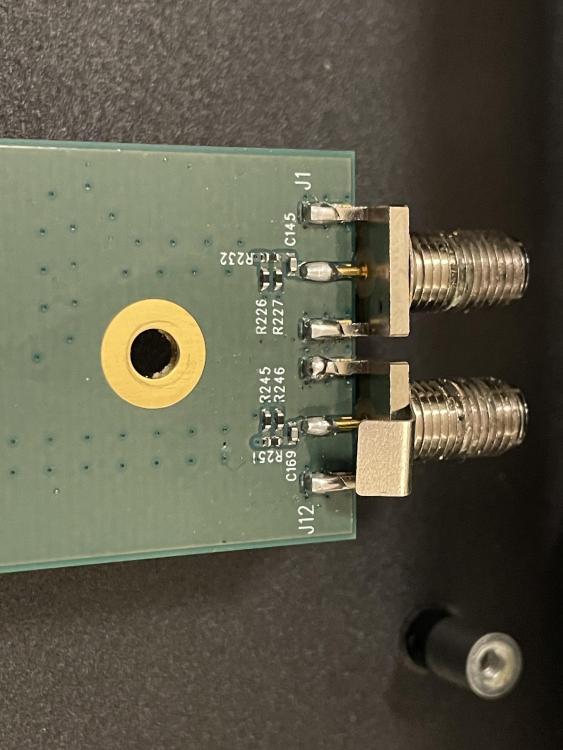
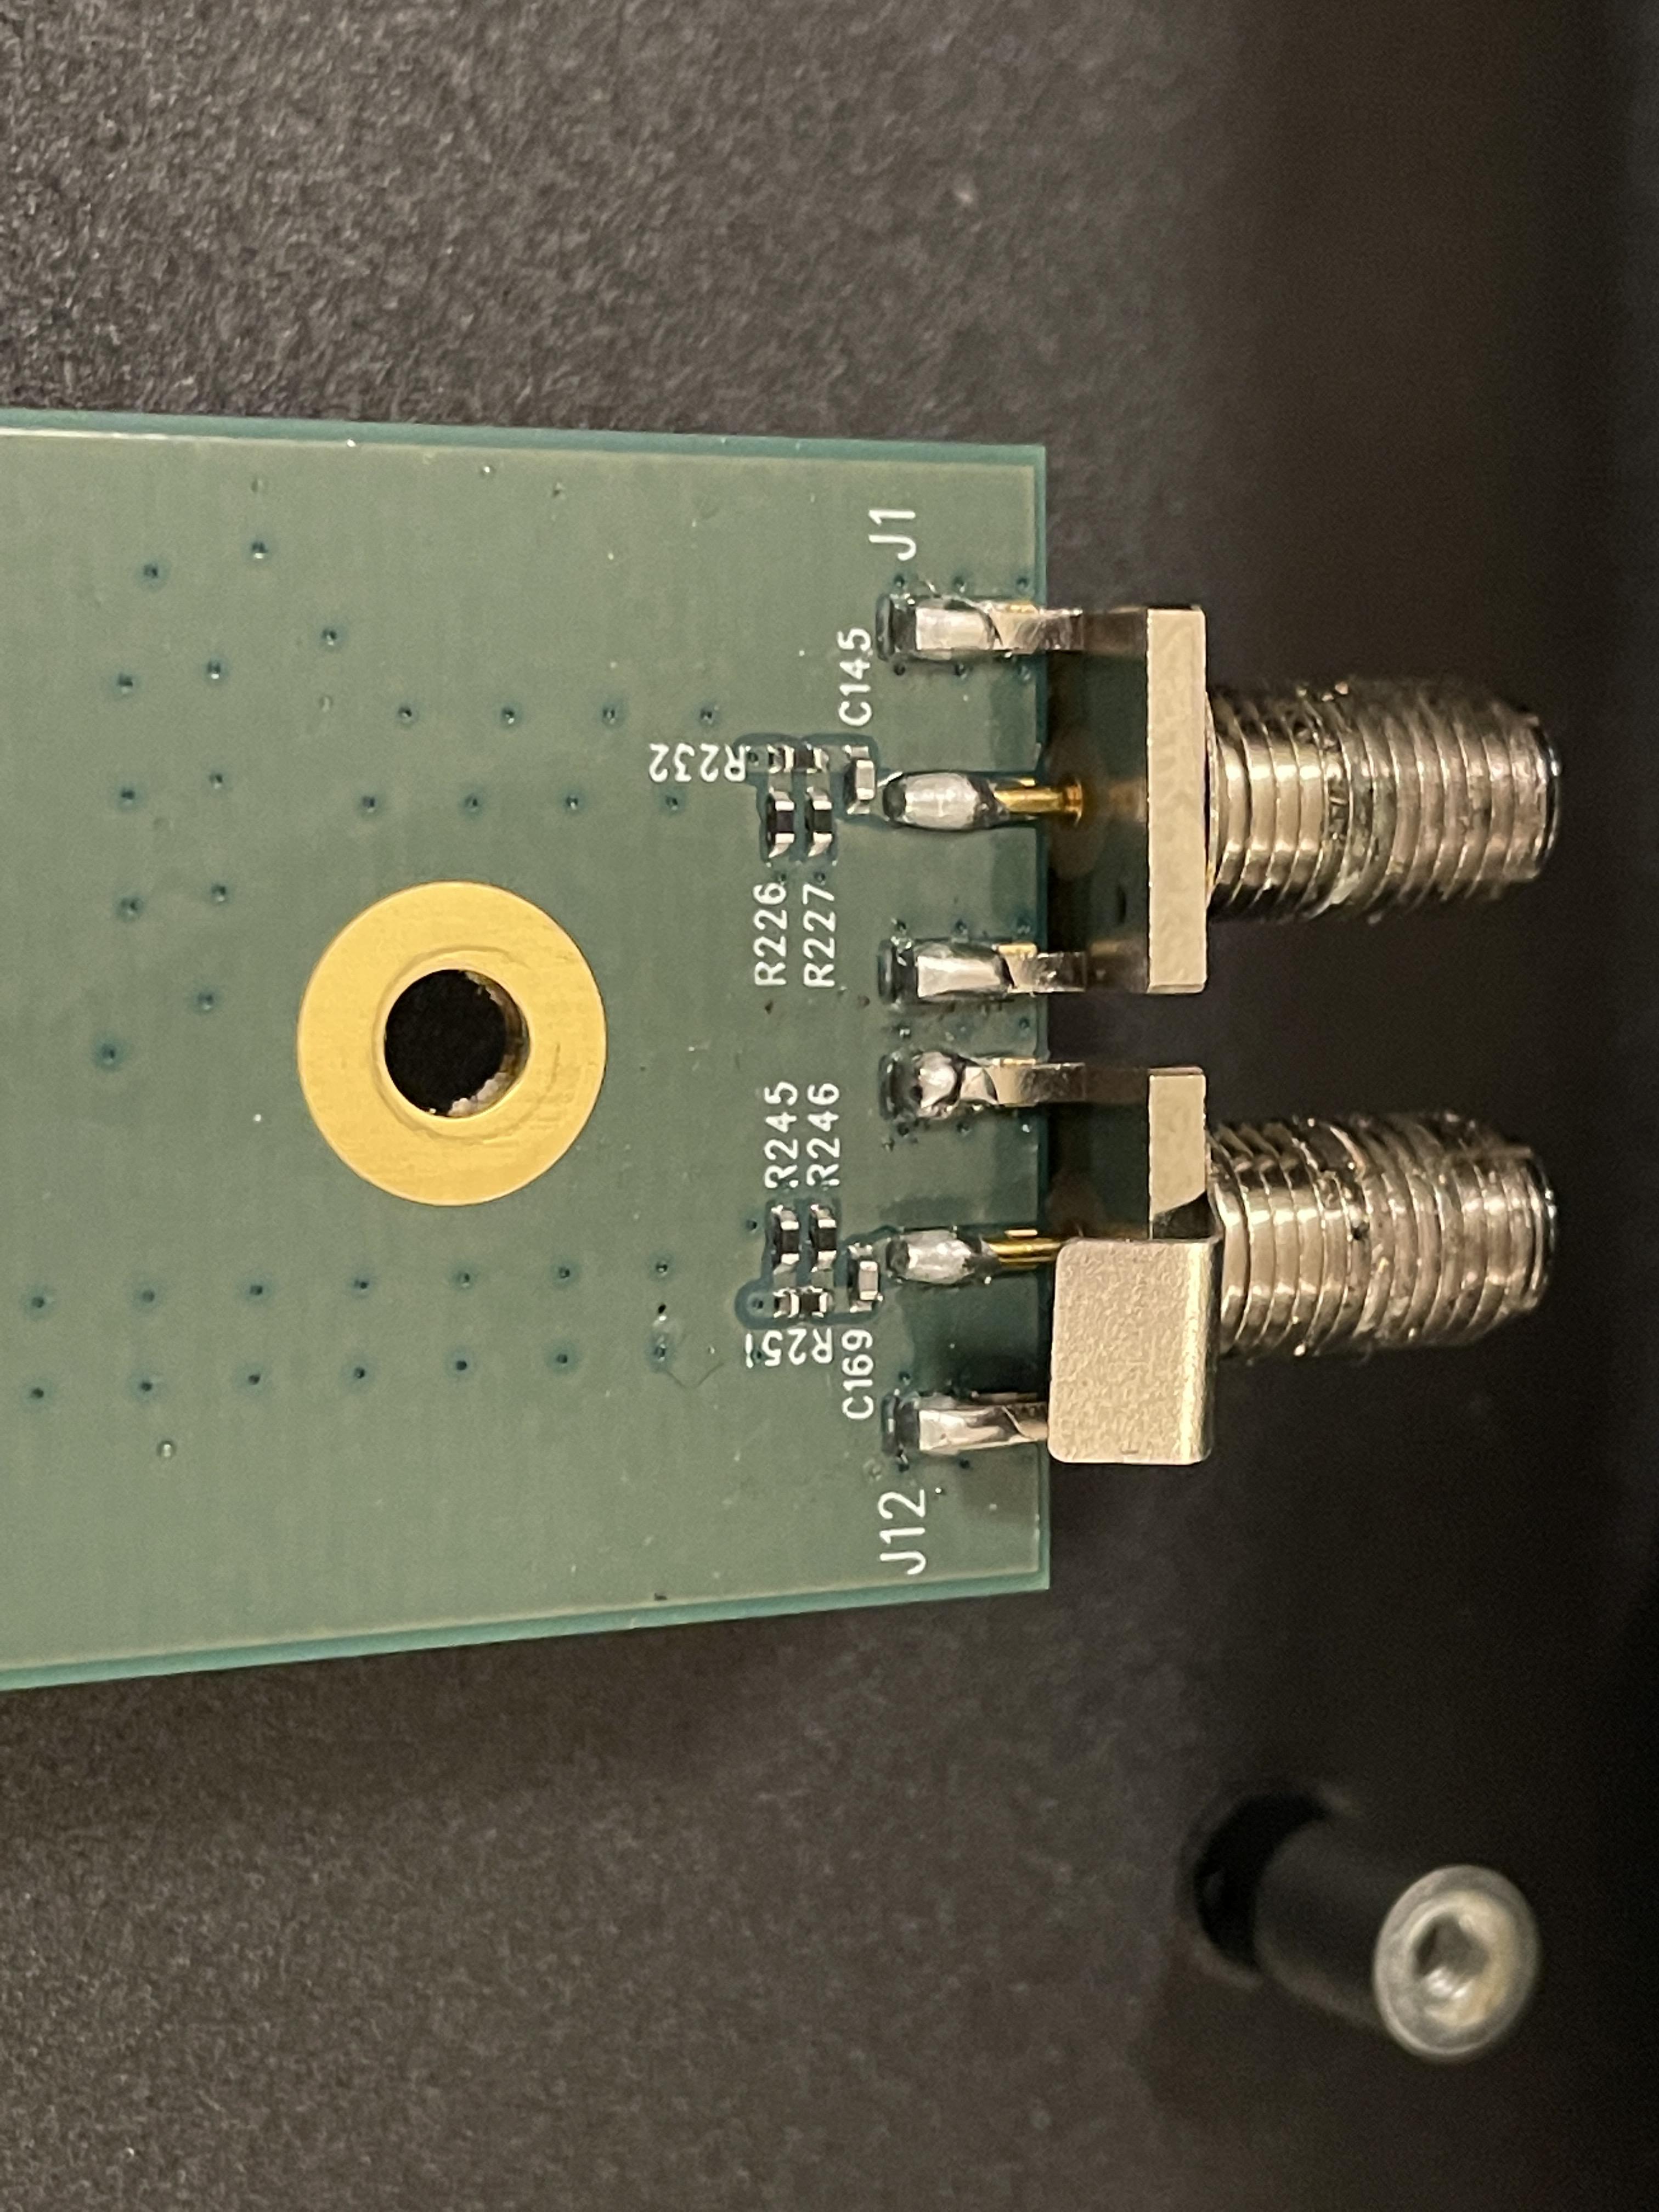
Look at those tiny 0402 sized SMD components directly next to the work area! My guess is that these are either for filtering or buffering.
-
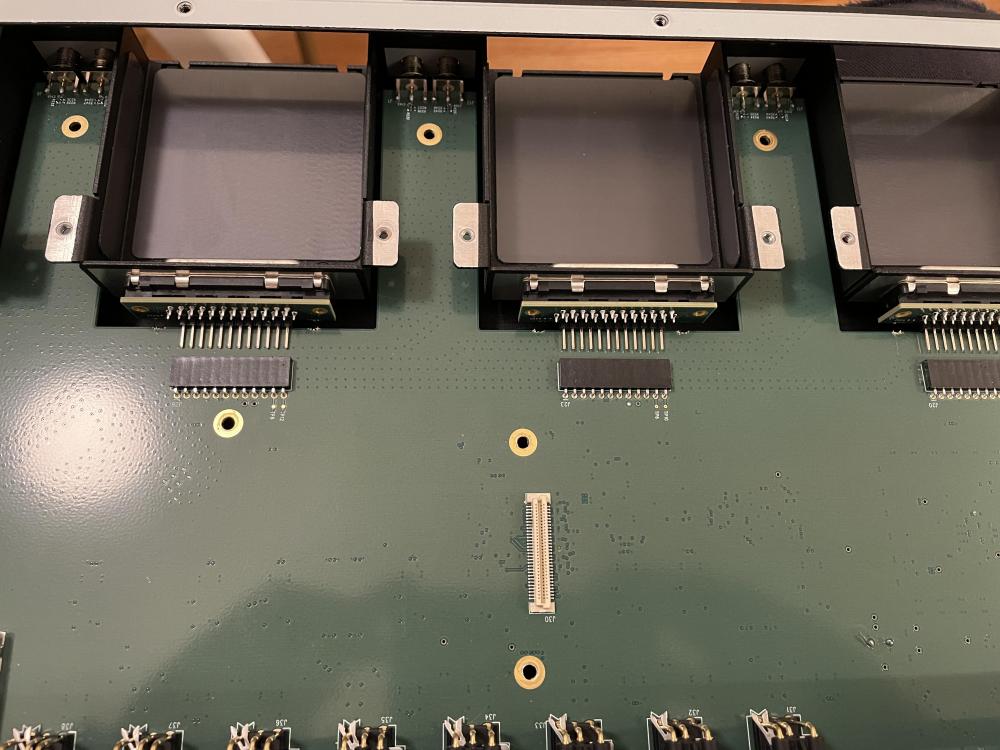
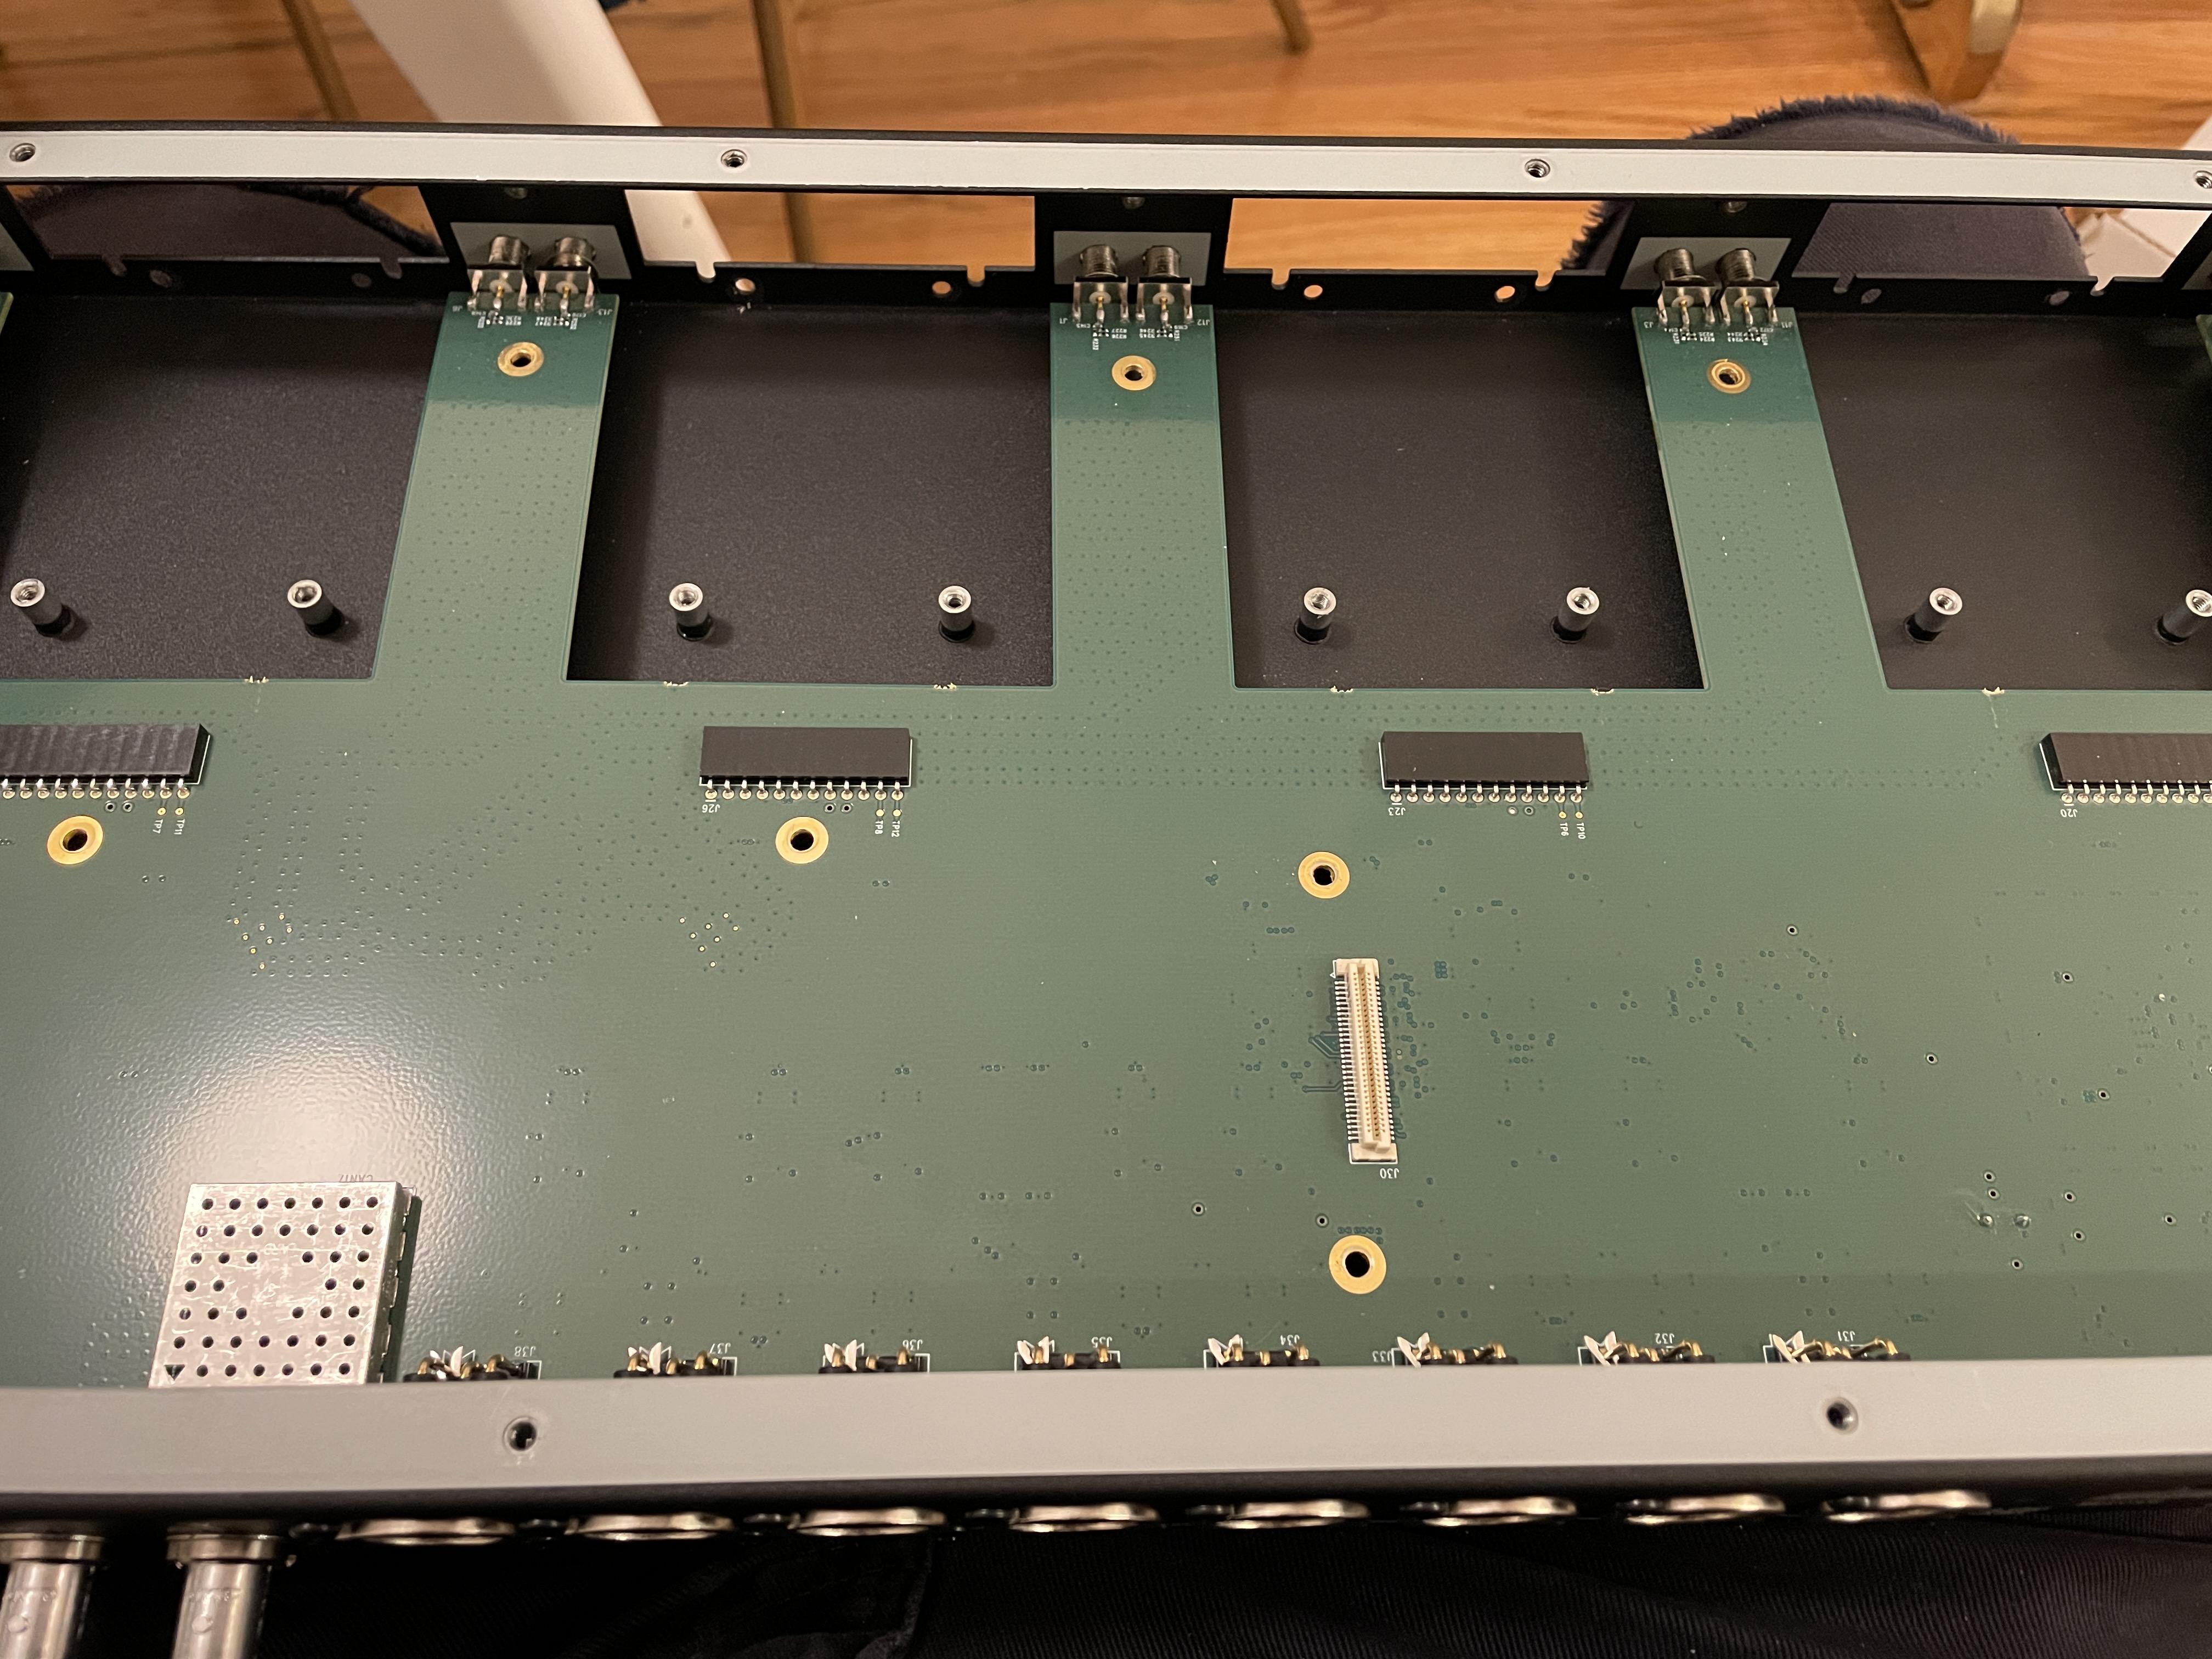
Step 1: The Plan
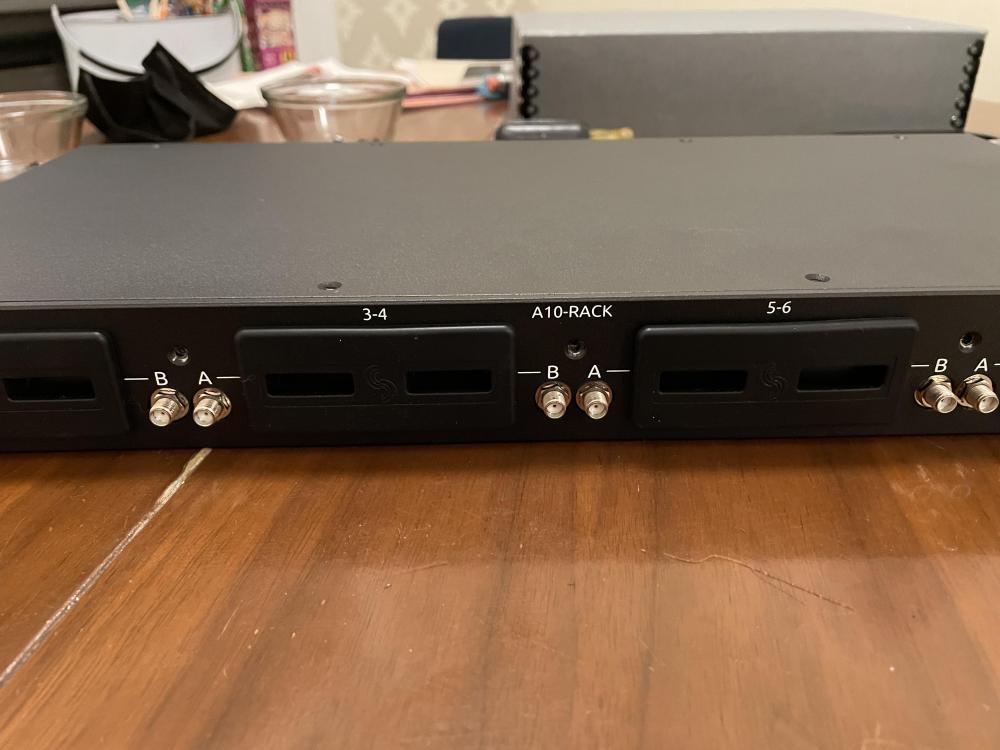

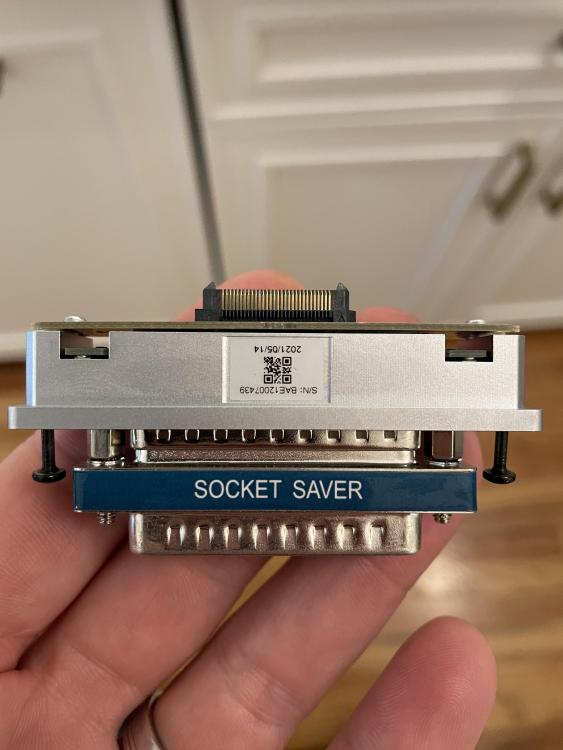
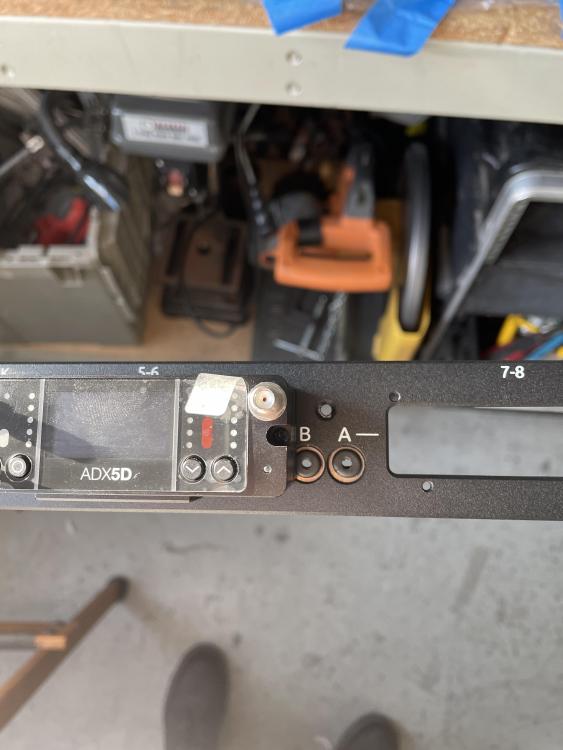
You can see here how the SMA's prevent the receiver from mounting properly:
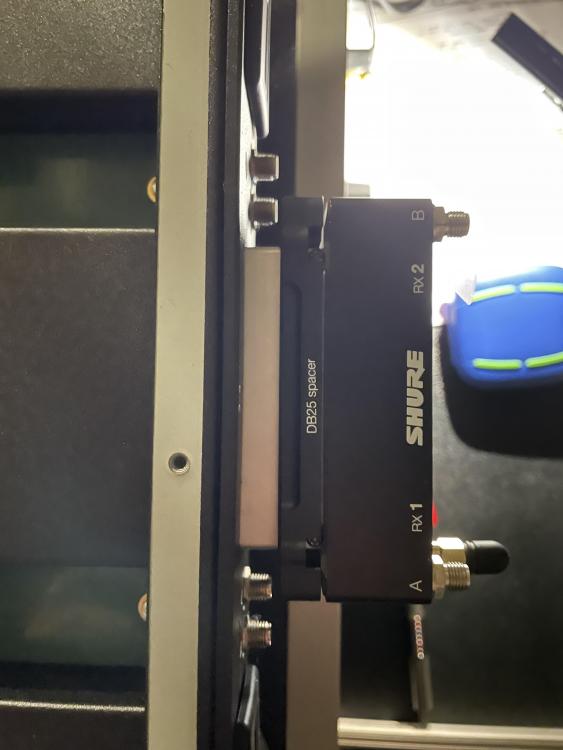
Again, inspired by a discussion on FB, there seemed to be two possible ways I could go. I could A: Install DP25 spacers and custom fabricate receiver spacers that would make up for the extra distance to the chassis, or B: Replace the SMA jacks altogether.
I thought I should have a look at option A first, as it would be the least destructive.
After Some Dremeling, I was able to get the DB25 spacer to mate properly with the receiver backplate:
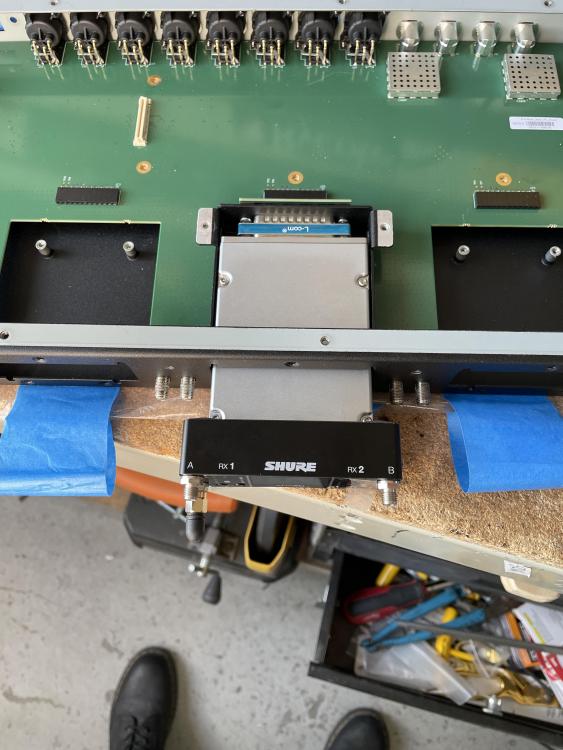
While this would certainly have been the easier course, there were a few things that didn't quite sit right with me. Firstly, the receivers ended up standing a bit too proud of the chassis for my taste, and second, the DB25 spacers would have no way of securing to either the chassis or the Rx unit. As a part of the plan here is to be able to pull receivers to go into a bag when needed, I felt this was a potential problem.
Let's go with Option B
Step 2: Proof of concept
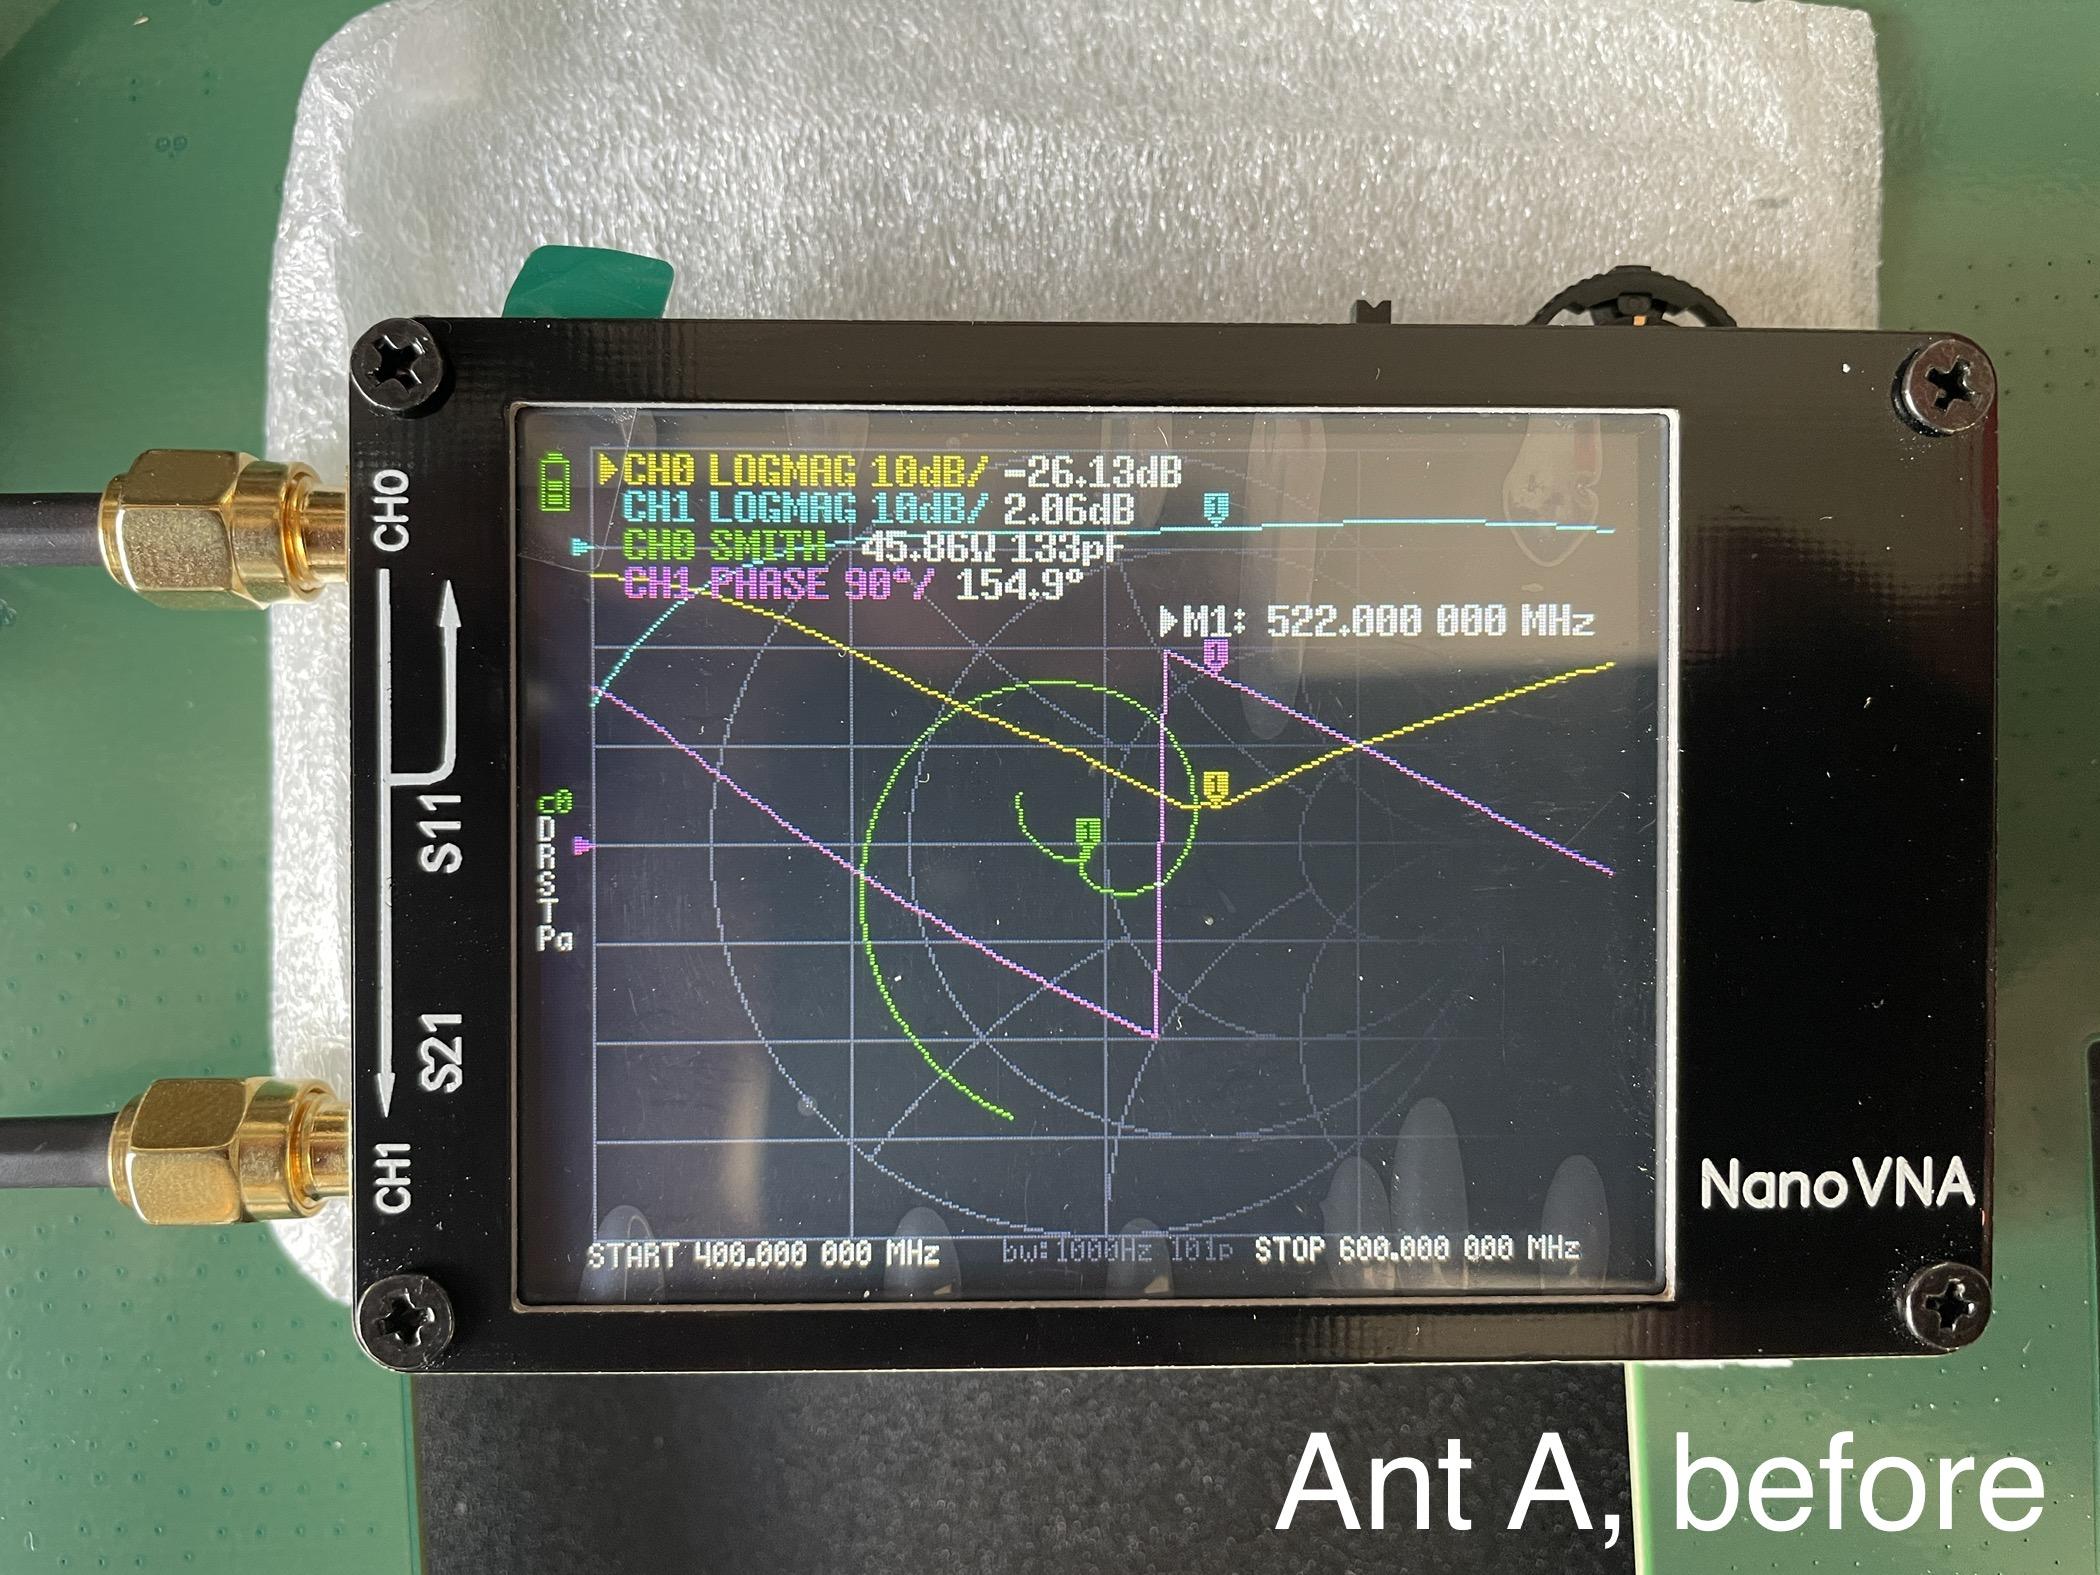
I decided to replace the SMA connectors with lengths of RG-174 that would home-run to the PCB. I added grommets for safety and fit:

With everything looking good so far, I decided to take a quick measurement of the RF from the antenna input to the SMA connectors for comparison later (**Note the Blue line and value, aprox 2 and 3 dB of gain, respectively, within the unit at 522Mhz. There is no significance to the freq I was metering, it just happens to be where the curser was at the time):

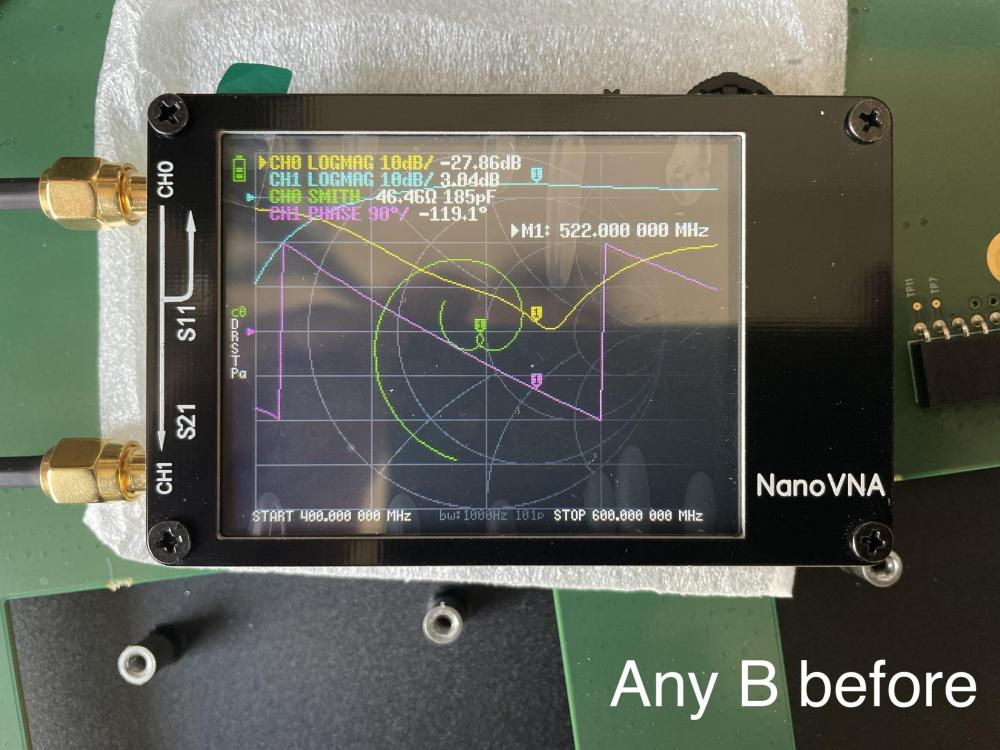
That was supposed to say "Ant. B", but my phone autocorrected and I just noticed. I'm going to live with it.
-
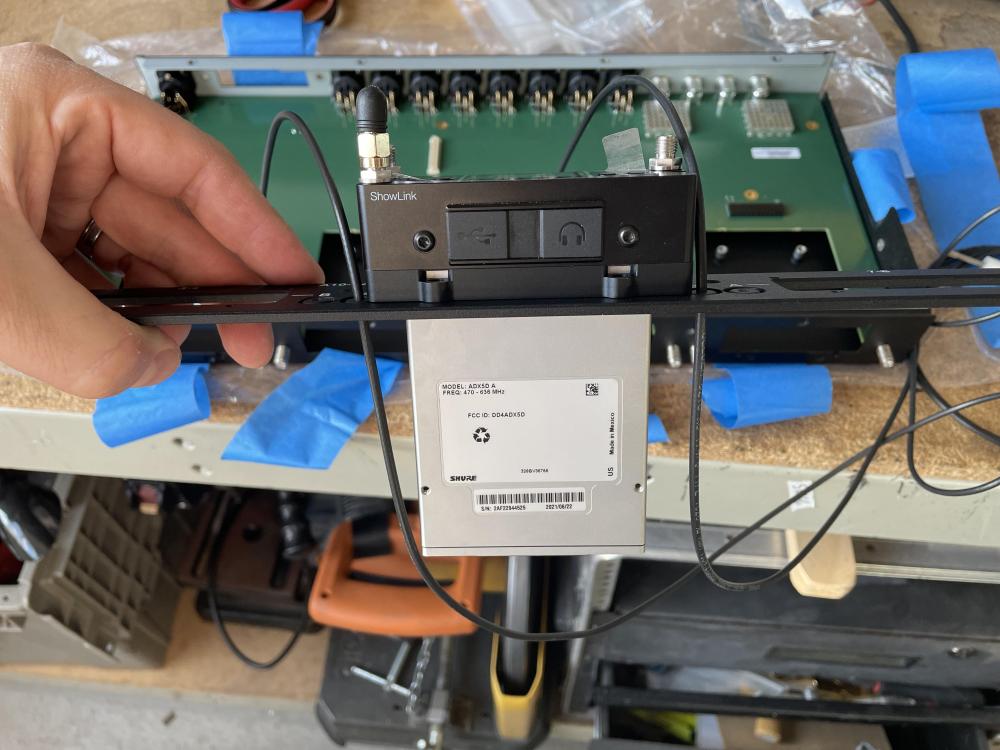
So... I started my transition into the Axient Digital line earlier last year. For months I had been sitting on a number of transmitters, in the hopes of a receiver solution that would suit the layout of my cart. I live and work in New York, and thus I've always valued having as mobile, and lightweight a cart as I can get away with, and the full-sized Shure rack receivers just weren't going to work with my setup.
Further considerations of mine were: The hope for DANTE integration, and a relatively high channel density (higher than Shure's AD4Q, at least).
When the ADX5D was announced, I figured all of my problems would be solved by pairing these with the Audio Ltd (now Sound Devices) A10 Rack. Unfortunately, the Shure receivers were just a bit too physically broad for the A10's SMA antenna spacing. Inspired by a recent Facebook discussion on the Axient Users Group, I decided to look into modding an A10 Rack to accommodate the ADX5D.
I thought I'd share my process in the event anyone is curious... I'm going to spread this out over a couple of separate posts below.
Please know that this modification is not for the faint of heart. I feel pretty confident working with electronics, and I was still triple and quadruple checking everything as I went. While this may present as a how-to, I am not looking to encourage anyone to try this for themselves. I accept no responsibility for your choice (should you attempt this), and you will most certainly void your warranty.
Here goes...
-
2 hours ago, Trey LaCroix said:
Let me know if you try any of these Wyatt. I’m trying to find a way to get at least one Shure in my A-10 rack.
I have a LOT of information forthcoming (Next week-ish?). Stay tuned. I will likely start a new thread.


Double lavs in live musicals?
in General Discussion
Posted
Generally, it's so that if a lead actor "sweats-out" a mic mid-performance, the Mixer has something to fall back on. Its typically used for lead rolls which don't allow for downtime to switch mics