Search the Community
Showing results for tags 'review'.
-
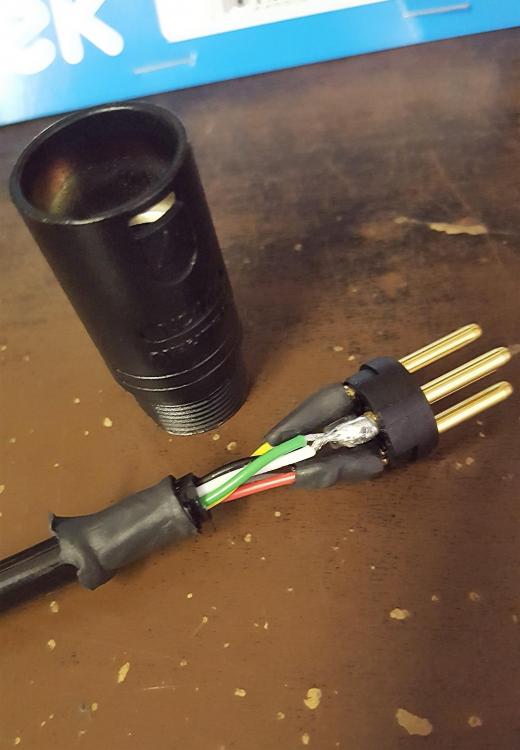
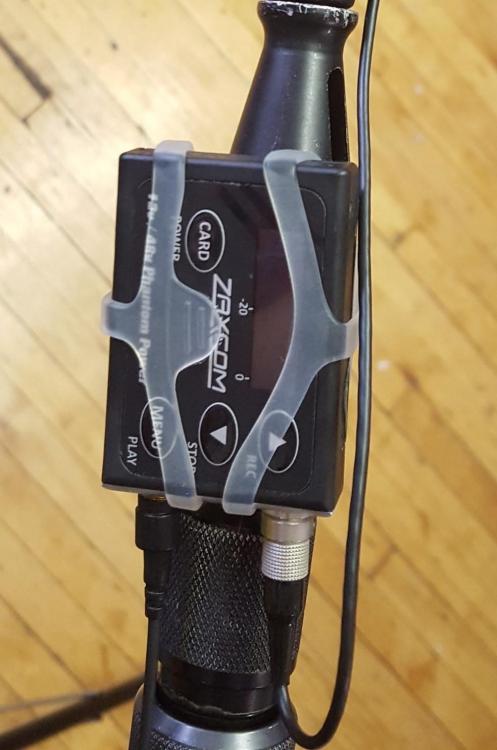
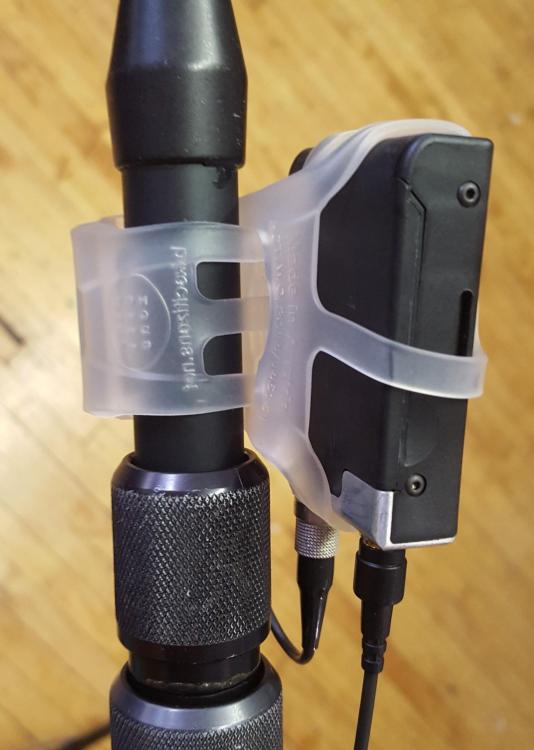
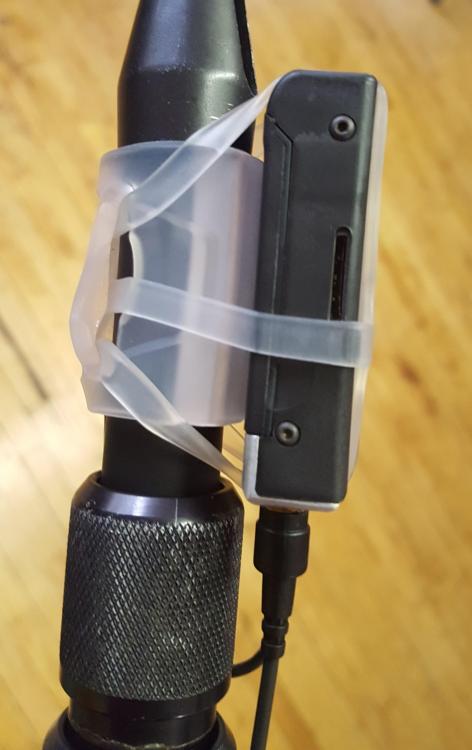
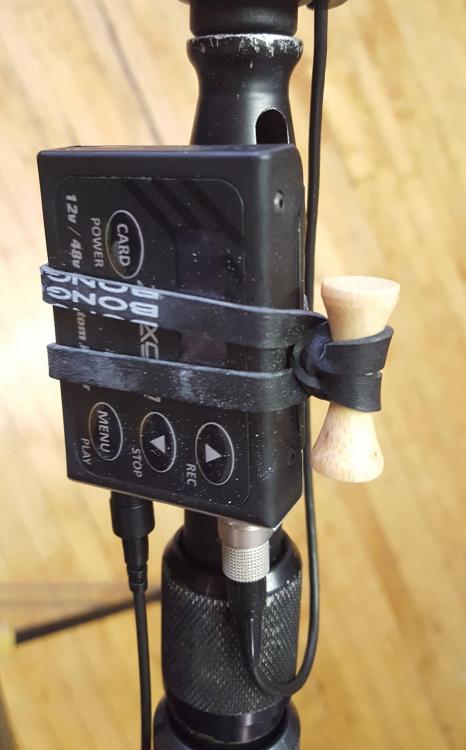
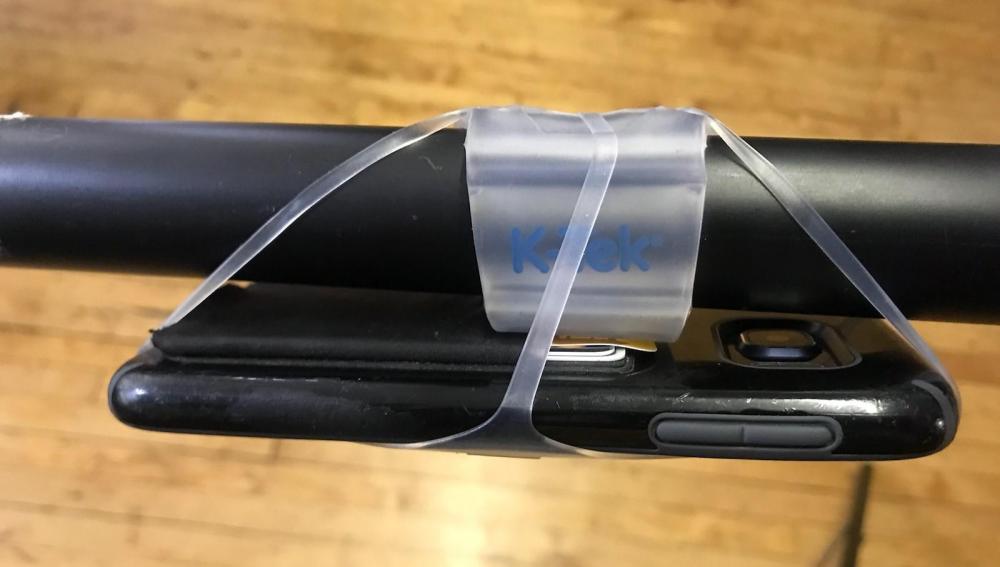
K-Tek Mighty Boom Cable Review: I was fortunate enough to test the Mighty Boom Cable this week. Created by K-Tek, this new, heavy duty, coiled XLR is advertised to make "off-the-shelf cables obsolete" with its extra strong and double-wired design. The Mighty Boom Cable is made with Neutrik XLR connectors and fits snugly into the XLR port of a boom pole. Straight out of the bag, it feels very durable and made to last, though a little stiff. The coiled section is less than half the total length of the cable. The long, straight cable ends were designed with the purpose of easily going into a Boombox or stand, but I found another reason to love this design. In my experience, most XLR boom cables are coiled from end to end, or may have an inch or two of straight cable before the connectors. With these cables, I've found that quick movements can cause them to slap against the mixer bag or tangle with my headphone cable. Because the Mighty Boom Cable has a shorter coiled portion, I found that I don't have these same issues, but I still get the stretch and movement I need with little to no handling noise. The most exciting aspect of the Mighty Boom Cable's design is on the inside. As someone who constantly repairs intermittent XLR cables, I really appreciated the craftsmanship. There are 6 large gauge internal wires. Each pin of the XLR connector has 2 soldered wires for a double connection and to help protect against unexpected signal loss. Each double-wiring is then wrapped in shrink-tubing. I thought the best test would be to actually break the connection and see if the signal is affected. I unsoldered one wire from a pin, wrapping it in electric tape so it didn't touch anything else. And despite the broken connection, the cable still worked perfectly and sounded great! I've only had it for a short time now, but I'm curious to see when, if ever, I need to repair The Mighty Boom Cable. It costs about $100 new, which may seem a little pricey when "off-the-shelf" coiled cables cost between $40-$60. But the Mighty Boom Cable is almost like 2-in-1, because of it's 6 internal wires and double connection. It's very well made and I think it's definitely worth the price! K-Tek Squid Universal Mount Review: I also got the chance to test out K-Tek's Squid Universal Mount, a high-quality silicone product designed to hold a monitor, phone, or mini Transmitter to a boom pole or tripod. Compared to a bongo tie, which is the mounting method I previously used, the Squid Mount is a much more secure and snug fit when used to mount a Zaxcom ZMT transmitter to a boom pole. The transmitter control buttons and screen are easily accessible and it's super easy to mount the vertical or horizontal. vs It took me a minute to figure out the best way to use the Squid Mount. There are instructions on the packaging, but I found them a little unclear and did a Google Search as well. Initially, I attached the mount incorrectly and the transmitter wiggled around more than it would have if I had used a bongo tie. The trick is to continue wrapping the ends around the front of the mount and have the transmitter rest on the flat logo section of the Squid Mount. Incorrect. The above photo shows a loose, floppy, mount. Correct. The above photo shows a snug fit. The silicone also feels soft and stretches beyond what I initially thought was possible. The packaging claims it can fit a smart phone, but I was surprised when it was able to stretch around my Galaxy S6 and case. It was a very tight fit, and I'd be wary of stretching it much farther, but it held my phone securely the to boom pole. The Squid Universal Mount costs $19 new, which seems a little expensive to me. Bongo ties, though not nearly as secure, cost under $10. However, I would definitely prefer using the Squid Universal Mount over a bongo tie just for the peace of mind that the transmitter is not going to fall off or dangle from the boom pole. It feels like a high quality product and I'm curious to see how it wears over time.
-
I've spent the last few months putting Lectrosonics's latest IEM/IFB system, called the Duet, through the paces here on my current show. The system is hands-down the BEST sounding in-ear monitor I've ever come across. It has a very good range in our studio and is nearly impervious to an incredible amount of wireless signals that are being used on our set. It is fully digital, scalable and it's also one of the most configurable and flexible cart-based systems on the market. The M2T Transmitter: The transmitter is 1RU tall and the width is ½ of a rack. Each transmitter comes with a hardware kit that covers half of what is needed to rack mount two units together as 1RU. There is also a kit available for mounting one M2T in a single rack-space. It boasts a large screen with easy to read, logically laid out status information. It has four levels of brightness control. In addition, the front panel layout has a headphone jack & volume control, Menu/Select & Back buttons, factory reset button, four channel buttons, menu navigation up/down buttons, USB Port, IR Port and power switch. The USB port is for updates and connectivity to Wireless Designer. The IR Port is for transferring settings to the M2R Receiver (including frequency, name, limiter, mix mode, etc).There are also plugs that can be easily removed to have external antennas front mounted on either side of the front panel if mounting a single M2T with the optional rack kit. The rear panel has two antenna output BNC connectors, power jack, dual Dante ports, four XLR/TRS inputs and an ethernet port for use with Wireless Designer. The transmission system is fully digital, and not a hybrid like some other Lectrosonics products. It has two separate transmitter carriers that each contain two audio signals. I'll talk more about the advantages later in the review. In addition to the four different analog inputs, the M2T features full Dante Connectivity – which means if you are running Dante, you can easily route ANY channel to the transmitter using Dante Controller via your computer. The menu system is logically laid out. You can adjust the Audio Level/Trim, Audio Input > XLR1-4 and Digital (Dante), Polarity, Custom Headphone monitoring setups, Brightness, Panel Lock, and editing of the names for tracks, signals and the individual M2R's name. With the Duet System, you can also set up a “FlexList” for creating up to 16 user profiles to quickly access your personal mixes on any of the receivers. The Duet system is wide-band and runs 470-608 Mhz for the US version, and 470-614 MHz for the export version. Both versions of the transmitter offer RF power output settings at 10, 25 or 50 mW. The M2R Receiver: The M2R is enclosed in a very solid milled aluminum case with the Lectrosonics “EbNi” finish - just like the current LT & SM series. The front of the M2R has a easy to read, square 1” x 1” screen. By default, it shows Name, signal strength & antenna diversity status, battery level percentage and audio levels (L & R). Under the screen there are four buttons: Menu/Select, Back, Up and Down. To the left of the screen is a battery LED showing battery strength (Green, Yellow & Red). This is useful when the screen backlight is set up to sleep after 30 seconds. The top of the unit has two fixed antennas, on/off & volume control pot, IR port, headphone jack and RF Link status LED. The left side has the battery door (dual AA). The right side has a USB port. There is a socket on the left and right side for mounting the wire belt clip. The rear has the model number / serial number plate and the battery installation guide. The M2R menu system is feature rich, especially compared to most currently used systems on sets. From the menu, you can do Frequency Scans, access FlexLists, Frequency, L/R Balance adjustment, Mixer Mode (choosing a given audio output to L/R/Mono), Limiter functions, HF Boost, Meter Mode, Clear Scan Data, Backlight Level, Battery Type, Lock Settings and set the Compatibility Mode (Duet Digital or FM IFB). Range / RF Immunity: The Duet system is limited to a 50mw transmission. Even so, we get a range that easily covers our entire large studio floor. This is considering that the amount of other wireless devices on our set is more than I've ever seen - by a large factor. In fact, we're using a Clearcom Freespeak II system that sends up to 32 channels of audio out to the comms systems of our puppeteers. We tried the most common forms of IEM/IFB being used (Lectrosonics R1As, Comtek 216s and Sennheiser G3s) next to the Freespeak II transmitters. In each case the receiver got a nasty proximity buzzing sound... all except for the M2R, which was ROCK SOLID right up against the Freespeak II transmitter. Battery Life: Using Eneloop Pro rechargeable batteries, we easily made it to lunch (6+ hours), especially with the backlight set to 30 seconds on before going to sleep. (Update) I’ve gotten reports from another crew who are using the Duet System with Energizer AA Lithiums. They’ve been getting a full day on one set of batteries. Advantages in the real world: The Duet system is ideal for use as a PL and IFB for Boom Operators. A BoomOp has the independent ability to switch between Program Mix and Boom ISO Mix using the Mixer or Flexlist menu. The system is also ideal for directors and executives. Keep in mind, the menu controls can be locked in the menu. How We've Been Using It: We've been using it two ways on our set: 1: BoomOp IFB/PL - Our Boom Operators can switch between a Program Mix/Private Line Feed and an Isolated Boom Feed/Private Line Feed at a couple of button presses. The ability to use an isolated feed is great for finding noises and checking for strange reflections / phase issues. 2: Director's Comms / PL to Puppeteers - Our director is also operating a steadicam. We have a belt worn Comm/PL kit that consists of a M2R receiving a custom mix (Program + Performers). We are using a Lectro SMV with a Lectro Mute Switch (Referee-style) and lavalier so the director can then give instructions directly into the comm system to our puppeteers. Costs (MSRP): M2TND (no Dante): $2150.00 US M2T (With Dante): $2335.00 US M2R: $1080.00 US Take note: •Only a cart-based transmitter is available currently. There is a plan for a bag transmitter in the near future, but no definitive date set. •We've had the blue volume control knob come loose over time. No worries, just keep a 0.5mm hex wrench on hand and give it a good tighten now and then. •Be warned: once you've given the M2R to your director to listen to, they will never want to listen to another “inferior” IEM/IFB again. ;-) In Conclusion: The Duet is a powerful system offering crystal clear audio, great range and high RF immunity. Along with it's amazing routing options and also coupled with full Dante connectivity, the Lectrosonics Duet IEM Monitoring System is a prime choice for on set use. Links: Lectrosonics Duet System Page http://www.lectrosonics.com/europe/M2-Duet-System-IEM/IFB/category.html DUET Manuals: http://www.lectrosonics.com/europe/category/96-m2-duet-system-iem-ifb.html Full Review and Pictures on my blog: http://blog.chrisdurfy.com/the-lectrosonics-duet-iem-system-m2t-m2r/
-
Tucking my gear away this morning, and thought I'd relay my experiences thus far with the boombox. I don't get as much soundstage work as I do EXT, on-location. When I saw it in the showroom I was a bit on the fence. It's a sturdier piece of wood than something you'd tuck under one arm and yell "wait up guys!" But I came around to it. And the price might throw people off, compared to just buying an apple box. Not to mention, a nesting storage box or something of that nature might be more in the spirit of what you need. All those reservations aside, I picked one up in the spirit of Treat Yo'Self day (Parks and Recreation reference). My justification primarily had to do with curbside shooting, where the drainage slope already chips away at my height and where there are few options for putting down the boom. There someone might head up a stoop, walk into the frame, etc, and limit where you can boom. That and the fact that I now need to patch or toss out my 5th pair of jeans for tearing out the ass just behind the same pocket. That comes at a price too! I have a standing desk in my work studio, but the same apple box I've been using is splintered and sharp along the edges and serves as stand in for kitchen stool, etc. I think a lot of unfinished apple boxes with a fine edge could cause that problem. So how does the boombox stand up? Like a charm. It's certainly deep and heavy enough to handle an extended 14'/16' poll without a windjammer. I haven't discovered it's tipping point in terms of fulcrum or wind vector, but honestly I wasn't looking for it either. And naturally by eliminating the "Los Angeles" dimension of the box, the "New York" is certainly more stable. On that point, however, if you're on a gravely sidewalk for example, or the surface is not flat, this box can be every bit as wobbly and risky as a standard apple box. So the same common sense which served you thus far still applies here. And keep in mind that the cylinder for the boom is straight down the middle of the box, big enough for the full heel of your shoe to sink (I often use moccasin/driving shoes for interiors or anything that lets me feel the surface, but still.) That could lead to a nasty fall/strain, so get your bearings up there and stay put. As for sitting, it is certainly boss to have a chair as you migrate around the set. And I get to keep all the new jeans I sprung for recently! If you have good posture, or still think the old seats at Shay were enough, your butt and the boom can share the space (see picture). The handles are convenient and comfortable. And the cylinder is deep enough to carry your shotgun in it's case to set, or less critical gear, at least so long as the weather holds. It's also a pretty convenient place for a trash receptacle for your double sided, breath mints and kind bar wrappers etc, or loose ends like lav treatments until you have a moment to address them. I'm always stuffing my pockets or sticking old tape to my pants, and otherwise a messer professor. That little bin comes in handy. Thought I'd use my butane solder to etch my name on one side, but there's little risk to anyone thinking that's their apple box. Not to mention, the lovely finish on the box would burn and cause my contact info to blur. For those who think "it's such a nice box, and you're certainly paying for it. I'd feel bad when it got it's first scratch." Well beyond the normal scratches from a flat cement ground, you're typically going to use the bottom side down (unless you adhered to my safety note, and flipped it over when you boom full height.) You won't see the wear (but, yes, on pavement it'll get chewed up fast.)
-
http://goo.gl/vphBsE
-
I posted this on my blog today. You are welcome to check out the post with all the pictures attached if you like here or read below: ---------------------------------------- I recently got a Schoeps CMR. It is a single cable solution for connecting a bodypack to a Schoeps MK series capsule. I'd like to start off by saying that if you love the sound of the Schoeps Modular MK series capsules as much as I do, and also use them for your primary plant microphones (in cars, on desks, etc.) you will LOVE what this product does! There were two ways (before the CMR) that we would use the Schoeps as a plant with the following chain of gear: Plug-on Transmitter: MK41 Capsule > GVC Swivel > Colette Cable > CMC6U Power-supply > Plug-on Transmitter A fairly straight forward process and fairly simple chain of five pieces. Bodypack Transmitter MK41 Capsule > GVC Swivel > Colette Cable > CMC6U Power-supply > Denecke P48 Box > XLR to TA-5 Cable > Lectrosonics SMV Transmitter This works, but it get's more complicated because of the need to introduce phantom power to the mic. The chain is eight pieces long. Then you add paper tape & Joe's Sticky Stuff (don't have some? GET IT! Miracle product for plants). As you can imagine, that can be a lot of different bits to grab, sometimes on a moments notice. With the Schoeps CMR and the Bodypack Transmitter: MK41 Capsule > GVC Swivel > CMR Cable > Lectrosonics Bodypack. This cuts the gack in half for bodypacks with a chain of four (or three if you prefer not to use the GVC Swivel). How does it work? Are there tiny German unicorns on a miniature hamster wheel stirring up the phantom juices to make this amazing product work? No, but that does paint a nice picture! (Bonus points for whoever actually PAINTS this picture, I'll attach it to the blog.) According to the manufacturer about the CMR: low power consumption: only about 1/20 to 1/48 that of a phantom-powered microphone So, it seems they have found a way to use the small current that the Lectrosonics bodypacks output (that can also power a Sanken CUB-01 for example) and use it to power the mk41 capsule. The Downside? Are there any downfalls? Well, like all things, the Schoeps name does not come cheap. I've seen it retail for between $659 and $770. It may sound like a lot to pay, but when you consider you don't need a expensive CMC6 to power the capsule when used as a plant, it is a pretty good deal and greatly simplifies a way to get that sweet Schoeps sound! The CMR will NOT work with the CUT1, but does work with the DZC- pad and GVC swivel. It will also not work with Zaxcom Transmitters. Also, it is a little bit bigger at the connection to the capsule than a Colette, but considering everything in the chain that it eliminates, this is negligible. Conclusion: That being said, I've already put it into play on set. The CMR worked like a charm. I'm sold! Notes: Some information about the CMR I found at Posthorn: ** For Sennheiser SK50 transmitters, the CMR must be ordered with the termination installed by Schoeps. It is only available with a 2 meter cable. We do recommend that all terminations are installed by Schoeps. Schoeps has confirmed compatibility with current and legacy Lectrosonics (TA5F) models, Audio Ltd. and Sennheiser SK 50. Other connector terminations available as a special order - exact wireless brand and model info is required. The Schoeps CMR will NOT work with known Zaxcom transmitters or the Sennheiser EW Series. The CMR also will NOT work with Colette Active accessories (e.g. CUT1, KC 5g) or the BLM 03 Cg. A DZC- pad or GVC swivel are the exceptions and can be used. THANKS! The Schoeps CMR was courtesy of Scott Bolland of Redding Audio & Christina Zofia Wittich of Gotham Sound. Many thanks!
-
Hello all, I am gathering my sound gear together so I can become a sound man for film and tv. I've been boom operating for the past year and am trying to get gigs in shorts and small film projects. I plan to work alone as a sound mixer and boom operator and am very curious on getting K-tek articulated boom pole (http://www.ktekbooms.com/audio/boom-poles/klassic-articulated-poles/). My question is has anyone tried it or owns it and have any feed back on how well it preforms or likes and dislikes about the pole. This is going to be my first boom pole and I don't mind spending the a lot now if I plan on using it for the rest of my career. Thanks
-
Here's a little something I found today while clearing out some old bookmarks - an in depth look at a few of the usual (and maybe not so usual) shotgun, hyper, super and cardioid suspects. Now, I did not write this and to be perfectly honest I don't know if I would agree with some of the stuff that this guys says (admittedly, he is a video guy apparently) but I thought it did make interesting reading and there are some decent samples recordings with each mic that he reviews. Apologies if this has been posted before, I did do a search (yes, on google) with no results, so here goes.. http://www.kenstone.net/fcp_homepage/right_mic_brockett.html Enjoy - Chak
- 4 replies
-
- Supercardioid
- Hypercardiod
-
(and 4 more)
Tagged with:
-
It's been several weeks since NAB, but Sennheiser finally sent me an MKE 600 shotty mic to review. It's not as bright or present as the ME66 / K6 module mics, but I think it has a decent enough sound, with AA powering & high-pass switch, for only $399. And you get to enjoy watching me realize that I don't belong in front of camera. Notes I forgot to add (that only we would care about): - Off-axis rejection is pretty good. I'd say the pickup is more supercardioid that it is lobar/tubular. - It doesn't handle RF that well. - Freq. response is pretty flat, with a slight incline from 2-5 KHz. - Battery life is about the same as the ME 66. Introduces about 1 dB of noise compared to 48V. - HPF - Curve indicates ~80 Hz, but I think its more like ~110 Hz. Voices become nasally. Full review: http://www.brightsideofnews.com/news/2013/5/4/review-sennheiser-mke-600-shotgun-microphone.aspx ~ Matt
- 14 replies
-
- sennheiser
- mke
-
(and 2 more)
Tagged with:
-
Hi all, Last Saturday morning a bunch of local Atlanta mixers, boom-ops & utilities met over breakfast at Whit's house to field test the Super CMIT. We had all heard how successful the Super CMIT had been used by Simon Hayes on “Les Misérables” in studio conditions. We wanted to test the practical applications of using the Super CMIT in the field. (Note: I am writing this from memory a week later, so I encourage any involved to correct me or add more details to our findings!) The Gear -788t / CL-8 Bag rig -Neumann KMR82i on a 22' Ambient Boompole -Schoeps Super CMIT 2U on a 22' K-Tek Boompole Note 1: To use the 788t in AES mode, you have to enable “AES Power” in the menu and also on the individual tracks (in same place you select phantom power). Hook up your AES Cable to the back. The cable we had was set to put the DSP (super-CMIT) channel on channel one, the CMIT (non-dsp output) on 2 through a single XLR output. The cable also had a second XLR to hook up a second Super CMIT if desired. Note 2: There are two preset DSP modes. One is “standard” DSP and the other what we termed “extreme”. From the Schoeps website: -Preset 1 1: moderate directivity increase (green LED); ca. 11 dB reduction in diffuse sound (5 dB greater than a Schoeps CMIT 5 U or channel 2 of the SuperCMIT 2 U) Preset 2: strong directivity increase (red LED); ca. 15 dB diffuse sound reduction. This setting is reserved for special applications since sonic artifacts can occasionally be heard. In our tests, we did not tinker much with Preset 2 as it isn't very applicable to our purposes with the introduction of artifacts into our tracks. We also did not engage the filters on the CMIT and left them open. This kind of became a test of three, as we compared all results between the Super CMIT in DSP mode and in standard CMIT versus the Neumann KMR82i. The "Shooting Range" Whit's house has some good conditions for a proper field test. There is a good-sized waterfall and a busy road nearby. Also, there is a small airport nearby. At the back of Whit's house is fairly quiet (except for the occasional aircraft). Test 1: Waterfall While booming a single person near the waterfall we noticed that the Super CMIT had amazing background rejection and pulled the dialogue right out of the waterfall. The background could still be heard, but was diminished greatly. The standard CMIT and the 82 performed as expected and did a good job of bringing the dialogue forefront, leaving the sound of waterfall in the background. While booming between two people have a conversation, the CMIT and 82 sounded “natural” while cueing. The Super CMIT had some issues here. Some noticed artifacts while cueing as the processing tried to match the movement and change of position of the mic relative to the background. To fight this effect, a BoomOp would have to be careful to keep the mic on a the same plane of axis when cueing. Which is better? Well, I suppose the answer is “It depends”. If that waterfall was instead a generator, perhaps the directivity would be exactly what you want. The waterfall as part of the scene, perhaps not. Test 2: Running Diesel Truck in Background We experienced similar results with the rumble of the truck as with waterfall. Again, if the rumble was a generator you couldn't get turned off, perhaps the Super would be the way to go... If a picture car, the CMIT or 82i sounded more natural to most of us. Test 3: The Wide We conducted this test with stationary subjects with an imaginary frame above our “actors” of 10-12 feet. On pavement, we noticed a reverb effect on all mics that was added. When moved to the grass, this was removed. The 82 lost a lot of low end frequency at this height, but was still very legible. The Super and CMIT both kept more of the low end and sounded better to most of us, with Super CMIT having a slight edge in a controlled situation of two actors having a one to one conversation. Whit brought up a very valid point here though: The Ad-lib. What if there were other actors in the scene were known to adlib often. Would you want the more directional and less forgiving Super CMIT? Likely not. Test 4: The “Really” Tight We ALL agreed the Super CMIT sounded too present and “splattered” when used to close to the source. It needs some air in between to sound natural. Test 5: Walk & Talk We did walk & talks two ways: from above, and from below. From above, all mics sounded nice. Noted that the Super CMIT might be nice in mitigating the sound of gravel or crunchy footsteps if boomed from the proper angle, if so desired. From below, they also sounded good. Of course, all were in some form more susceptible to aircraft noise with the Super CMIT giving a few more moments of “acceptable” sound than the others by mitigating some of the off axis background noise. The Conclusion Someone in the group called this mic a “very expensive one trick pony”. While it may be useful in more than just one scenario, it certainly is a very specialized microphone and at $4,449US it is certainly very expensive. Is it something to have in the kit? As a wise man once said... “It depends”... While it certainly would be nice in certain situations to have, it is one of those items that might be difficult to recoup costs outside of your standard kit rental. It is an amazing piece of technology and if you can afford it, and it would be a nice microphone to have in the arsenal. That being said, I don't think any of us rushed out to get one after our testing. But time will tell! The Players Mixers: Whit Norris, Chris Durfy, Aron Siegal, Todd Weaver, David Terry Boom/Utility: Chris Harris, Matt Derber, Maaike Snoep, Dana Simmons ENG/Post: Michael Wynne Special thanks to: -Whit & Kathy Norris for hosting us at their house. -Trew Audio for arranging the Super-CMIT appointment. -Redding Audio for supplying the demonstration Microphone. -Michael Wynne for taking the pictures of the event. THANKS!!!
- 41 replies
-
- shotgun
- field test
-
(and 4 more)
Tagged with:
-
Hi Everyone, For those of you who are wondering what the Voice Technologies VT5000 sounds like, I made a review for a tech website I'm freelancing for, "Bright Side of News" I'm pretty awkward in front of the camera, but the point of the video was to compare it side by side against a Sennheiser 416. 480p minimum on a non-mobile devices sounds best. Because of publisher deadlines I had to rush the review a bit. So I forgot to test the female voice, wind handling, and some other tests. For the most part, the VT5000 sounds a bit nasaly as if you're hearing a computer microphone across Skype. I also had to do a bit of audience hand-holding since the majority of the site's readers are into computer hardware, and not entertainment gear. If you have any other questions, I still have the mic with me, and can test what I can. Enjoy, Matt
- 21 replies
-
- voice
- technologies
-
(and 2 more)
Tagged with:


